User guide
This guide gives a short introduction about Chemaxon's Trainer Engine.
Table of Contents
- The interfaces of Trainer Engine
- Trainer Engine Graphical User Interface (GUI)
- Trainer Engine REST API
- Playground
The interfaces of Trainer Engine
Trainer Engine offers three interfaces:
- Trainer Engine graphical user interface (GUI) to build, validate and compare models for computational chemists
- Trainer Engine REST API for integration and automation
- Playground to run interactive predictions
The generic workflows of Trainer Engine are summarised in this page.
Trainer Engine Graphical User Interface (GUI)
The GUI of Trainer Engine was built on the concept of the run. A run is a long process that requires several computational resources to yield a result. To create a new run in Trainer Engine, click on the New run button in the main navigation.
The following run types can be created:
Automated models
Automated model building is a process of descriptor generation and model training runs that yields an array of models with the optimal model with high accuracy. The best model is selected from the generated array of models based on sorting using accuracy parameters. This process is often reffered as "Auto ML" (Automatic Machine Learning).
The automated model building can be used in two way:
- Standard way, when Trainer Engine tries to figure out a lot of configuration options for you.
- Advanced way, when you have the opportunity to fine tune parameters.
Standard Auto ML
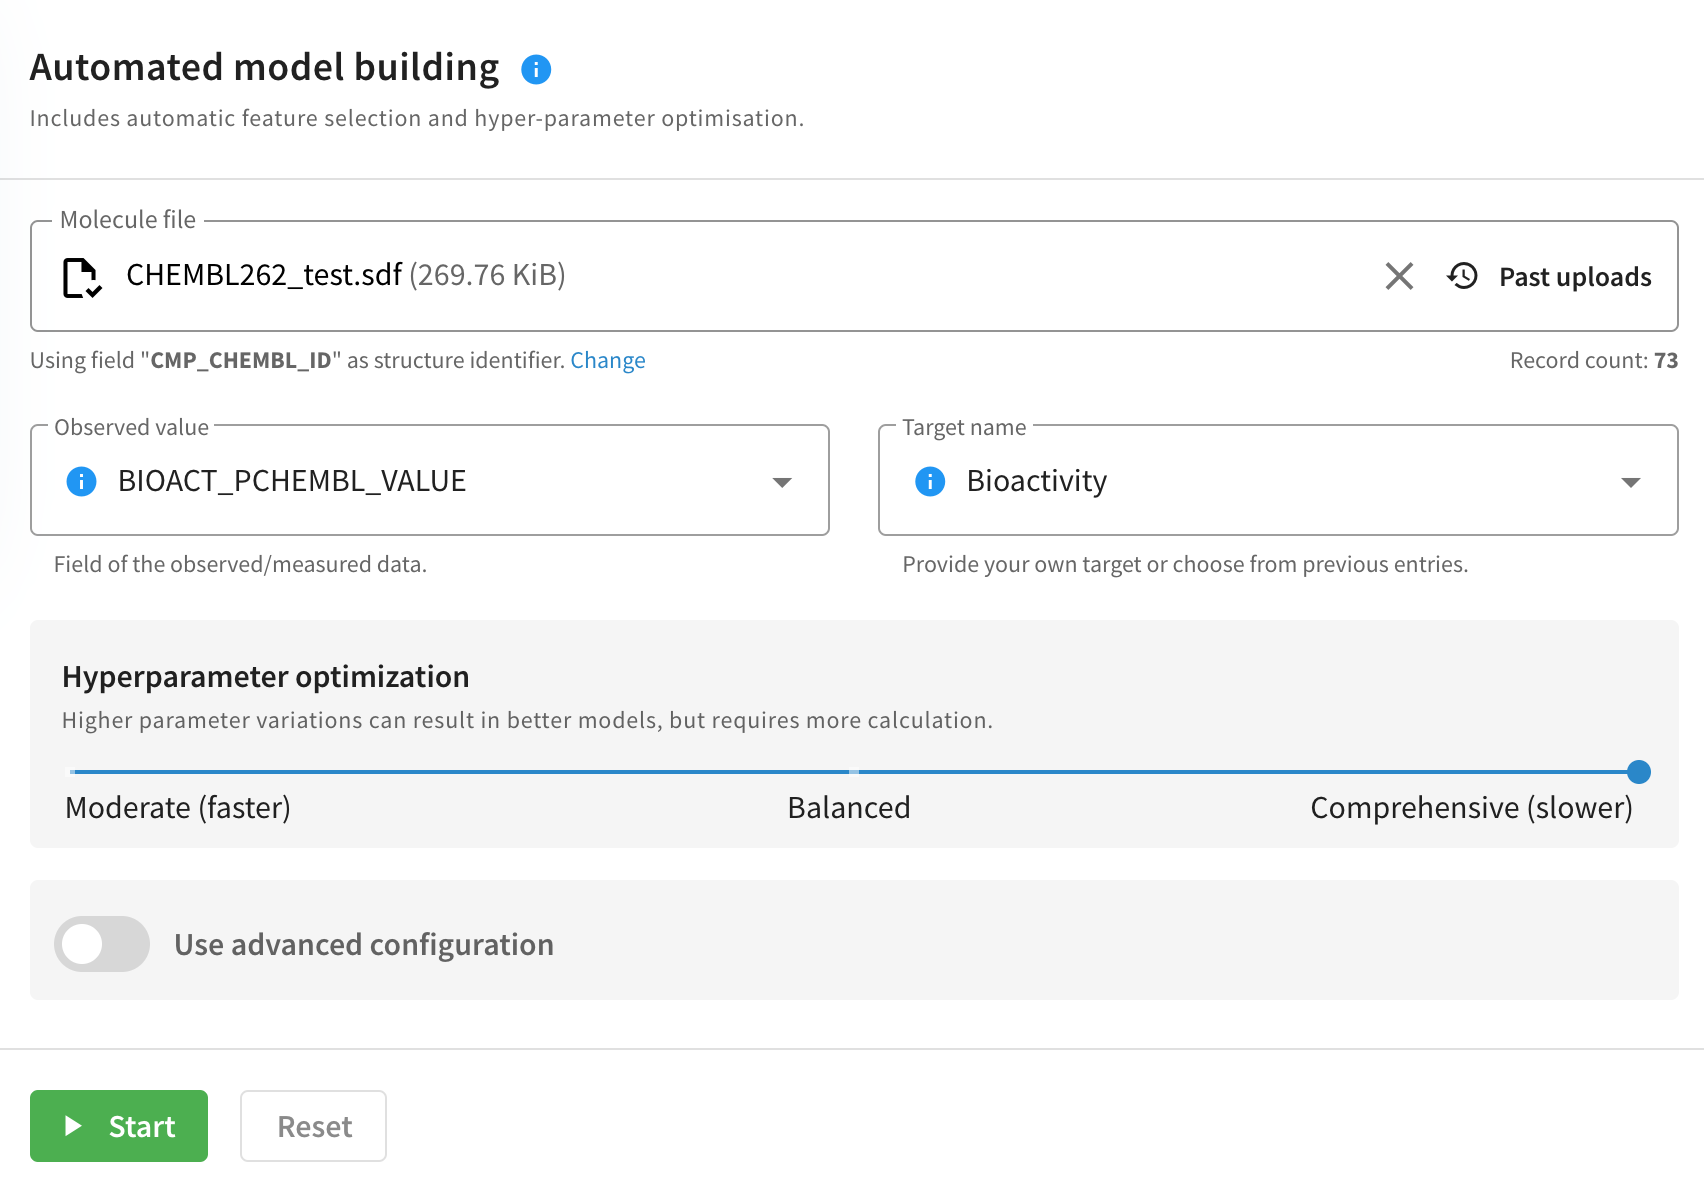
To run an automated model building in the standard way , follow the steps below:
-
Upload an input file. The supported file format is .sdf, with labeled data stored in a mandatory sdf field. Also, set the Observed value and Target name fields.
-
Choose the degree of hyperparameter optimization. This controls how many hyperparameter variations will be generated during the process. More variations will result in more training models, hence you will have a broader set of options to choose the best model from.
-
Once you set up everything, you can simply run the automated model building by clicking on the Start button. You can also reset the default settings by clicking on the Reset button.
Advantages
- During automated model building, Trainer Engine is able to guess the type of the problem (classification, regression) based on the selected observed value.
- Feature selection is automatic
- Run naming and validation strategies are pre-filled with default values
Advanced Auto ML
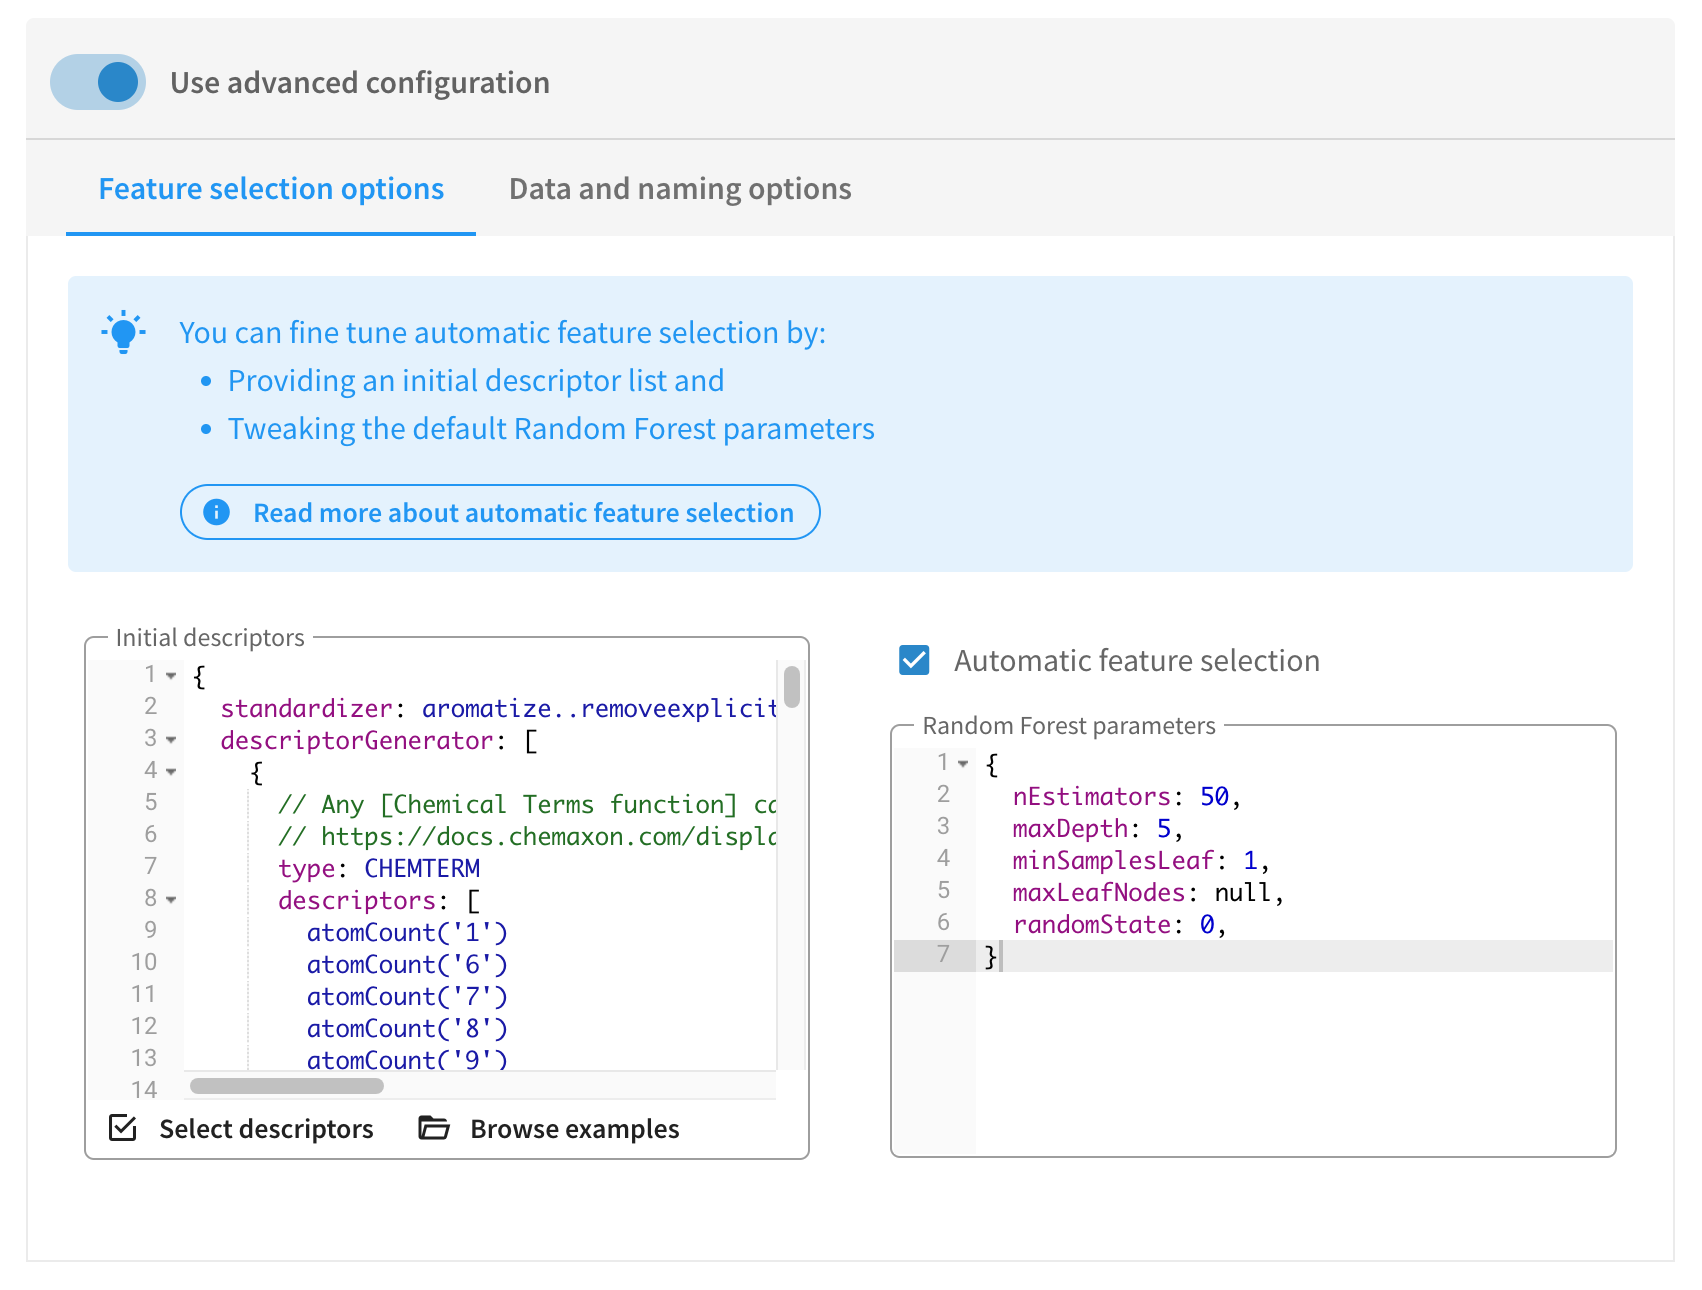
If you select "Use advanced configuration" at the bottom of the form, a new panel will show up, to fine tune the process of automatic model building:
-
Trainer Engine uses the Boruta algorithm for descriptor selection. You can override its parameters manually or you can even disable it by unchecking the "Automatic feature selection" checkbox.
-
You can control which descriptors should be used during model building
-
Under "Data and naming options" you can give your runs a custom name, change cross-validation parameters, turn conformal prediction on, or even set visibility options for applicability domain.
Training models
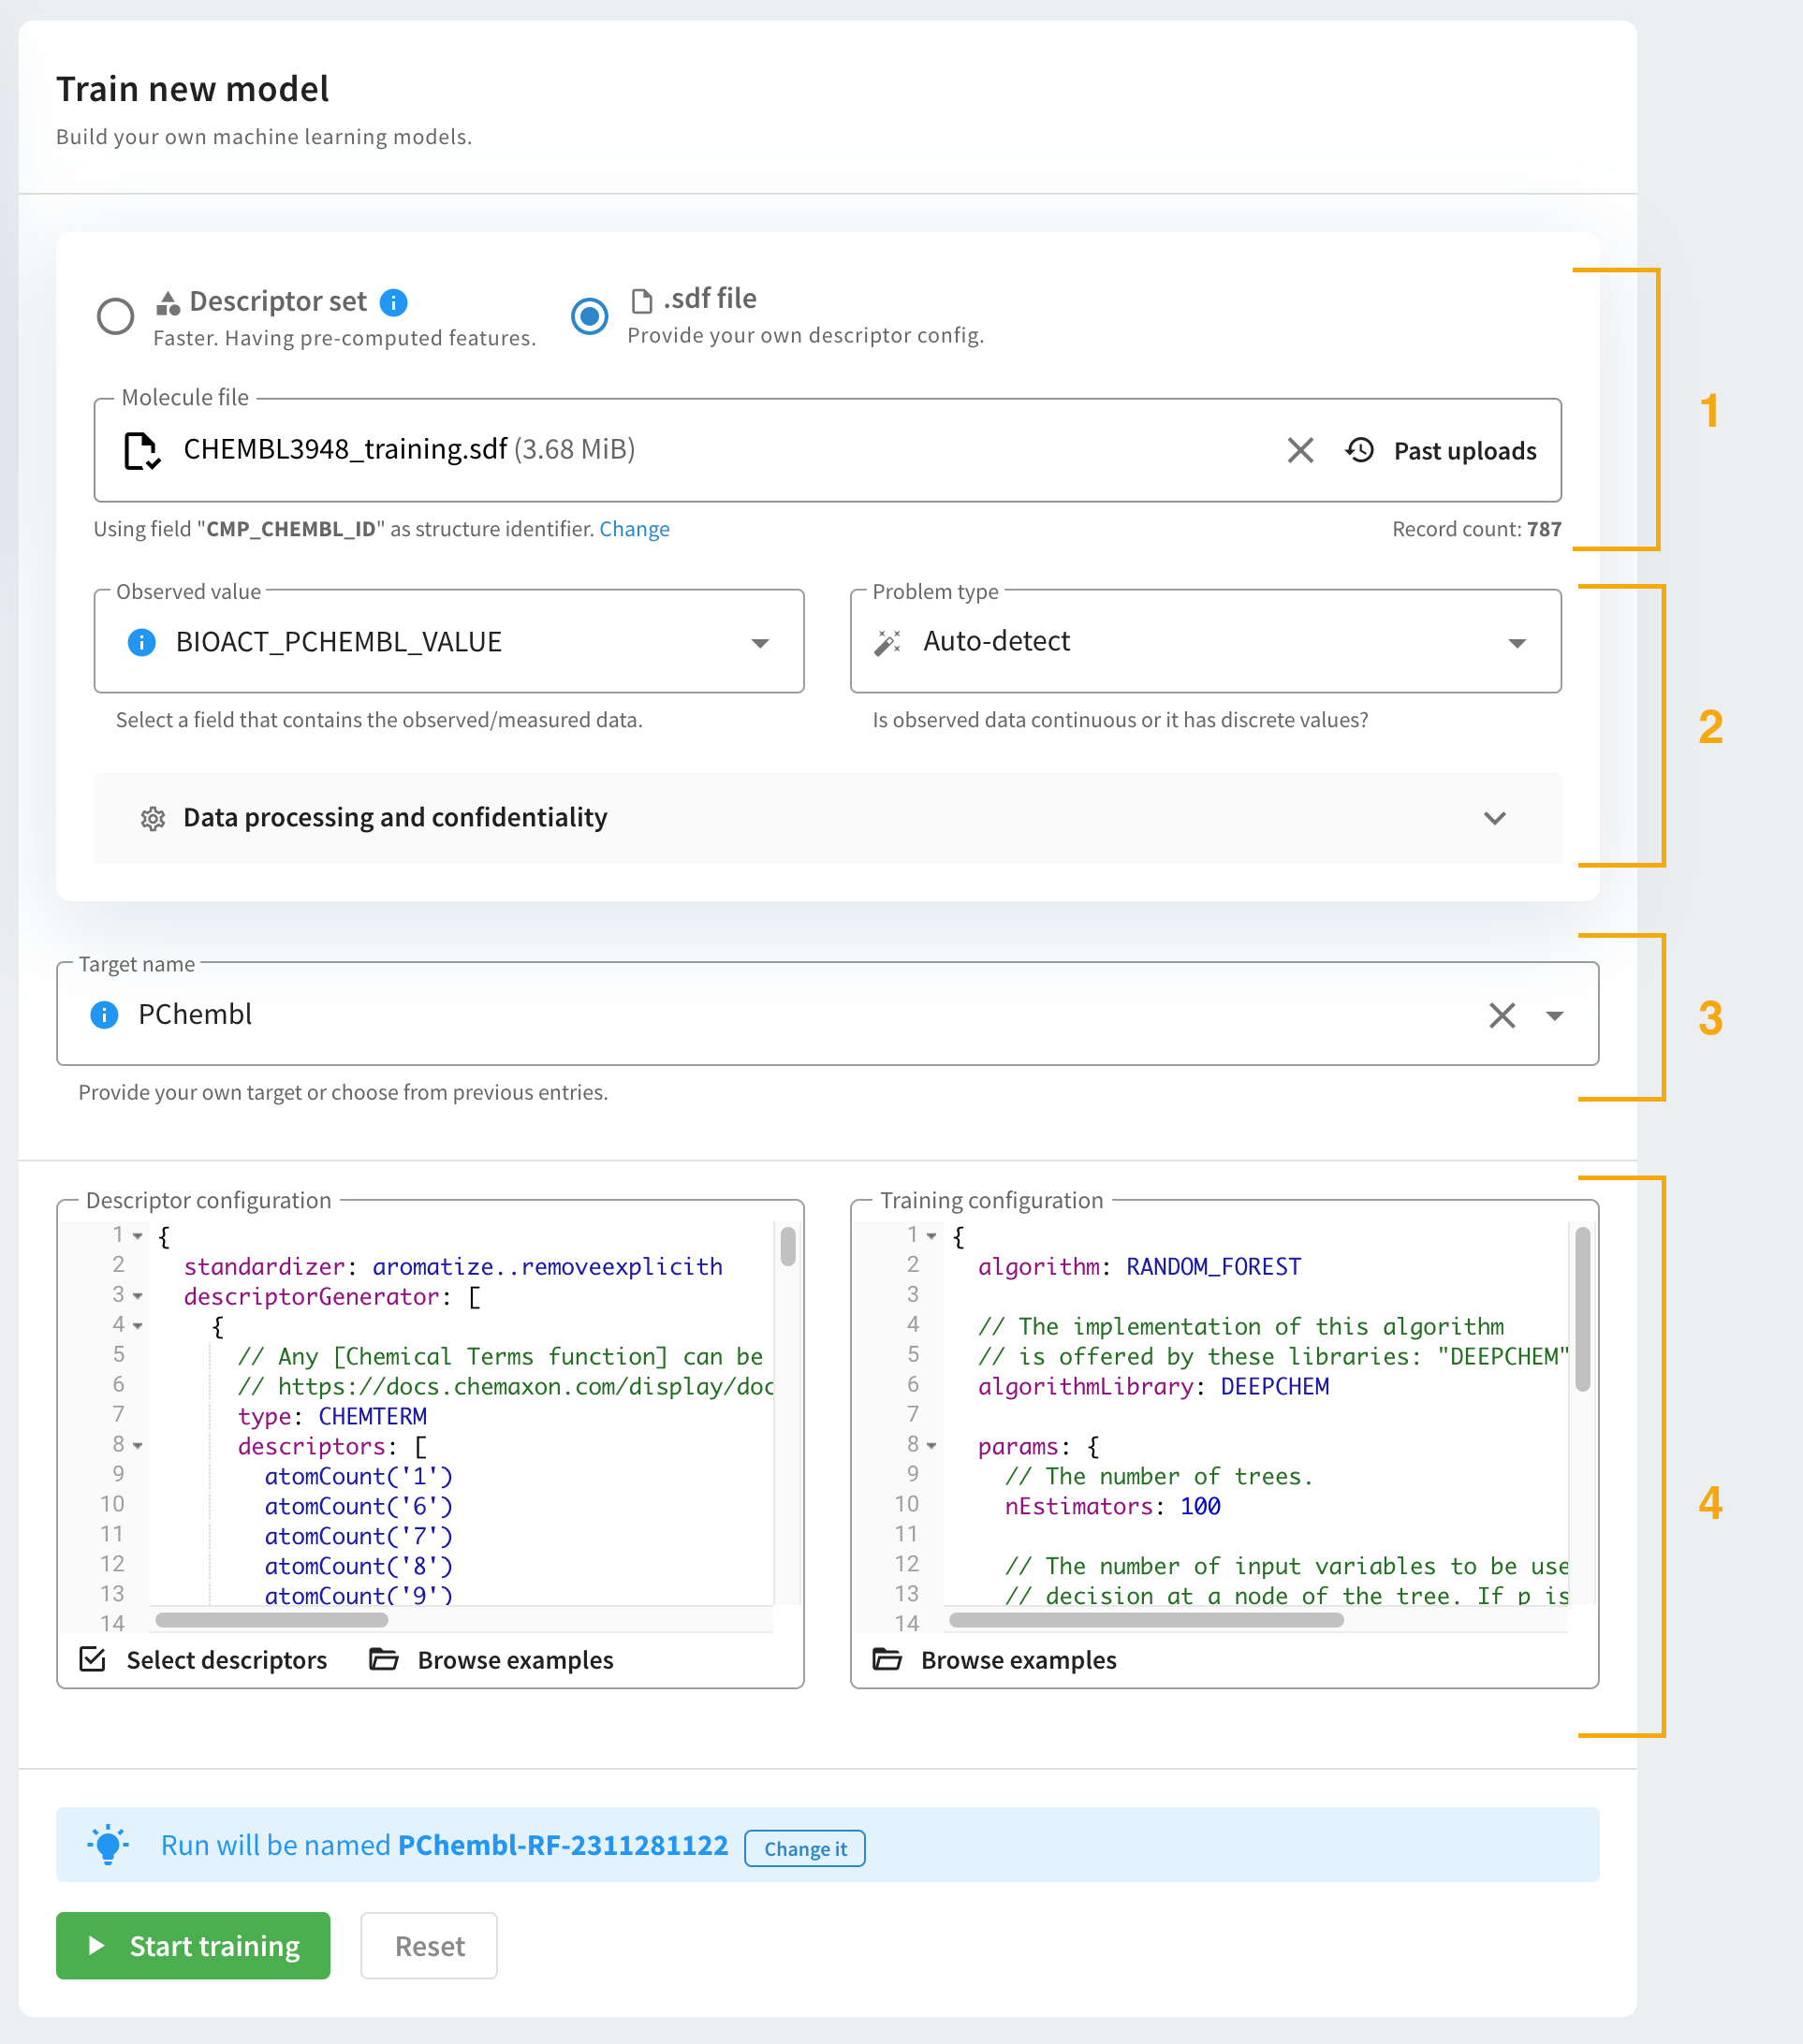
To build your own training models, follow the steps below.
-
Upload an input file. The supported file format is .sdf, with labeled data stored in a mandatory sdf field. The list of previously uploaded sdf files are available by clicking on "Past Uploads". You can also use a pre-generated descriptor set to run a new training.
-
Select the Observed value field. Please consider the followings when specifying the observed data in the input file:
- Observed data is mandatory for training. After the .sdf file is uploaded, the identified fields are listed automatically.
- Classification data format is: integers (0, 1, 2).
- Labels can be added using the following syntax: Integer:"Textlabel", for example: “ 0:SAFE” and “1:TOXIC”.
- In case of multiple classes, no statistics are calculated.
- Regression value format is: numeric field
- This specification fails if there is a string (e.g. “Nan”, “NoData”) in the observed data.
- Choose Auto-detect as Problem type if you want Trainer Engine to automatically guess the problem type based on the nature of "Observed data".
-
Add Target name. Target name is used to tag or classify models. Target name can be typed in or selected from a pre-defined list of names. It is also used during automatic name generation.
-
Choose the descriptor and training configurations you want to apply from the lists of examples. The lists pop up after clicking on the Show examples part of the configuration windows. You can also modify the chosen configurations. However, it is recommended to check the example configuration files first. Detailed descriptions are available in the Trainer configuration page.
{info} Earlier versions of Trainer Engine supported JSON as a format of configuration. From v. 3.0 configurations are defined in HJSON format.
- Once you set up everything, you can simply run the training by clicking on the Start training button. You can also reset the default settings by clicking on the Reset button.
Predictions
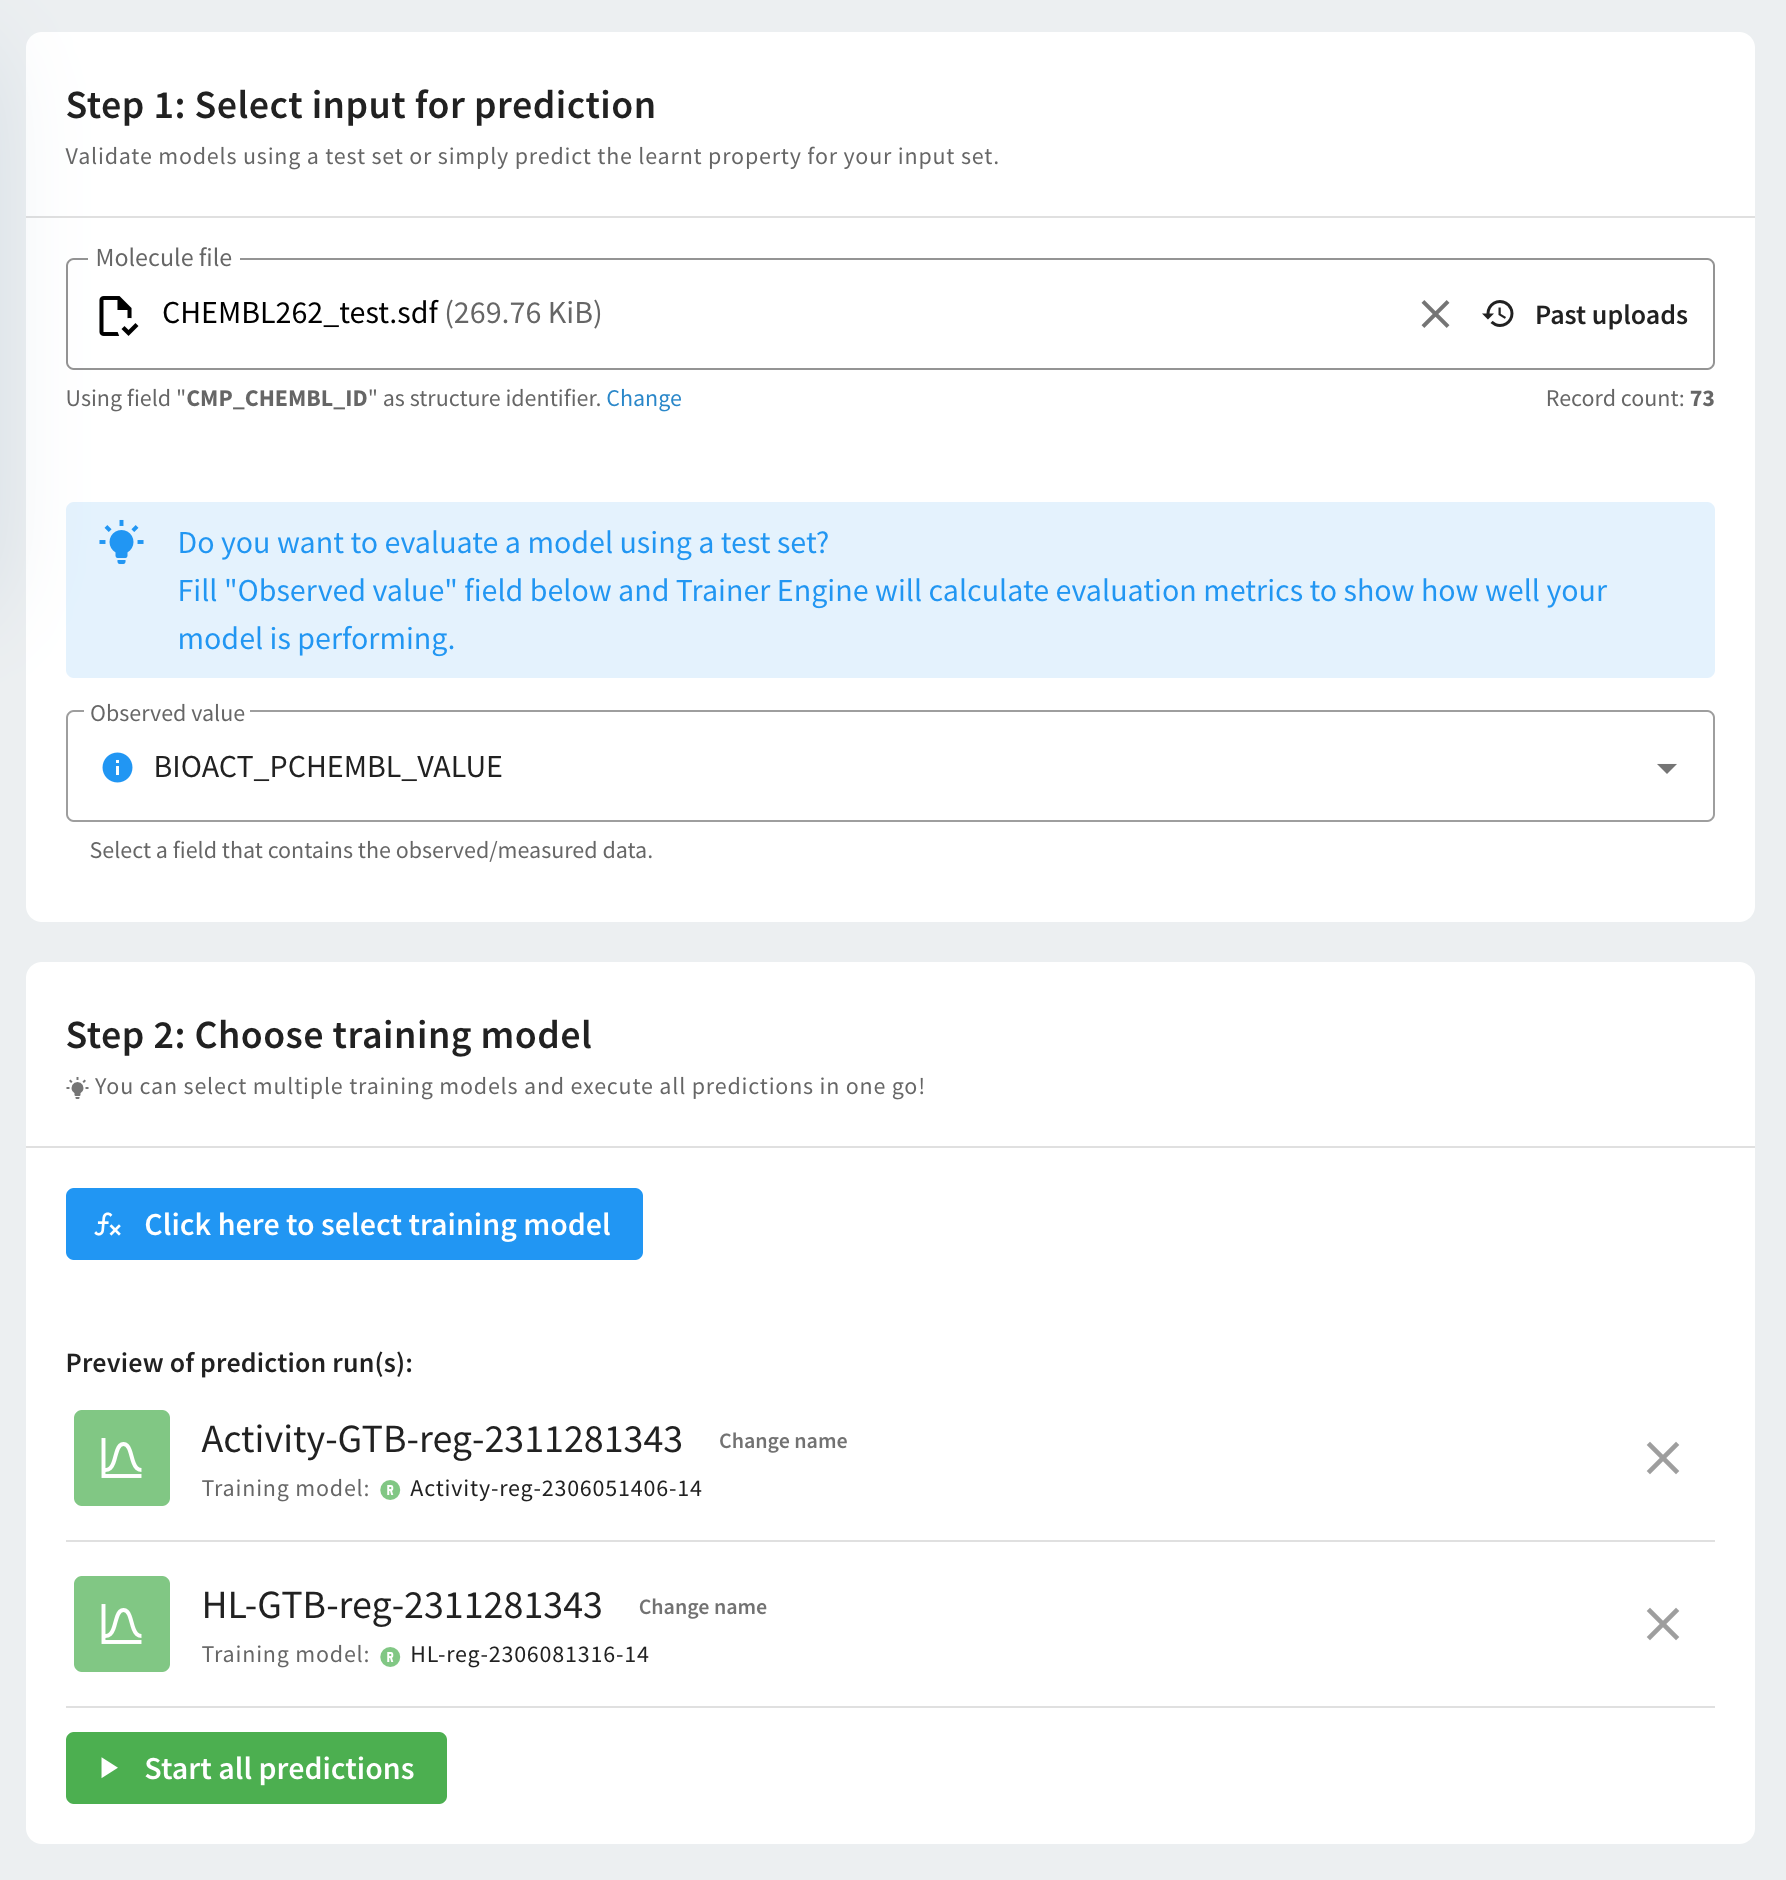
To run a prediction on a set or to test a built training model, follow the steps below.
-
Select an input file for prediction. The supported file format is SDF. The list of previously uploaded sdf files are available by clicking on "Past Uploads". You can also specify the structure identifier of the molecule file. Indices are used as default identifiers.
-
Select the Observed value field. Selecting observed data is optional. If observed data is present and selected, evaluation metrics are automatically calculated for the prediction.
-
Select a model from the list of built training models. Multiple training models can be selected and their runs be executed in one go!
-
Once you set up everything, you can simply run the prediction by clicking on the Start prediction or Start all predictions button.
Descriptor sets
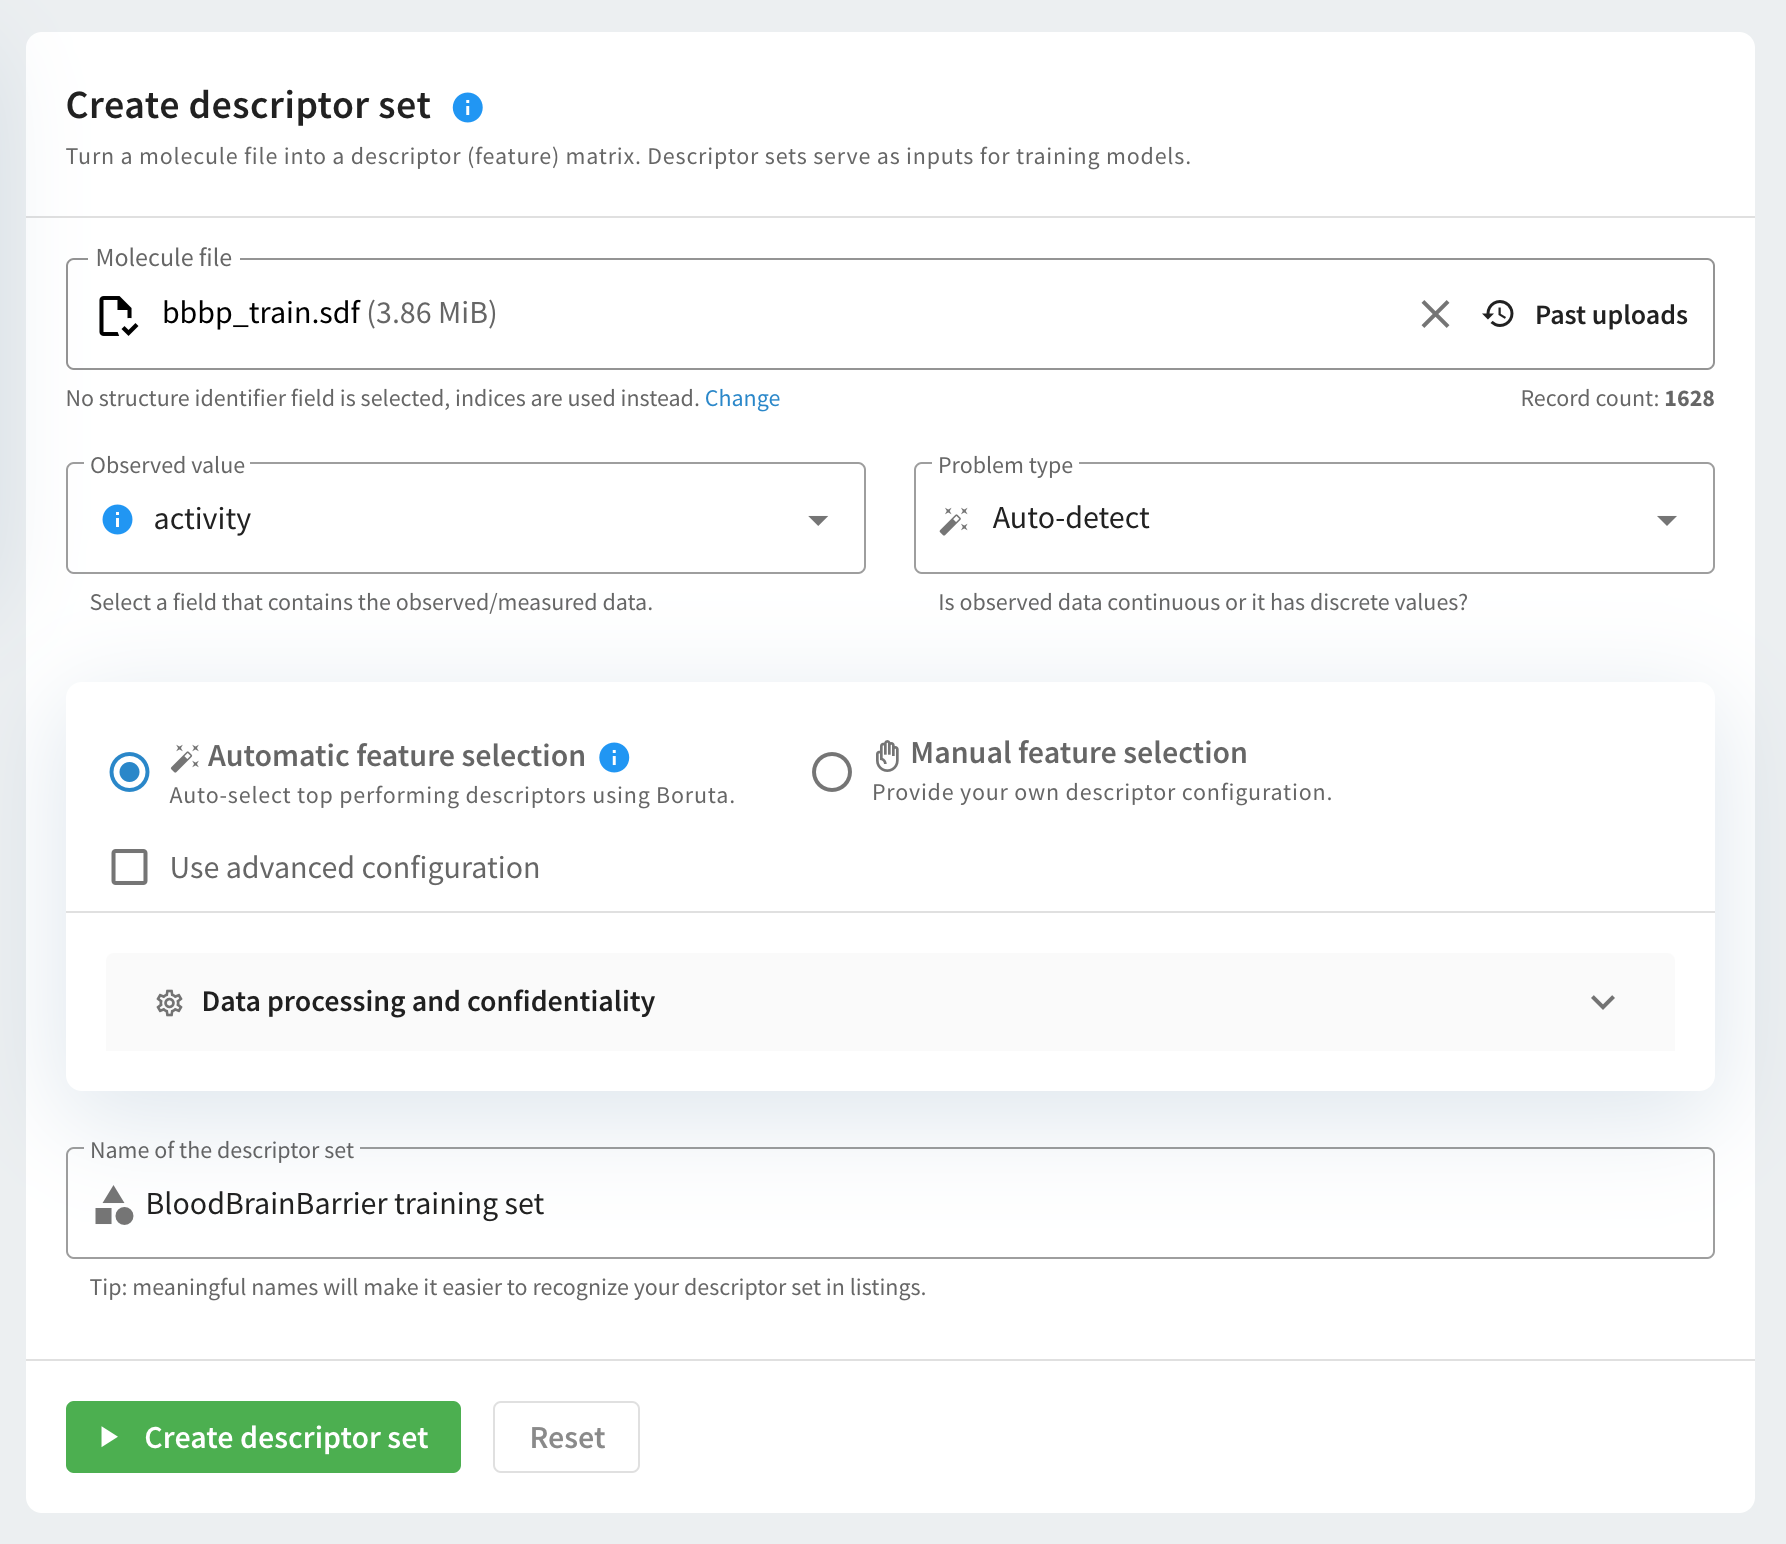
To create a descriptor set (matrix), follow the steps below.
-
Select an input file for creating descriptors. The supported file format is SDF. The list of previously uploaded sdf files are available by clicking on "Past Uploads". You can also specify the structure identifier of the molecule file. Indices are used as default identifiers.
-
Select the Observed value field and the Problem type. Trainer Engine is able to auto-detect the machine learning problem type in the input file. Choose Auto-detect to enable this.
-
Select the features to be used for descriptor generation. You can choose between automatic and manual feature selection.
- Automatic feature selection uses the Boruta algorithm to choose the best performing descriptors.
- Manual feature selection allows you to select the descriptors from a descriptor configuration file.
- Name the descriptor set. Once you set up everything, you can simply create the descriptor set by clicking on the Create descriptor set button.
The Runs page
The Runs page lists all previous runs in a table format. Selecting runs from the list add them to the Analyze page for further analysis.

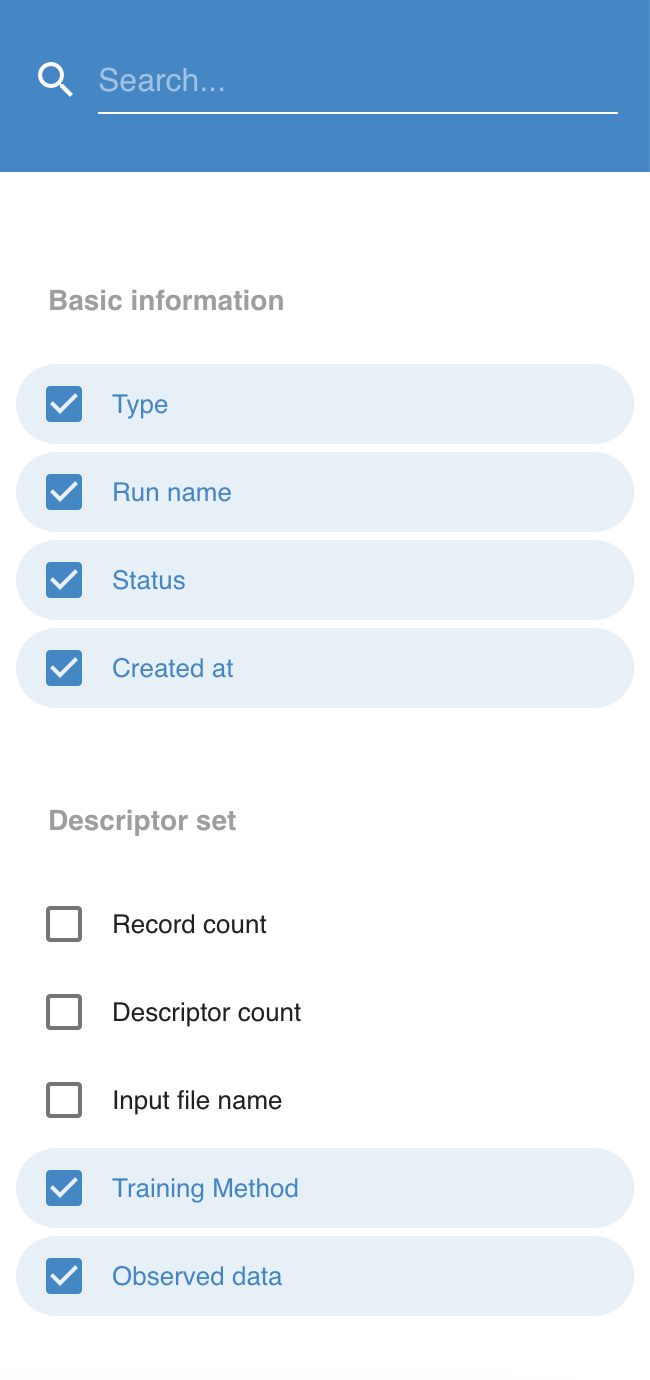
The Columns menu
The Columns menu lists all available parameters of a run that can be selected to appear in the table. A simple text based search on the top of the menu can be used to narrow down the available parameters.
Sorting based on a column value can be run by clicking on the column header.
The Filters section
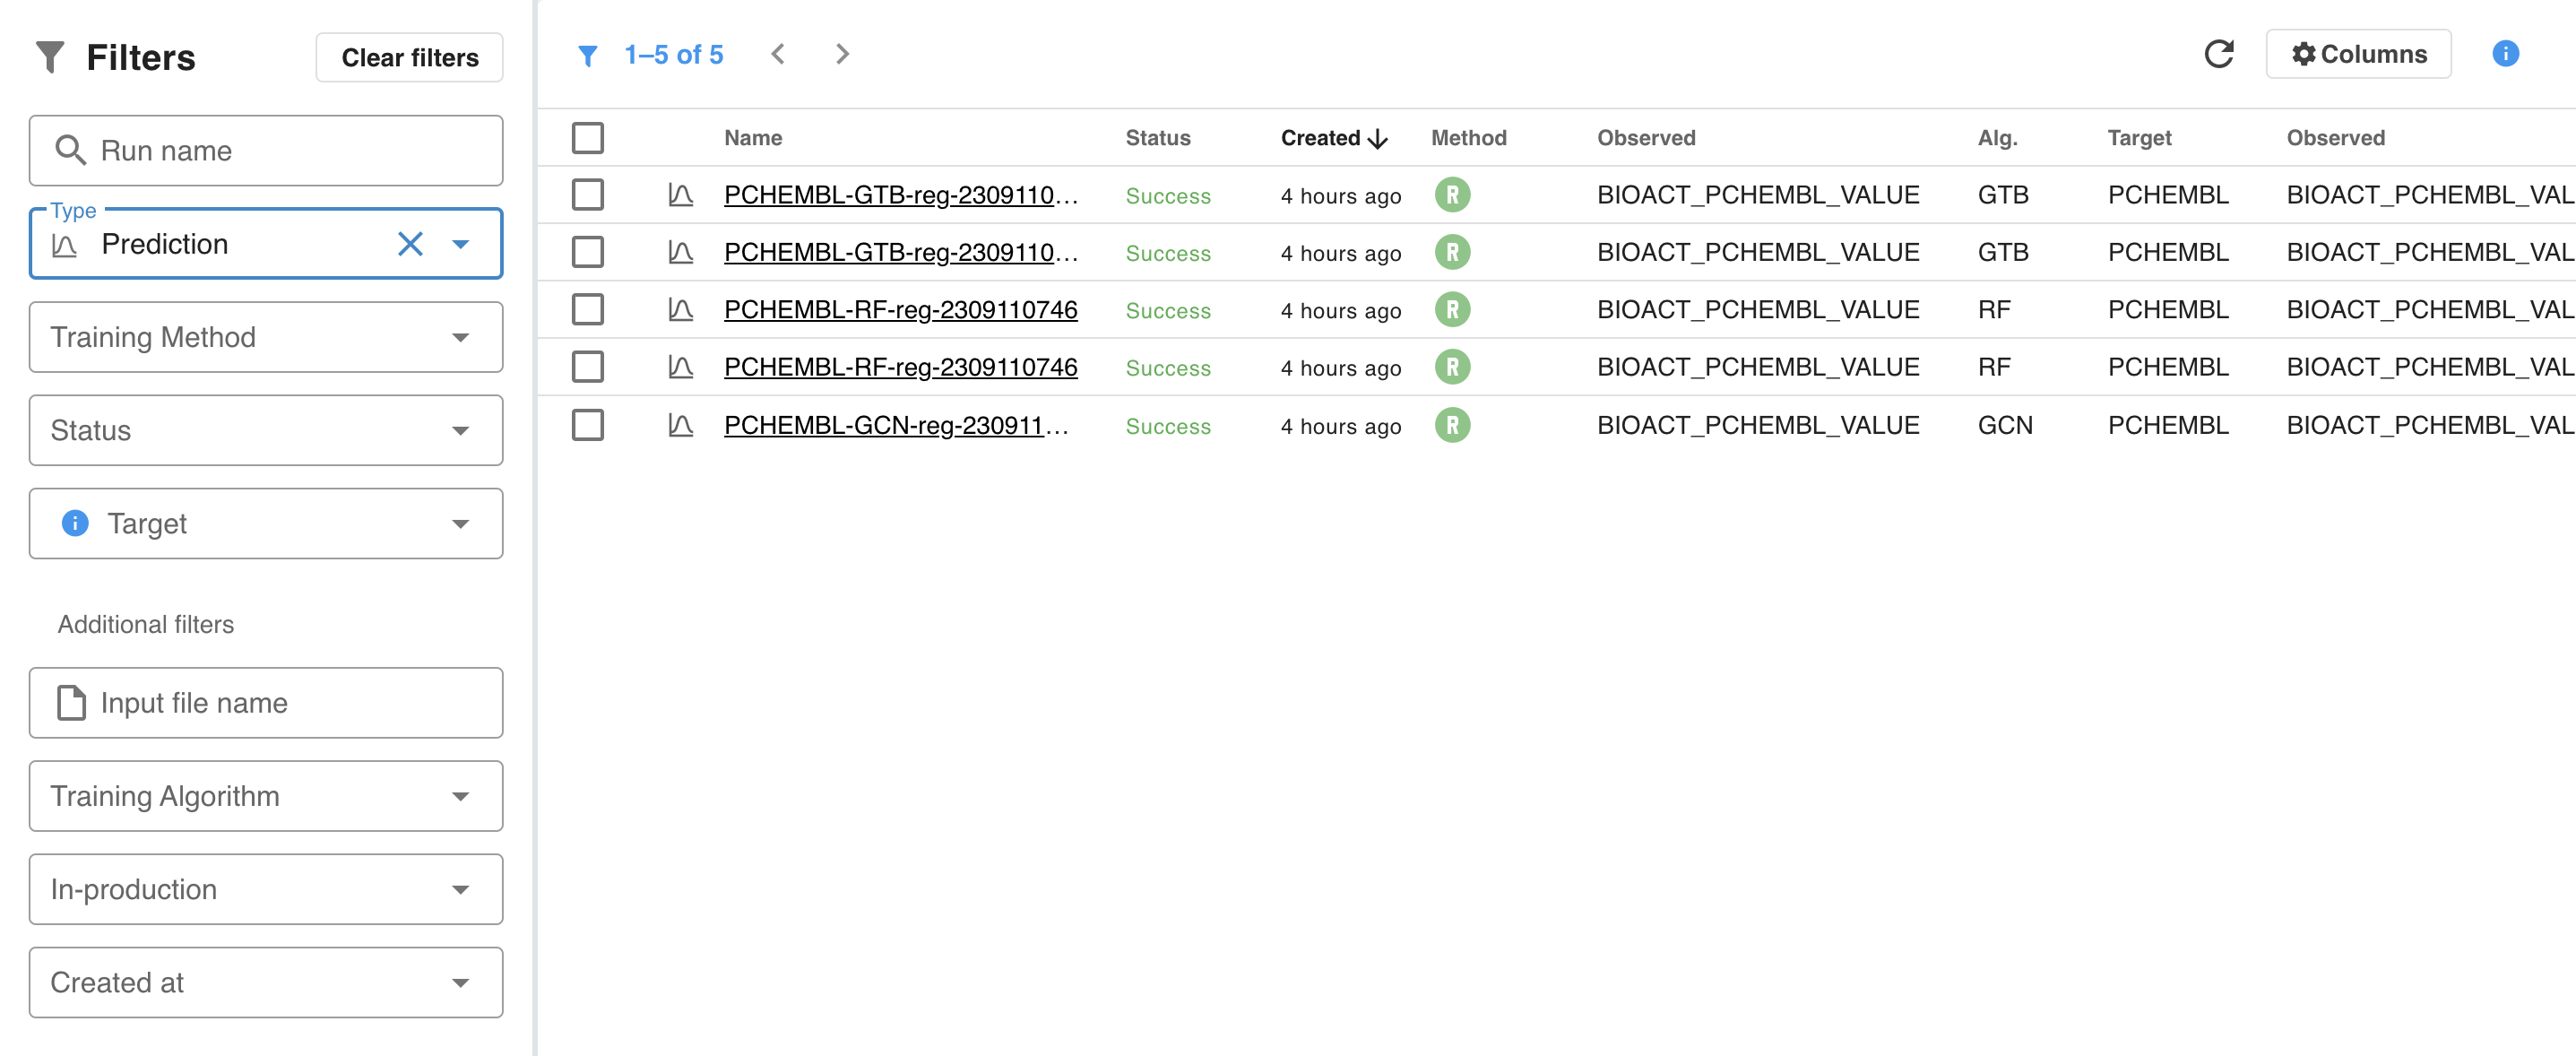
The Filters section allows different filters to be defined for the list of runs.
Run statuses
Runs can also be filtered based on their status. The following statuses are defined: Running, Waiting, Failed, Orphaned, Cancelled and Success. Only one training run can be in a Running state, all other training runs are put in a Waiting status until the running one finishes or gets cancelled. A run can be cancelled while being in a Waiting or Running state.
{primary} Runs can be archived. Archived runs are not visible, but they persist in the system.
{info} Runs are parallelised to utilise available CPU resources.

The 'Explore runs visually' section
The 'Explore runs visually' section gives a plot of different statistical parameters of the runs in their order of appearance.
Details page
An underlined run name provides a link to its corresponding Details page. The Details page summarises all data of that run.
Analyze page
The Analyze page allows to compare selected runs and to analyse them in detail. It is a flexible and configurable view that supports visualization, comparison and assessment of model details and accuracy measures.
Trainer Engine REST API
Trainer REST SWAGGER documentation is available at https://<trainer-host>/swagger-ui/index.html
Playground
The general documentation of Playground is available here: https://disco.chemaxon.com/calculators/playground/
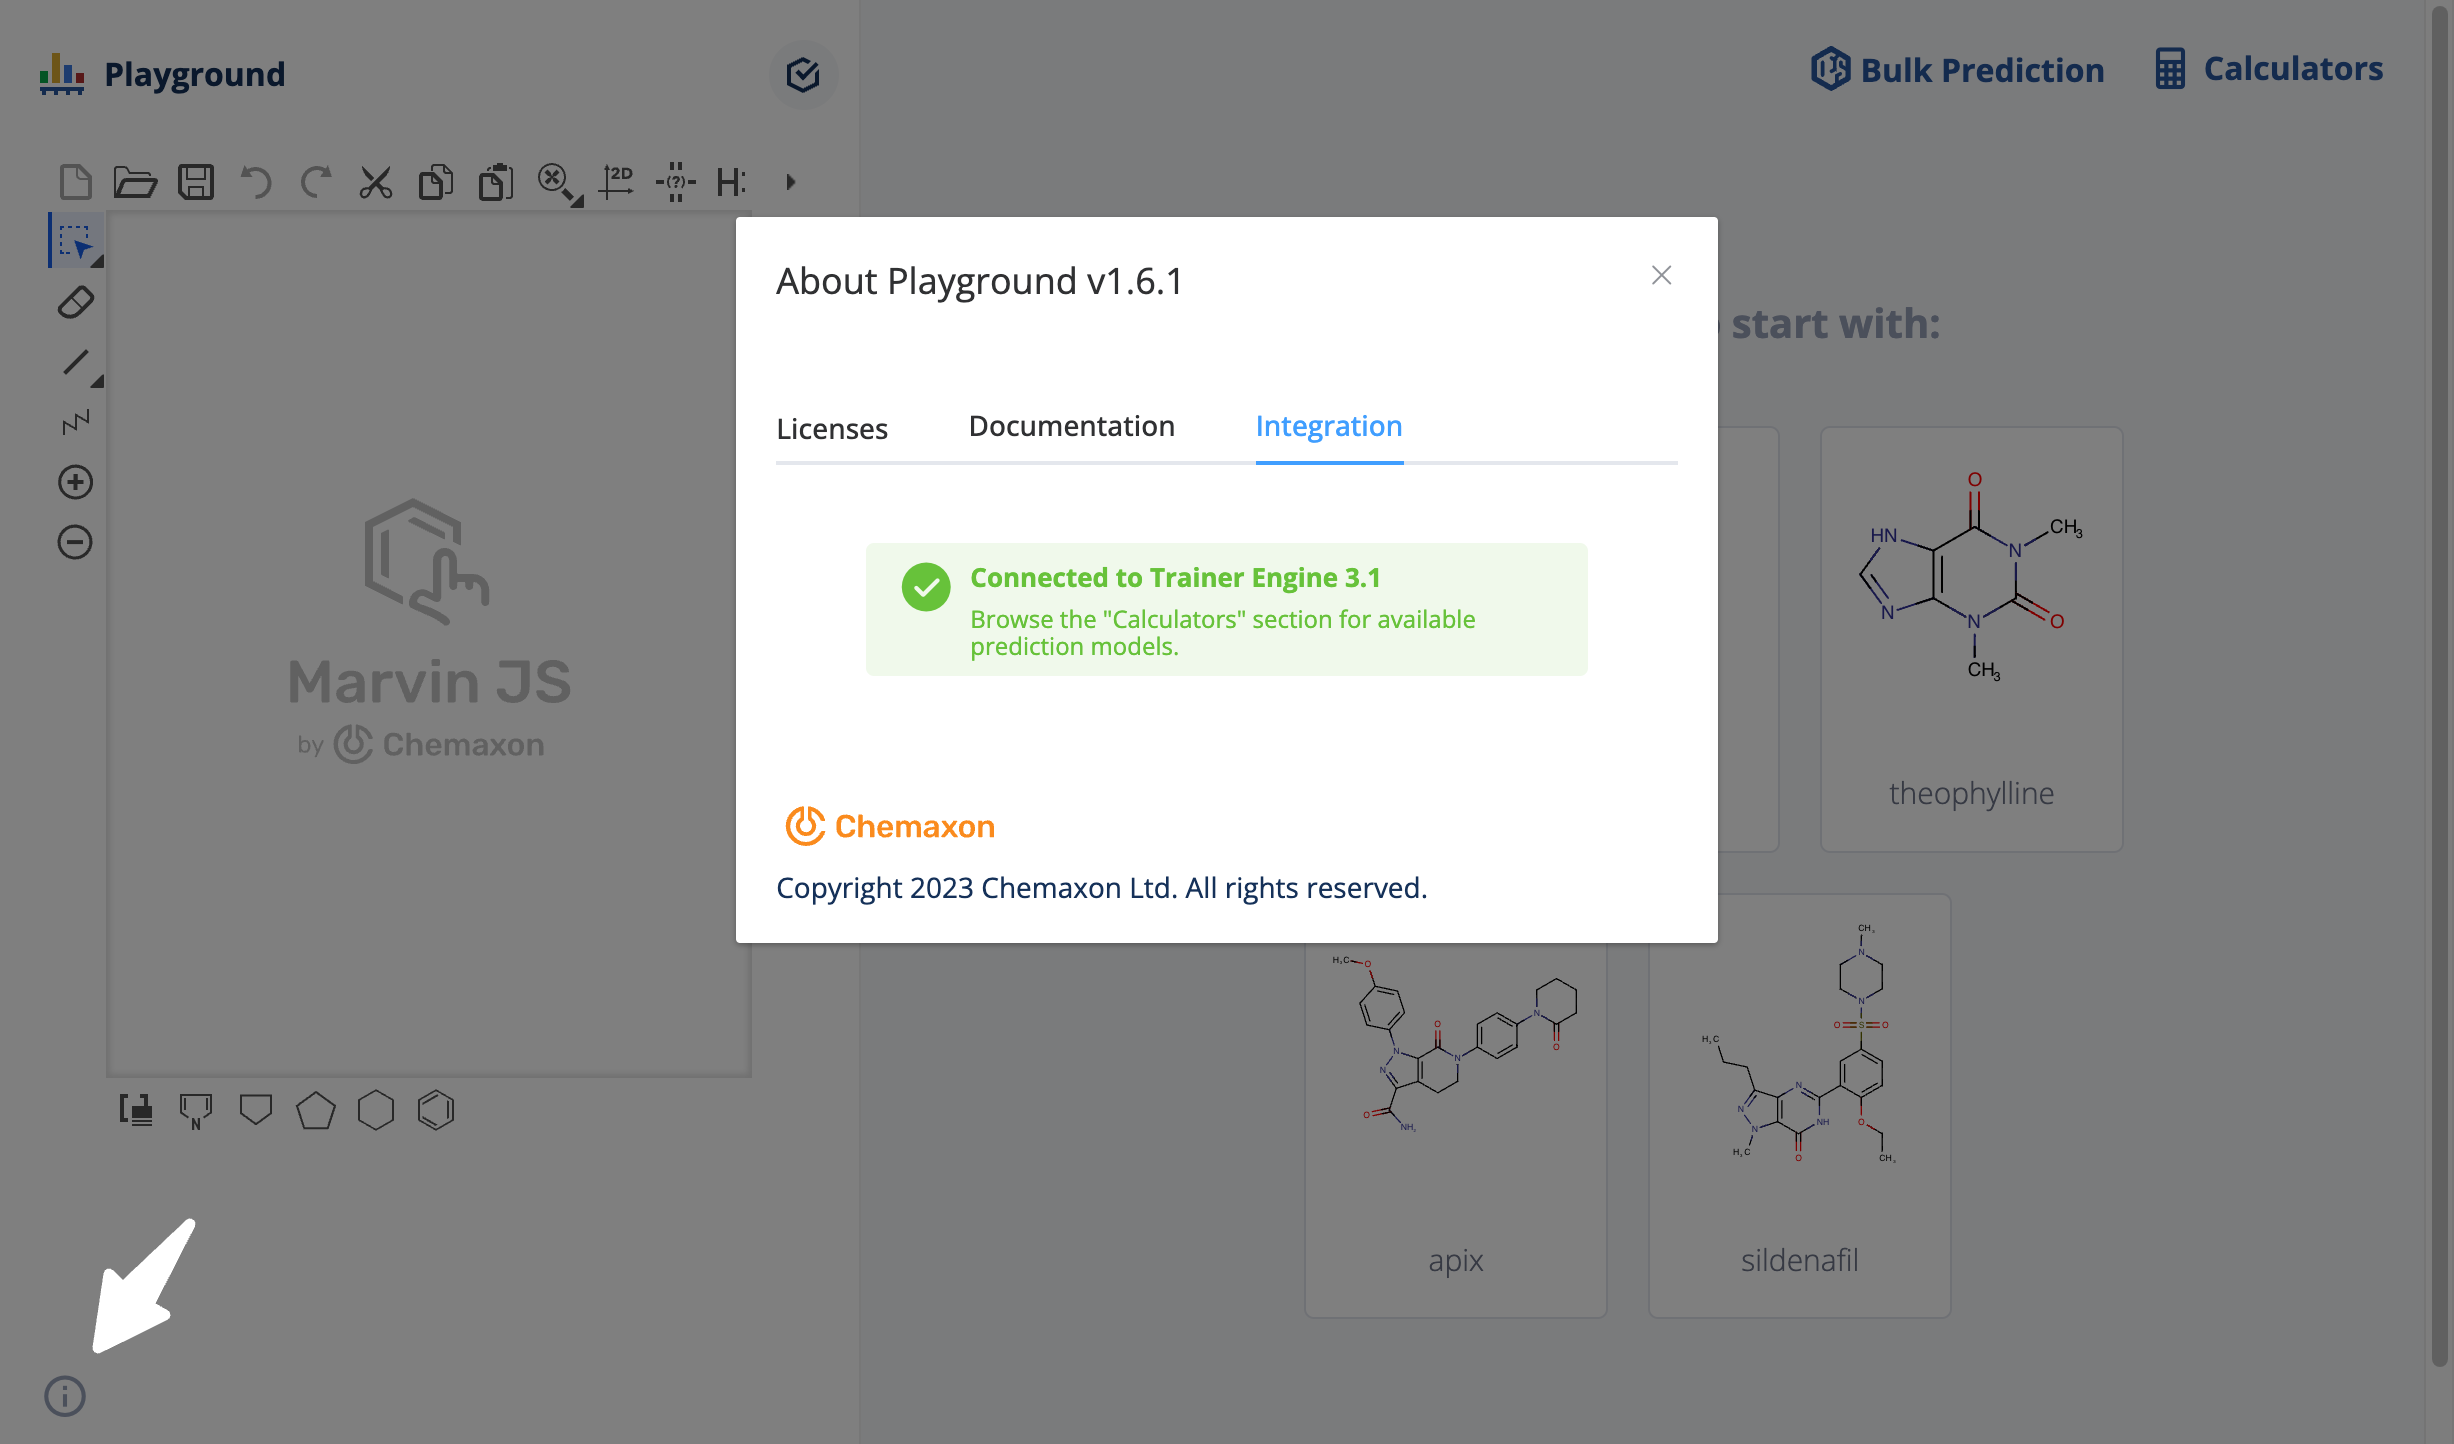
Check Playground integration
The Integration tab of the About dialogue in Playground shows the state of the Trainer Engine connection.
Single prediction with Playground
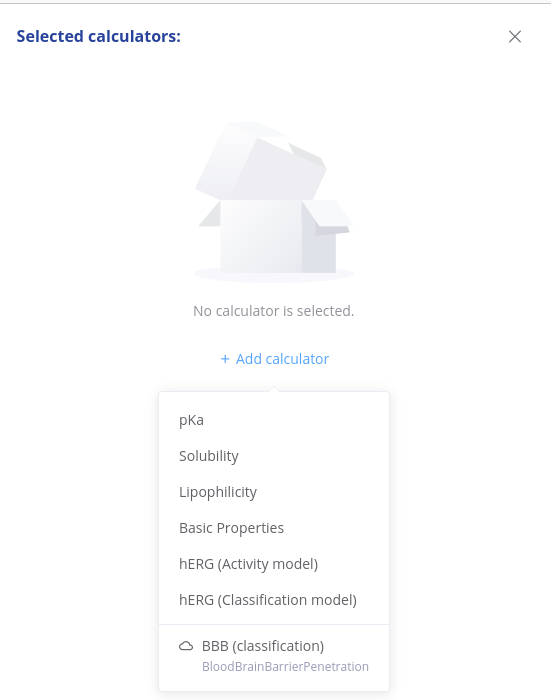
If Trainer Engine is connected, production flagged models are shown in the list of calculators, marked with a cloud icon.
Batch prediction
The Bulk Prediction icon opens a dialogue to select a Trainer Engine model and upload an sdf file. The results are available for download after prediction.
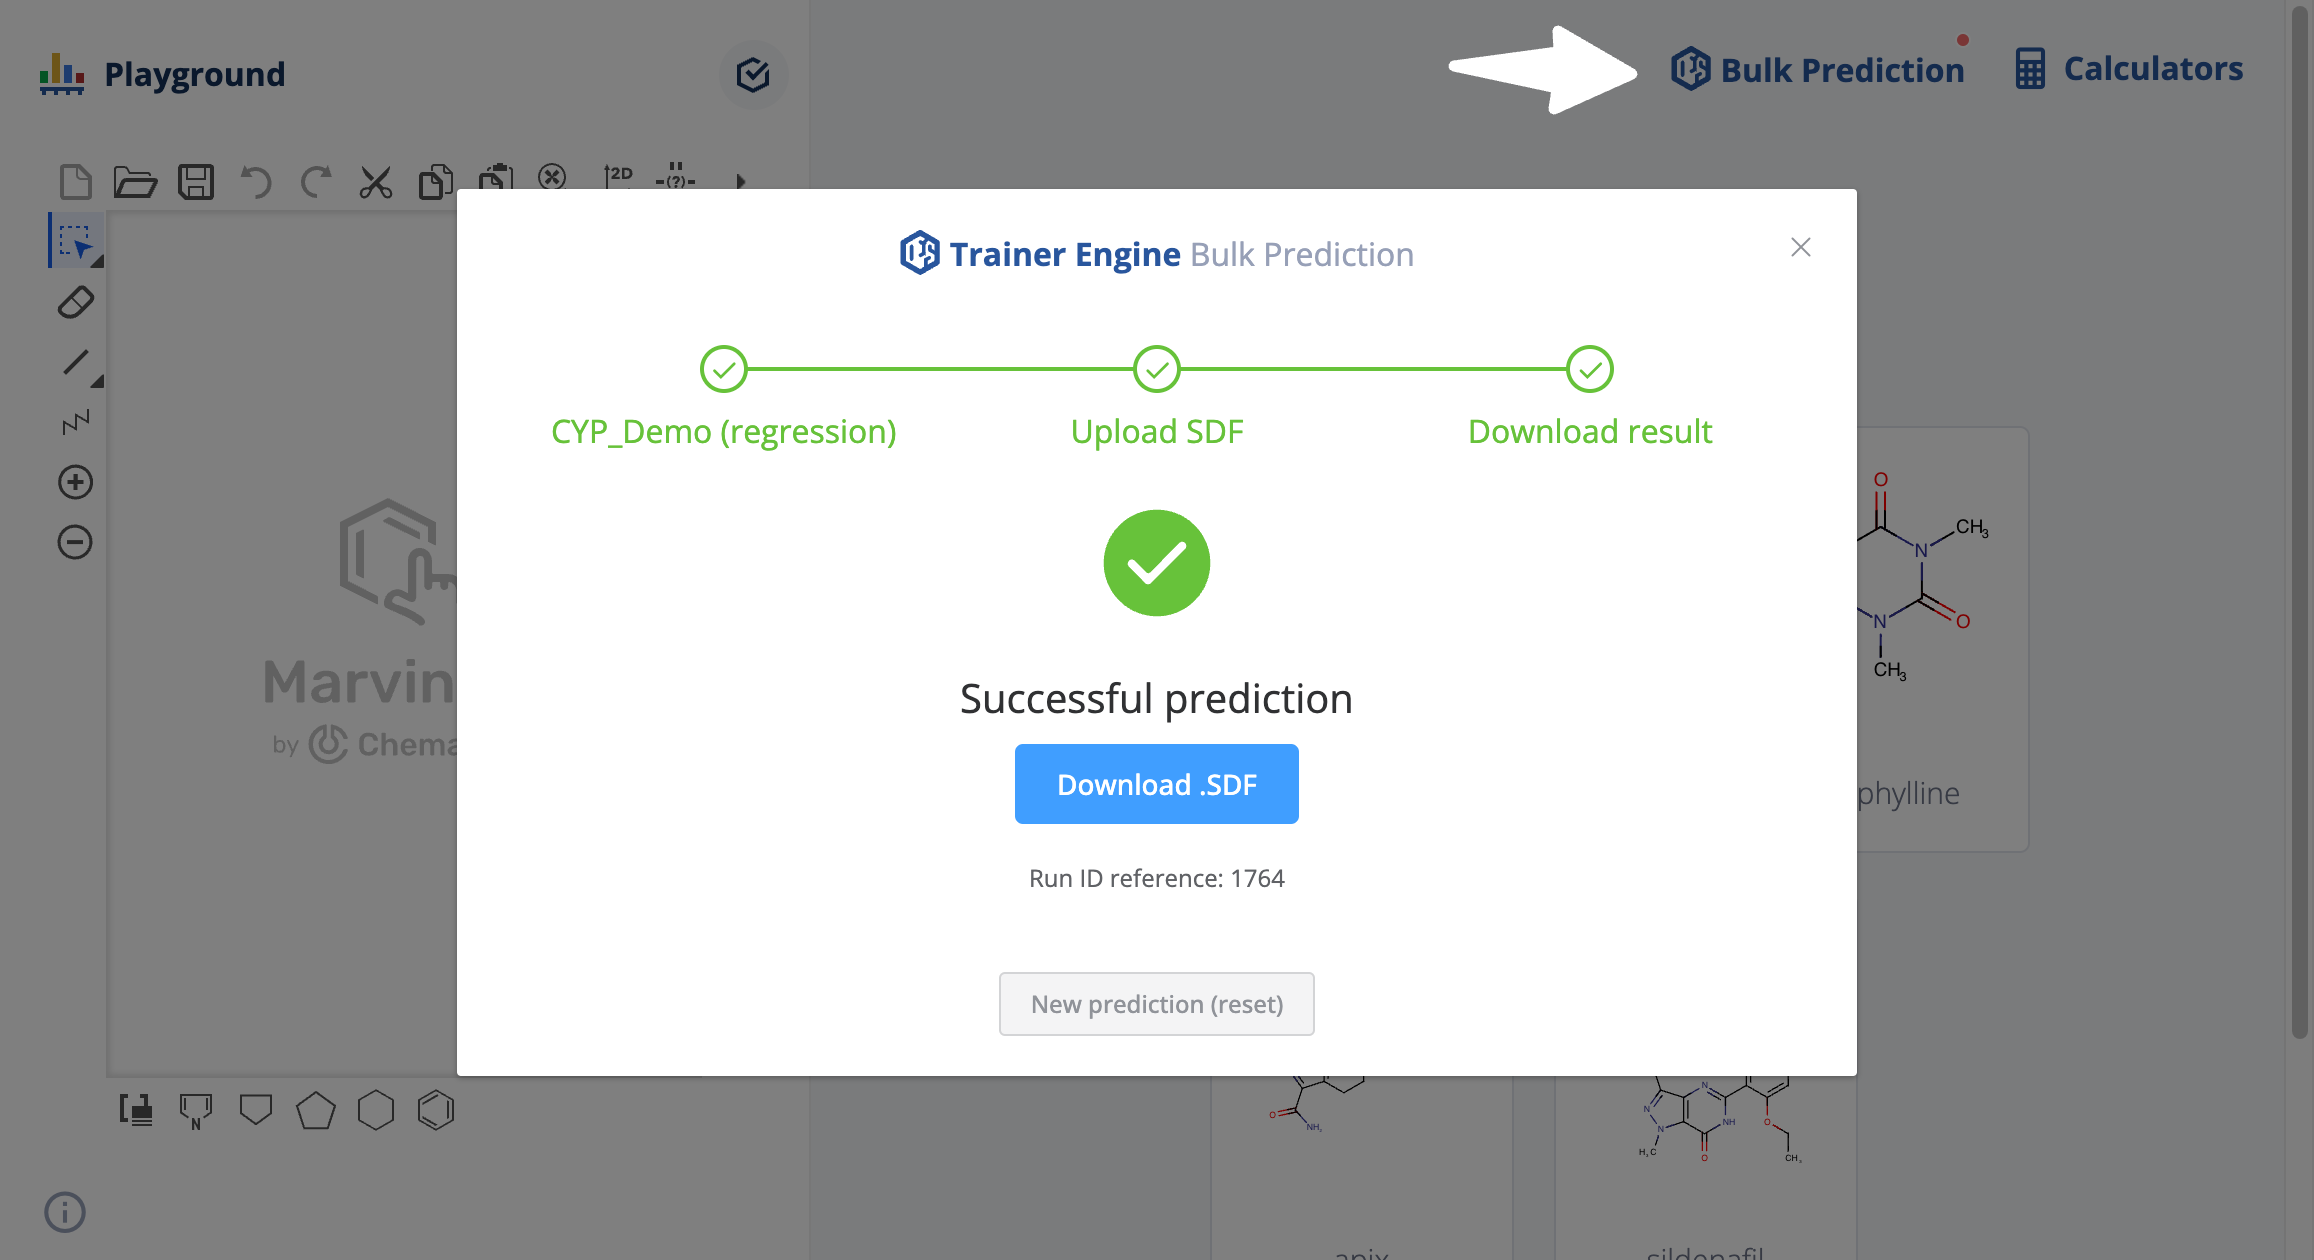
Bulk predictions started from Playground are marked as "external runs" and are not listed on the Runs page of Trainer Engine.
The progress, the status and the corresponding log file are available by referencing the run id:
/trainer/#/run/{run id reference}