API keys
Plexus Connect allows user login by API key to be able to use Connect APIs.
It is the additional means of login specifically designed for using Connect features
outside of the Connect UI.
There are two parts. The management of API keys and using the defined API keys.
Management
Consists of UI and APIs for creating, editing and deleting the API keys.
For Management to be active the business flag API_KEYS_LOGIN must be enabled.
When the Management is active, there is new option in the main menu.

Menu option leads to the Management dialog.
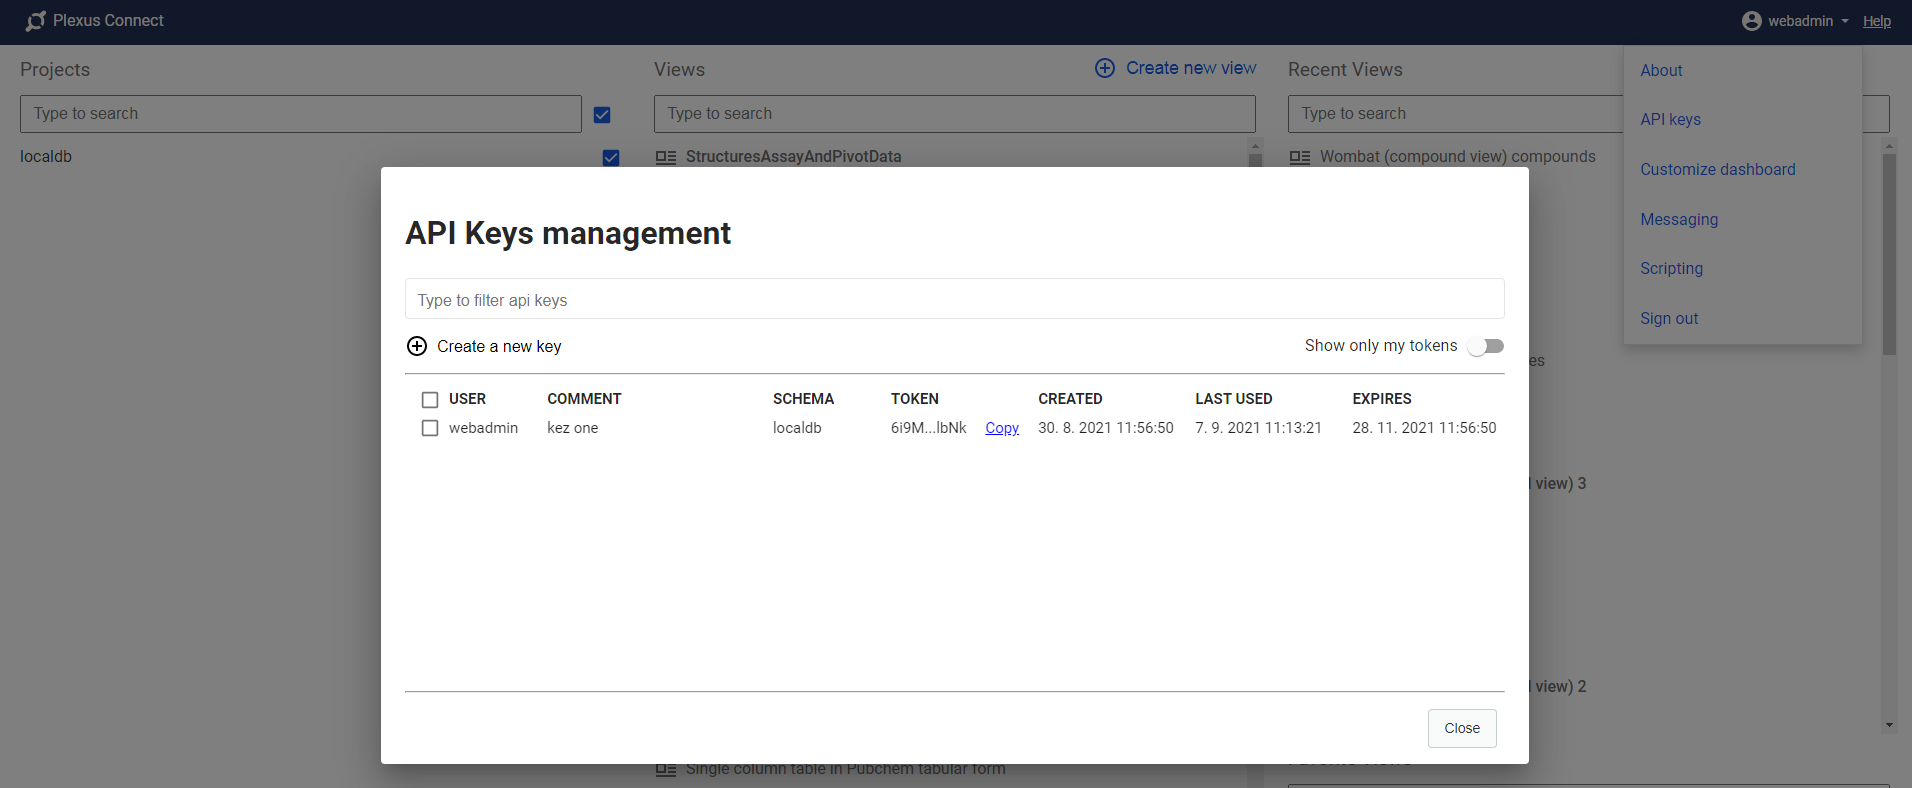
There any user can create API keys for himself linked to specified schemas selected by user.
New API keys will be by default valid for 180 days. After that, they will expire.
The validity of API keys can be changed by setting the value plexus.apiKeys.validityInDays in nps.properties file.
It is not possible to extend the validity duration, so after expiration, new keys must be created.
Each user can modify or delete the API keys as they see fit. Modification allows only changing the "comment"
of the API key. Each user can also delete the API key, however it effectively means,
the key will be considered expired by that action, but the key will still remain in the database for audit purposes.
Administrator users are allowed to modify and delete all API keys, even those belonging to other users, however, they cannot create new API keys for other users.
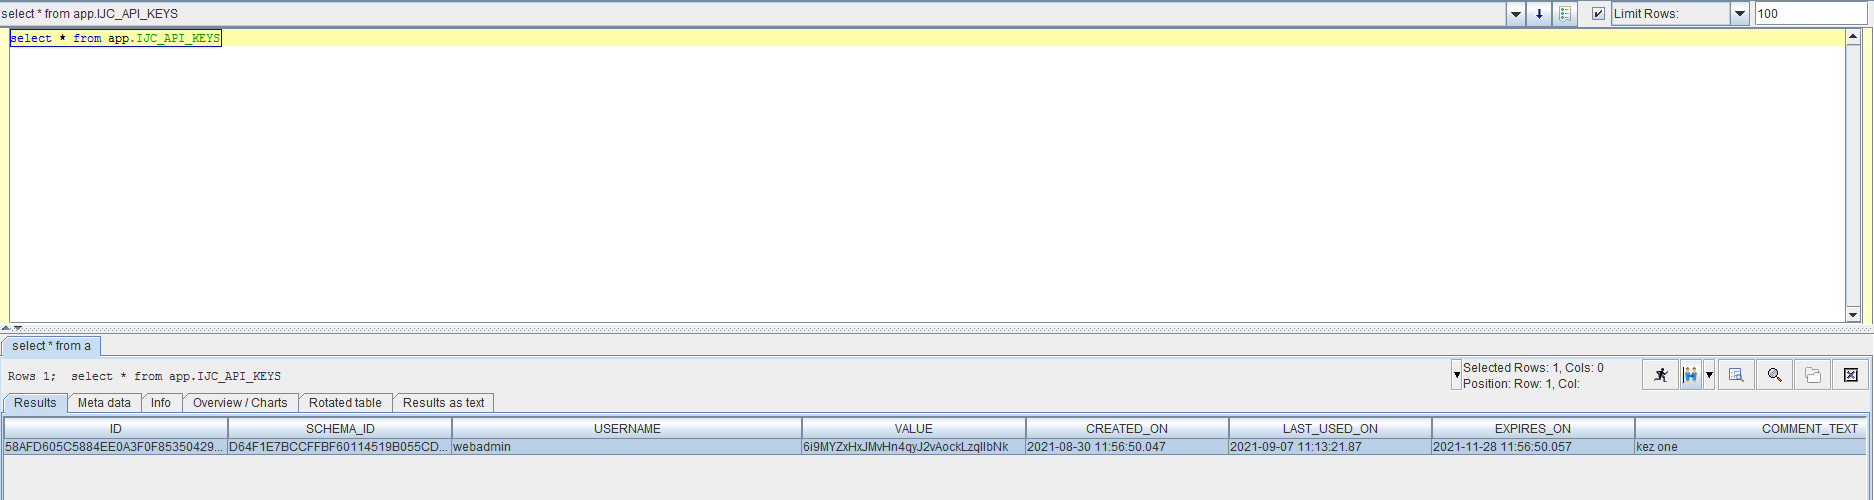
API keys are stored in the IJC_API_KEYS database table. They will stay there, unless manually deleted by DB administrators.
Login by API key
Login by API key is always enabled, however without management of the API keys it is not possible to create valid API keys.
User, who wants to use his API key, has to copy the key value from the API key Management dialog in the Connect UI.
Typical use case than would be using the copied API key value in Python Scripting, where user just inserts
his API key into his script instead of a previously used username/password.
Also, the server schema ID or ids must be added to the script, because API keys are linked to set of schemas previously selected by user.
You can get the server schema ID from the URL, it is the first part of the view address, see picture below:
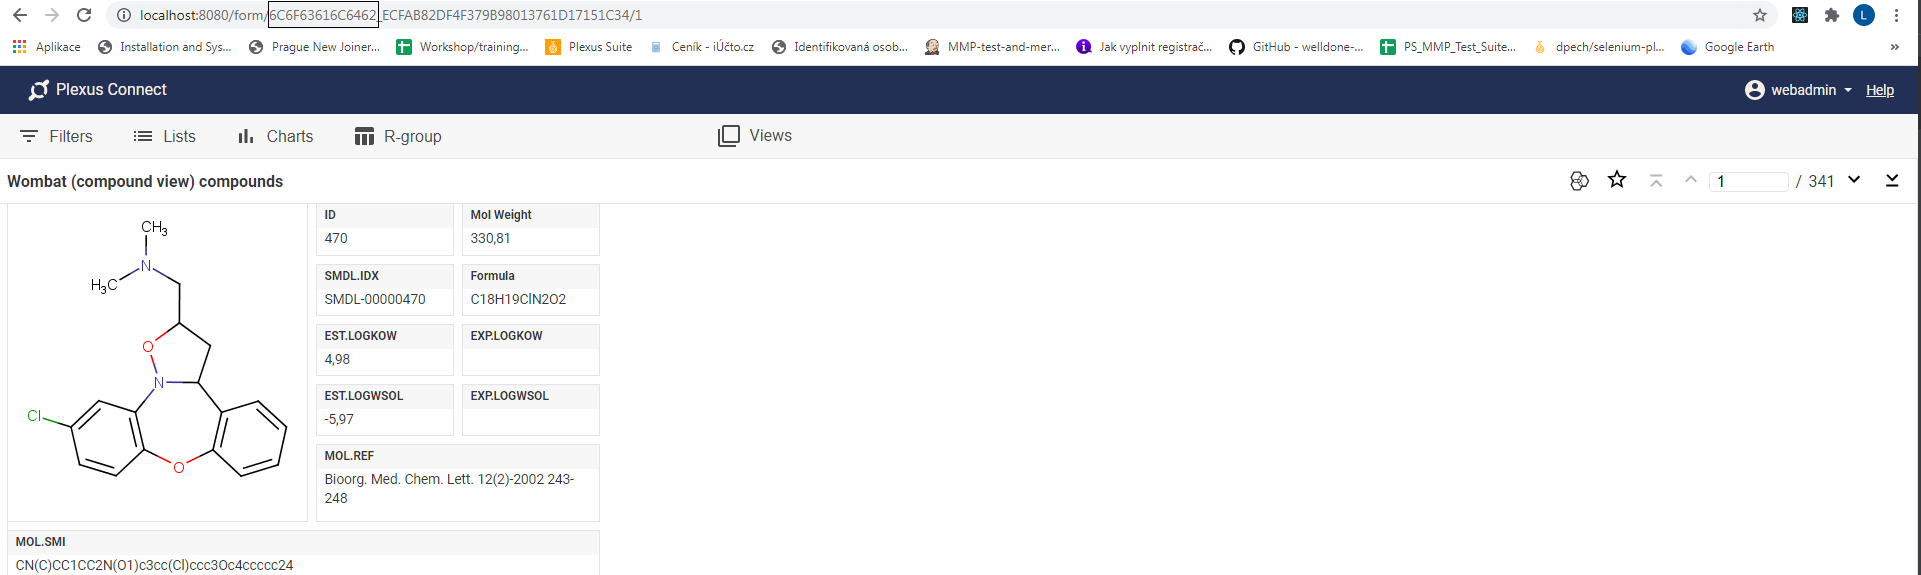
Picture shows, the server schema id is 6C6F63616C6462.
See example script below:
    from connect_api import DataApi
    # DataApi("apiKey", ["serverSchemaId"]) or DataApi("apiKey", ["serverSchemaId1", "serverSchemaId2"]) for 2 schemas
    api = DataApi("6i9MYZxHxJMvHn4qyJ2vAockLzqllbNk", ["6C6F63616C6462"])
    session = api.copySessionFromURL("http://localhost:3002/form/6C6F63616C6462_ECFAB82DF4F379B98013761D17151C34/4?search1%2FDEE7DBBC35E95BB9494A1CB9F1536160%2F2=0-%3E,1-300&sorts=ascending-true,fieldId-DEE7DBBC35E95BB9494A1CB9F1536160,widgetId-194A0883A70F1BFE4B5F9487A9089252&childSel=C15079B06FDA5FD35173EBD5E3BC9DB5-2")
    result = session.getData(["ID", "EST.LOGKOW"])
    print(result)
    session.close()
When using Schema refresh by IJC, IJC automatically creates its own API key (bound to the user who initiated the Schema refresh), uses it and then discards it afterwards.
It is possible to use API keys on your own and call the APIs manually or by your script or program.
See example below when using curl to access the API of Connect:
- The first request will return XSRF-TOKEN and PlexusSessionId as [SESSION] in Cookie.
- curl -i localhost:8080/xsrf
- results in getting set-cookie headers with SESSION and XSRF_TOKEN
- make sure, you don't follow the redirect if it happens, so you have access to cookies above
- Use POST to log in and use token from the UI, don't forget to add headers and cookies from previous request.
- curl -i -X POST -H "X-XSRF-TOKEN: XSRF_TOKEN" -H "Cookie: XSRF-TOKEN=XSRF_TOKEN; SESSION=SESSION" -H "X-Schema-Ids: schemaId1:schemaId2:etc" -H "Authorization: ApiKey
" localhost:8080/api-key-login - this will log the user in and return new SESSION in the cookie (reference it as SESSION2 for now), if login is successful, otherwise it will return http status 401
- curl -i -X POST -H "X-XSRF-TOKEN: XSRF_TOKEN" -H "Cookie: XSRF-TOKEN=XSRF_TOKEN; SESSION=SESSION" -H "X-Schema-Ids: schemaId1:schemaId2:etc" -H "Authorization: ApiKey
- Call again the request for XSRF_TOKEN, but add there a header with new SESSION2.
- curl -i -X GET -H "Cookie: SESSION=SESSION2" localhost:8080/xsrf
- the result will be new xsrf token in set-cookie header - reference it as XSRF_TOKEN2 for now
- You are now logged in and have SESSION2 and XSRF_TOKEN2, which now should be part of each request to Connect APIs.
- Verify you are logged in, dont forget to add specified headers and cookies.
- curl -i -X GET -H "X-XSRF-TOKEN: XSRF_TOKEN2" -H "Cookie: XSRF-TOKEN=XSRF_TOKEN2; SESSION=SESSION2" localhost:8080/rest/user/signedInUser
- This should return 200 and body with “userName”
- curl -i -s -X POST -H "X-XSRF-TOKEN: XSRF_TOKEN2" -H "Cookie: XSRF-TOKEN=XSRF_TOKEN2; SESSION=SESSION2" localhost:8080/rest/admin/broadcast?message=your_test_message
- This command should display your test message in Connect interface
Script example below can be used do the work above in once:
#!/bin/bash
APIKEY=${APIKEY} #!create APIKEY and replace the variable.  Value example: "TWOZbOytM0QibA5AGglduOmLWbVBfCv9"
SCHEMA_IDS=${SCHEMA_IDS} #!schema_id is taken from the Connect URL.  Value example: "6A61706F6E65635F74657374696E67"
CONNECT_URL=${CONNECT_URL} # your_server_address:<PORT> Value example: localhost:8080

echo "getting first xsrf token"
curl -i -s ${CONNECT_URL}/xsrf > xsrf1response.txt
XSRF_TOKEN=$(cat xsrf1response.txt | grep "XSRF-TOKEN=" | cut -d '=' -f2 | cut -d ';' -f1)
SESSION=$(cat xsrf1response.txt | grep "SESSION=" | cut -d '=' -f2 | cut -d ';' -f1)
echo "calling login with token ${XSRF_TOKEN} and session ${SESSION}"
curl -i -X POST -H "X-XSRF-TOKEN: ${XSRF_TOKEN}" -H "Cookie: XSRF-TOKEN=${XSRF_TOKEN}; SESSION=${SESSION}" -H "X-Schema-Ids: ${SCHEMA_IDS}" -H "Authorization: ApiKey ${APIKEY}" ${CONNECT_URL}/api-key-login > loginresponse.txt
echo "extracting SESSION from login response"
SESSION=$(cat loginresponse.txt | grep "SESSION=" | cut -d '=' -f2 | cut -d ';' -f1)

echo "getting new xsrf token using the new SESSION ${SESSION}"
curl -i -s -H "Cookie: SESSION=${SESSION}" ${CONNECT_URL}/xsrf > xsrf2response.txt

XSRF_TOKEN=$(cat xsrf2response.txt | grep "XSRF-TOKEN=" | cut -d '=' -f2 | cut -d ';' -f1)

echo "calling getSignedInUser with new token ${XSRF_TOKEN} and session ${SESSION}"
curl -s -X GET -H "X-XSRF-TOKEN: ${XSRF_TOKEN}" -H "Cookie: XSRF-TOKEN=${XSRF_TOKEN}; SESSION=${SESSION}" ${CONNECT_URL}/rest/user/signedInUser
printf "\n"
echo "trying to send admin broadcast message with new token ${XSRF_TOKEN} and session ${SESSION}"

curl -i -s -X POST -H "X-XSRF-TOKEN: ${XSRF_TOKEN}" -H "Cookie: XSRF-TOKEN=${XSRF_TOKEN}; SESSION=${SESSION}" ${CONNECT_URL}/rest/admin/broadcast?message=test
Notes:
Usage of API keys is logged in the log. All unsuccessful login attempts are logged as well.
Each key has also date and time of its last usage stored in the database, it can be used for audit purposes.