Choral Installation of AWS Oracle RDS and Fargate
This document describes the necessary tools and steps needed for the installation of JChem Choral in AWS RDS and Fargate environment.
Architecture
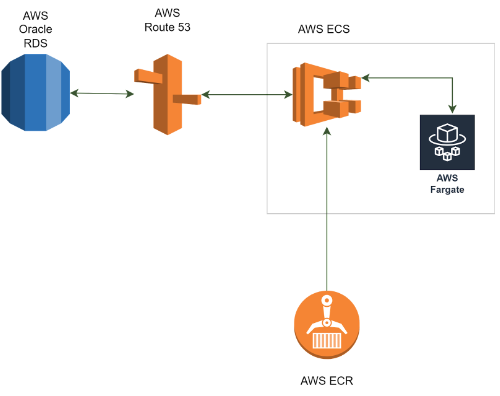
\">
Prerequisites
- Oracle RDS with Admin password
- AWS rights
- Local or EC2 Instance (AppServer) with
- Java (Java 17 jre for JChem Choral versions above 23.5)
- AWS CLI
- Docker
- Terraform
- SQL Client, e.g. SQLDeveloper
- AppServer connection to Oracle RDS
- Familiarity with
- AWS RDS, Fargate, ECR, ECS, Security groups, CLI
- Terraform
- Docker
An RDS database running with a user that the Choral service can use to create its backend data. In this docs this user will be referred to as <RDS user> and <RDS password>.
Fargate service CPU and memory capacity is limited, you can check if the suggested values do not exceed Fargate’s capacity. If memory seems insufficient, you can uncheck caching options to lower memory requirements. If it still exceeds Fargate’s capacity then our recommendation would be to run Choral service in an EC2 instance as it is described in this documentation.
Installation steps
The installation is twofold, we fake the application service for initialization
using a local or EC2 instance. We create the application service in Fargate
which will serve the database and replace the local fake application service
with this one.
During the installation we make the following steps:
- Local initialization of the Choral service without SQL script execution
- Set up and start Choral ECS
- Finish Choral configuration steps in AWS RDS
1. Local initialization of the Choral service without SQL script execution
The first (partial) installation of Choral will be executed here. RDS is set as database and a local machine or an EC2 instance is applied for the application service.
RDS instance is accessed by the local machine or by the EC2 instance.
Use SQLdeveloper.
The application service is initialized by the without SQL script execution (8b) method.
-
Have Oracle RDS in place
- have its ADMIN password and SID
-
Create indexuser with indexuserpassword
CREATE USER <RDS_USER> IDENTIFIED BY <RDS_PASSWORD>; GRANT connect, resource to <RDS_USER>; GRANT unlimited tablespace to <RDS_USER>;Example:
CREATE USER indexuser IDENTIFIED BY indexuserpassword;
GRANT connect, resource to indexuser;
GRANT unlimited tablespace to indexuser;
-
Local or EC2 (AppServer) installation of the service
- Connection to RDS is OK (tunnel)
-
configure config/choral.conf in order to store index in Oracle by adding the following lines:
# write back to oracle
com.chemaxon.jchem.psql.scheme=gcrdb
com.chemaxon.jchem.psql.gcrdb.isSingleTable=true
com.chemaxon.jchem.psql.gcrdb.singleTableName=engine_data
com.chemaxon.jchem.psql.gcrdb.sqlBuilderProvider=ORACLE
com.chemaxon.jchem.psql.gcrdb.jdbcUrl=jdbc:oracle:thin:@localhost:1521/<SID>
com.chemaxon.jchem.psql.gcrdb.user=<RDS_USER>
com.chemaxon.jchem.psql.gcrdb.password=<RDS_PASSWORD>
-
and configure config/application.properties by overwriting the default values of choral.init.oracleUrl and choral.init.grantingUser
localhost is set below since the RDS is tunneled
- Memory settings
- License file, see step 5
- Molecule type, see step 7
-
Initialize server without SQL script execution
2. Set up and start Choral ECS
This step serves for the docker image creation, and uploading it to ECR, then finally starting a choral ECS using the image.
-
Download the required files
- Download the terraform scripts (choral-fargate.tar.gz or choral-fargate.zip) required for the following two steps here.
- Download a Choral .tar.gz Linux installer matching the version of choral that you initiated the service with in step 1.
- Copy the Choral .tar.gz file into the Docker subdirectory in the choral-fargate directory, and rename it to choral.tar.gz.
-
Setup terraform.tfvars
- Set all variables according to your aws environment
- Refer to README.md Inputs section if the function of some variables is unclear
-
Add parameters to SSM Parameter Store
- Refer to README.md Add new SSM parameter section for examples on how to add the license url, db user and db password parameters to the SSM Parameter Store
- License URL does not need to be escaped
- Set db user and db password to <RDS_USER> and <RDS_PASSWORD>
- You can check that the parameters are available under the correct SSM name on the AWS online interface under AWS Systems Manager>Parameter Store
-
Create Docker image and upload to ECR
- Set the correct ECR repository name, tag and choral version in main.tf in the Docker subdirectory inside the choral-fargate directory
- Open a command line interface and navigate to the Docker subdirectory inside the choral-fargate directory
-
Run
-
(Optional) You can check the actions the script will perform before performing them with
-
Run (on Linux)
-
Run (on Windows)
- You can check that the image is available in ECR on the AWS online interface under Elastic Container Registry>Repositories
-
You might need to manually log into your ECR with docker in order for the terraform script to work. An example of how this can be done using CLI:
-
Setup AWS environment and choral ECS
- Navigate to the choral-fargate directory in the command line interface
-
Run
-
(Optional) You can check the actions the script will perform before performing them with
-
Run
- The RDS security group to allow back and fourth communication with Fargate will be generated but the security group won't be assigned to the RDS automatically, however the command to do so will be printed after the script finishes, run that command or manually assign the security group to the RDS, an example command can be found in README.md under the Add new security group to RDS section
- The Fargate_Route_name that has to be used in the next step will also be printed after a successful terraform script run as Route53 record name
3. Finish Choral configuration steps in AWS RDS
During this step SQL scripts for finishing the Choral configuration must be executed.
RDS is tunneled.
Use SQLdeveloper. The SQL scripts to be run are available in <choral_home>/sql/ folder.
- Find the name of the router (Route 53 -> Hosted Zones -> Records) that handles the Fargate cluster (you can also find information about which target group the Fargate service was registered to in the Fargate service’s Deployment > Events tab), this will be referred to as Fargate_Route_name
-
Modify 2_http.sql
Example:
-
Execute as Admin user in RDS (scripts work on SQLDeveloper but not in SquirrelSQL or DBeaver)
- install_system.sql
or
- 1_createUser.sql
- 2_http.sql
-
Modify 5_indextype.sql
Example:
-
Execute as CHORAL_OWNER user in RDS (scripts work on SQLDeveloper but not in SquirrelSQL or DBeaver)
-
install_choral.sql
or
- 3_choral_settings.sql
- 4_logger.sql
- 5_indextype.sql
- 6_choral_idxstat.sql
- 7_choral_assoc_stats.sql
-
- Test the installation by running 8_smoke_test.sql as CHORAL_OWNER.
Performance
By nature of the AWS Fargate service, it is not suitable for running performance intensive tasks consistently, because it is impossible to achieve a guaranteed level of performance, instead it varies greatly, even when using the same configuration of CPU and memory.
In case consistent performance is desired, we suggest to install the Choral Server on a non-burstable EC2 instance, as described on the Installation Choral on Amazon Oracle RDS and EC2 page.
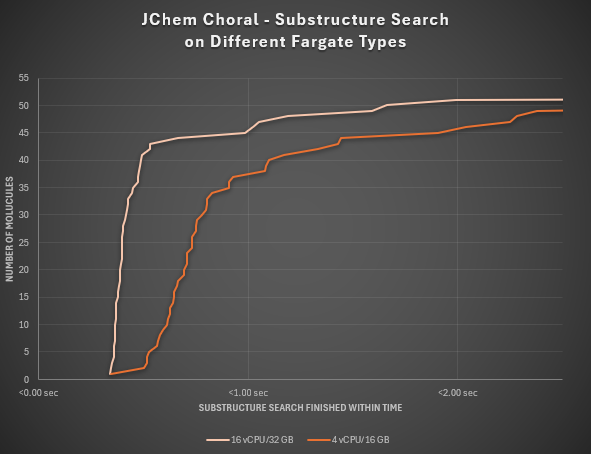
Substructure search performance
Choral on AWS has undergone comprehensive testing under two different Fargate task types to evaluate the substructure search performance for a set of 52 varied query molecules within a table containing 1.5 million records.
In the case of an average Fargate type of 4 vCPU and 16 GB memory, 71% of the queries have finished in under 1 second. After choosing a stronger Fargate type of 16 vCPU and 32 GB memory, 87% of the queries have ended up giving results under 1 second.
For every search a limit of 100 has been used. The RDS instance type for both tests was: db.m6i.xlarge (4 vCPU/16 GB).