The Schema Editor
The Schema Schema Editor is the expert tool for managing your IJC database. Most simple operations can be performed without needing to use the Schema Editor, but in some cases it may be easier to use the Schema Editor, and some advanced operations can only be performed using it.
The Schema Editor allows you to manage your current IJCEntities and Fields, as well as to add any existing database artifacts that are not yet known to IJC. In this way it lets you incorporate data from an existing database into IJC.
Schema Editor overview
The Schema Editor contains an explorer component on the left and an editor component on the right. In simple terms you select the appropriate item in the explorer, and make changes by one of these approaches:
-
Making changes in the editor and clicking the Apply button
-
Using the buttons in the Schema Editor toolbar
-
Using the right click popup menu which is present in many places
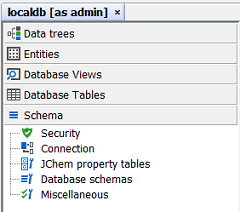
The explorer panel on the left has 5 tabs:
-
Schema - properties and settings for the schema itself
-
Data Trees - A list of the data trees in the schema and the data hierarchy of each data tree
-
Entities - each entity in the schema, plus the fields and relationships for that entity.
-
Views - details of the database views
-
Tables - details of the database tables
Explorer panel:
Each outlook bar shows the items relevant to that type in the explorer as top level nodes. The child nodes for each item depend on the type of item.
Explorer contents
An item in IJC usually represents something in the database. For instance:
-
An Entity represents a database table
-
A Field represents a database column
-
A Relationship represents a foreign key constraint and is used to define the relationship between two Entities
When an object is created in IJC the database artifact is created and IJC is made aware of this together with any additional data that is needed about the item. But what happens if the database artifact has not been created by IJC? In this case IJC will not possess the additional information it needs about it to be able to manage it. This may be the case if you have connected to a database that already has tables in it that were created by other means. The Schema Editor lets you see these artifacts and "promote" them into IJC so that it can manage them. When you do this you need to provide the missing information to IJC so that it knows how to handle them.
Performing operations in the Schema Editor
There are a number of general approaches to performing operations in the Schema Editor that apply to most item types.
-
Locate the item in the appropriate explorer, right click on it and choose the appropriate option from the popup menu. Examples:
-
Locate an Entity in the 'Entities' tab, right click on it and select 'Delete' from the popup menu.
-
Locate a table in the 'Tables' tab, right click on it and select 'Promote to Entity'.
-
-
Locate the container for the promoted item type in the appropriate explorer, right click on it and choose the appropriate option from the popup menu. The container can either be a container node, such as theFields container of the Entity node, or for the top level elements it is the empty space at the bottom of the explorer. Examples:
-
Right click on the 'Fields' container of the Entity node, right click on it and select 'New standard field...' from the popup menu.
-
Right click on the empty space in the explorer of the 'Entities' tab and select 'Promote table' and choose from the list of un-promoted tables that are presented.
-
-
Select the item in the appropriate explorer and use the appropriate icon in the Schema Editor toolbar. Examples:
-
Select a table in the 'Tables' tab and click on the 'Promote to Entity' (
 ) button in the toolbar.
 -
Select the 'Fields' container of an Entity node and click on the 'New standard field...' button (
 ) in the toolbar.
-
Creating artifacts
The most common approach in IJC is to create a new IJC item simultaneously creating the corresponding artifact in the database. The following types can be created in the Schema Editor:
-
Create an Entity along with its corresponding database table(s)
-
Create a Field along with its corresponding database column(s)
-
Create an Relationship along with its corresponding Foreign Key (and for many-to-many relationships a join table)
-
Add an index to a database table, specifying the column(s) for the index
Once you commence the 'create' process a dialog or wizard will appear to guide you through the process.
Deleting artifacts
An item in IJC schema can usually be deleted. Deletion can have two different meanings:
-
Remove the item (e.g entity) from IJC but leave the underlying item (e.g table) in the database.
-
Remove the item from IJC and also delete the underlying item from the database.
Both of these are supported, and you choose which option you want when you are asked to confirm the deletion. IJC remembers your last choice for this setting (prior to IJC 5.3.2 delete from DB was checked by default). Choose wisely!
Promoting artifacts
When you have an artifact that is not yet part of an IJC schema you may be able to promote it into IJC. The following can be promoted:
-
Database tables to Entities
-
Database views to Entities
-
Columns to Fields
-
Foreign Keys to Relationships
Once you commence the 'promote' process a dialog or wizard will appear to guide you through the process. The process of connecting IJC to an existing database is described in more detail in the Using existing database tables help page.
Manage Schema
The schema tab contains properties for the schema itself. Select the appropriate category to see and edit the settings:
- Security
You can define or edit the security settings here. See the Changing Security Settings documentation for more details.
- Connection
Properties of the database connection.
- JChem property tables
A JChem database needs a Property Table which is needed to store various information about the JChem structure tables. By default a single property table named JCHEMPROPERTIES is created when the IJC schema was originally created, and this is sufficient for most purposes. However it is possible to use a different table name, or to to use multiple property tables.
{primary} This is not recommended unless you have a specific reason for needing to do so.
To manage JChem property tables do the following:
- Switch to the 'Tables' tab and click on the 'Manage JChem property tables' icon (
 ) in the Schema Editor toolbar. The editor will open.
 -
Add or delete a property table using the appropriate buttons.
{primary} You can only delete a property table if it does not currently manage any JChem tables. Delete the JChem tables before deleting the property table.
{warning} Do not delete JChem tables directly from the database or the information in the property tables will become inconsistent. Always delete them using IJC which will ensure that the property table is updated appropriately. Property tables can also be managed using other Chemaxon tools such as JChem Manager. However, avoid doing this for databases used by IJC or the information may become inconsistent.
- Database schemas
On Oracle you can make additional database schemas accessible to IJC. See the Support for multiple database schemas page for more details.
- Miscellaneous
Other schema related settings:
-
Turn off initial data retrieval. Avoids generating an initial hit list when you first use a view. This can be helpful for large tables where the generation of the complete hit list can take some time. You must first run a query before you can see any data.
-
Enable event logging. Allows important events like changes to the database structure, or queries being executed to be written the log tables in the database.
-
Loading of database information. Provides different ways for loading the database information that IJC needs on startup.
There are 3 options for how the database information is retrieved on startup.
-
Load on start. Information for all tables that IJC is currently using is retrieved when IJC starts.
-
Load as needed. Nothing is loaded until it is needed.
-
Caching. Information for tables is cached along with the IJC schema information (in the IJC_SCHEMA database table) and used next time instead of being loaded from the database meta data or data dictionary tables. This should only be used when your database is not changing as the cached information would not be updated. To avoid this, when you connect to the IJC schema in "single user mode" you are automatically taken out of caching mode.
Whether 'Load on start' or 'Load as needed' is faster will depend on lots of factors, and you should experiment to see which is faster for you. Cached should be faster, but you should again check that this is indeed the case, and you should only use cached when you are not wanting to make changes to the tables or views in the database (editing data is fine, but creating or dropping tables, views or columns etc. is not).
-
-
'Position of the empty (NULL value) fields in ordered results' from database
- 'Database default behaviour' means that IJC respects original database behaviour
- 'Last' means that empty values are listed at the end
- 'First' means that empty values are listed first
The position of fields that have empty values in the ordered result list.
-
Built it Schema login/logoff script. It is possible to execute Groovy script syntax on commencement of login to a schema and/or when logging out of a schema. The first built in closure (execution block)
on_connectis synchronous with the schema initialization process. Any code added to this closure will become part of that sequence of events. Some default implementation is given (which can be uncommented and works best with a security policy in place!) which will display a dialog with the username displayed.The second closure,
on_disconnectis synchronous with the schema disconnect process and again a default implementation of a simple dialog is provided. You might wish to provide your own implementation of code within these closures but blocking the initialisation of the schema should be avoided. If possible start an asynchronous thread and always catch exceptions else they may go astray. A further Groovy example is given below the "default contents" screenshot.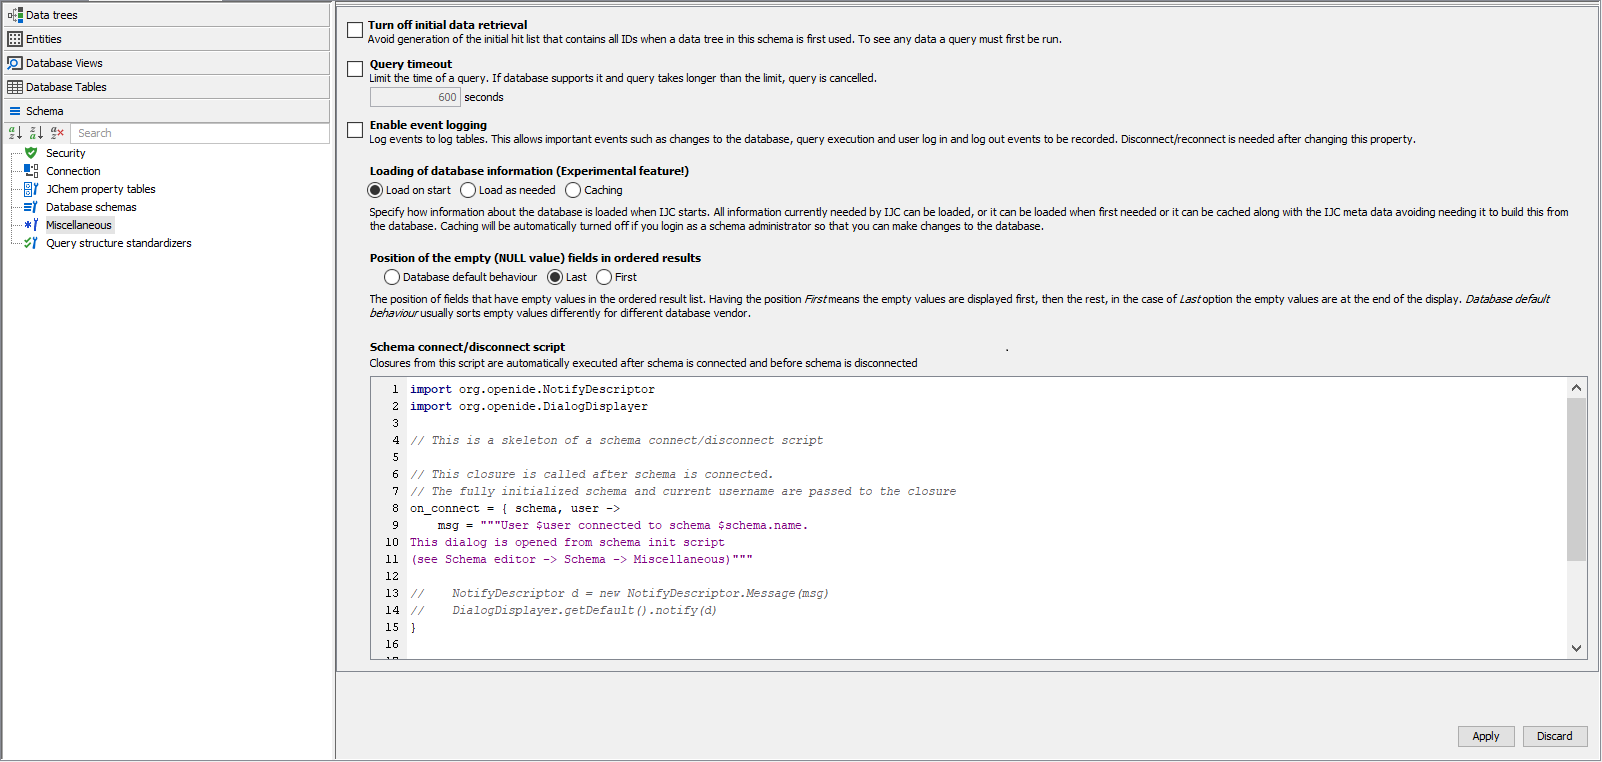
In this example we add the additional code to the default in order to write some data to a log table.
import groovy.sql.Sql on_connect = { schema, user -> Thread.start{ logger(schema, user) } } logger = { schema, user -> try { Sql sql = new Sql(schema.databasePlatform.dataSource); (1..100).each { sql.eachRow('select * from log') {row -> println "${it}"} sql.execute("insert into log (messages) values (${it})"); } sql.close(); } catch (exception e) { println e.getMessage(); } } -
Additionally to login/logoff script, Java service implementing DFSchemaInitHandler can be used to run custom behavior on schema connect/disconnect. Make sure to annotate the Java class with
@ServiceProvider(service = DFSchemaInitHandler.class)for IJC to find it. For example implementation see javadoc in DFSchemaInitHandler.
-
Query timeout: In the version 21.10.0 the possibility to set the query length timeout has been added. The Query timeout schema attribute is being used to indicate the length of time (in seconds) that IJC waits for a query to complete. If the time required for completing a query exceeds the value determined in Query timeout, an exception is thrown, and the query is cancelled. The setting takes effect on all queries executed on the particular schema. By default, no time limit is set on query execution since the Query timeout option is turned off.
Manage Entities
Entities can be added and removed from IJC using the Entities tab of the Schema Editor.
-
Entities can be created, along with their corresponding database table(s)
-
Entities can be promoted from a database table (or view) that is not currently used by any other entity
-
Entities can be deleted. You are asked to confirm whether you want the database table to be deleted from the database.
See the Editing Entities page for more details about creating Entities.
Manage Fields
Fields can be added and removed from IJC using the Schema Editor.
-
Fields can be created, along with their corresponding database column
-
Fields can be promoted from a database column that is not yet used by a Field.
-
Fields can be deleted. You are asked to confirm whether you want the database column to be deleted from the database.
See the Editing Fields page for more details about creating Field.
To delete an index in the Schema Editor:
-
Find the index under the Indexes node of a table in the 'Tables' tab.
-
Right click on the index and choose 'Delete...'.
{primary} Not all indexes can be delete as some are required by the tables or foreign keys in the database.
Manage Relationships
Relationships define associations between entities.
Relationships can be added and removed from IJC using the Schema Editor.
-
Relationships can be created, with or without a corresponding foreign key constraint in the database.
-
Relationships can be promoted from a foreign key constraint that is not currently used by the entity the field belongs to.
-
Relationships can be deleted. You are asked to confirm whether you want the foreign key to be deleted from the database.
See the Editing Relationships page for more details about creating Relationships.
Manage Tables & Views
Tables & Views provide the source objects for IJC entities.
Tables are added to your database automatically when a new datatree or entity is created. It is best practice for the users of IJC to manage tables and views via managing the entities. It is also possible to integrate existing tables or views in a database schema but after new additions (for example using SQLPLUS) you will need to disconnect / reconnect from IJC in order to then view them in IJC.
-
Tables can now be dropped from the database schema directly from IJC. This is really only required for orphaned tables i.e. tables that have no equivalent entity in the schema (or indeed a requirement for it). You cannot drop a table or view used by an entity.
-
Tables and Views not associated with an entity, but are required can be promoted to entities if they do not exist and their columns promoted to fields for existing entities.
-
You can now create indexes on tables directly within IJC.
Promotion and use of existing database tables is described in Using existing database tables.
Manage Indexes
Indexes provide the database with a much faster way to find values in a database column. Situations where adding an index will be beneficial (or not) are listed in the Performance tips tips and tricks page.
Please consult your database administrator if you are not clear about indexes.
To add an index in the Schema Editor:
-
An index can be added using any of these approaches:
-
Switch to the tables tab of the Schema Editor and find the table to which you want the index adding. Select its 'Indexes' child node and choose the 'New Index...' item from its right click popup menu
-
Locate a field whose column you want an index adding to in the 'Entities' or 'Data Trees' tab and choose the 'New Index...' item from its right click popup menu.
-
Select an Entity or Field in the 'Entities' tab and click on the 'Add index' icon (
 ) in the Schema Editor toolbar. The New Index dialog will open.
-
-
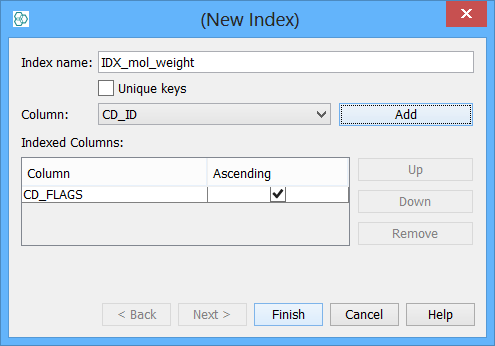
Specify the column(s) that will be indexed. If you started the dialog with a Field selected then IJC will assume you want to add an index to the column used by that Field. If you had an Entity selected you need to specify the columns yourself. You add a column by selecting it from the 'Column' combo box and clicking on the 'Add' button. It will be added to the list displayed in the table.
-
The currently specified column(s) can be changed by using the 'Up', 'Down' and 'Remove' buttons.
{primary} If the index contains multiple columns the order is important. Usually you will only want a single column in the index.
-
The order the column values are stored in the database can be changed from ascending to descending using the checkbox for the column in the table. Usually the default will be OK.
-
Specify a name for the index if the default provided is not satisfactory.
-
If you want the index to restrict the values for those columns to be unique (duplicate values are not permitted) check the 'Unique keys' checkbox.
-
Click on the 'Finish' button and the index will be added. Adding the index may take some time for large tables.