Markush Editor User Guide
- Markush Editor application
- Main menu and toolbar
- Panels and views
- Edit Markush structures
- Claim hierarchy
- Markush Composer
- Export to document
- Enumerate Markush structures
Markush Editor application
![]() Markush Editor is a desktop application for chemical patent drafting, suitable for creating and editing complex Markush structures and generating Markush claims. Markush Editor uses a graphical representation of the hierarchical nature of the R-groups in Markush structures. The structures (fragments) of an opened Markush file are identified, classified, and organized as a scaffold with attached R-groups to help you follow each nested structure. The application can be installed via the Markush Editor Installer. Short video tutorials demonstrating the main functionalities of the application are available here.
Markush Editor is a desktop application for chemical patent drafting, suitable for creating and editing complex Markush structures and generating Markush claims. Markush Editor uses a graphical representation of the hierarchical nature of the R-groups in Markush structures. The structures (fragments) of an opened Markush file are identified, classified, and organized as a scaffold with attached R-groups to help you follow each nested structure. The application can be installed via the Markush Editor Installer. Short video tutorials demonstrating the main functionalities of the application are available here.
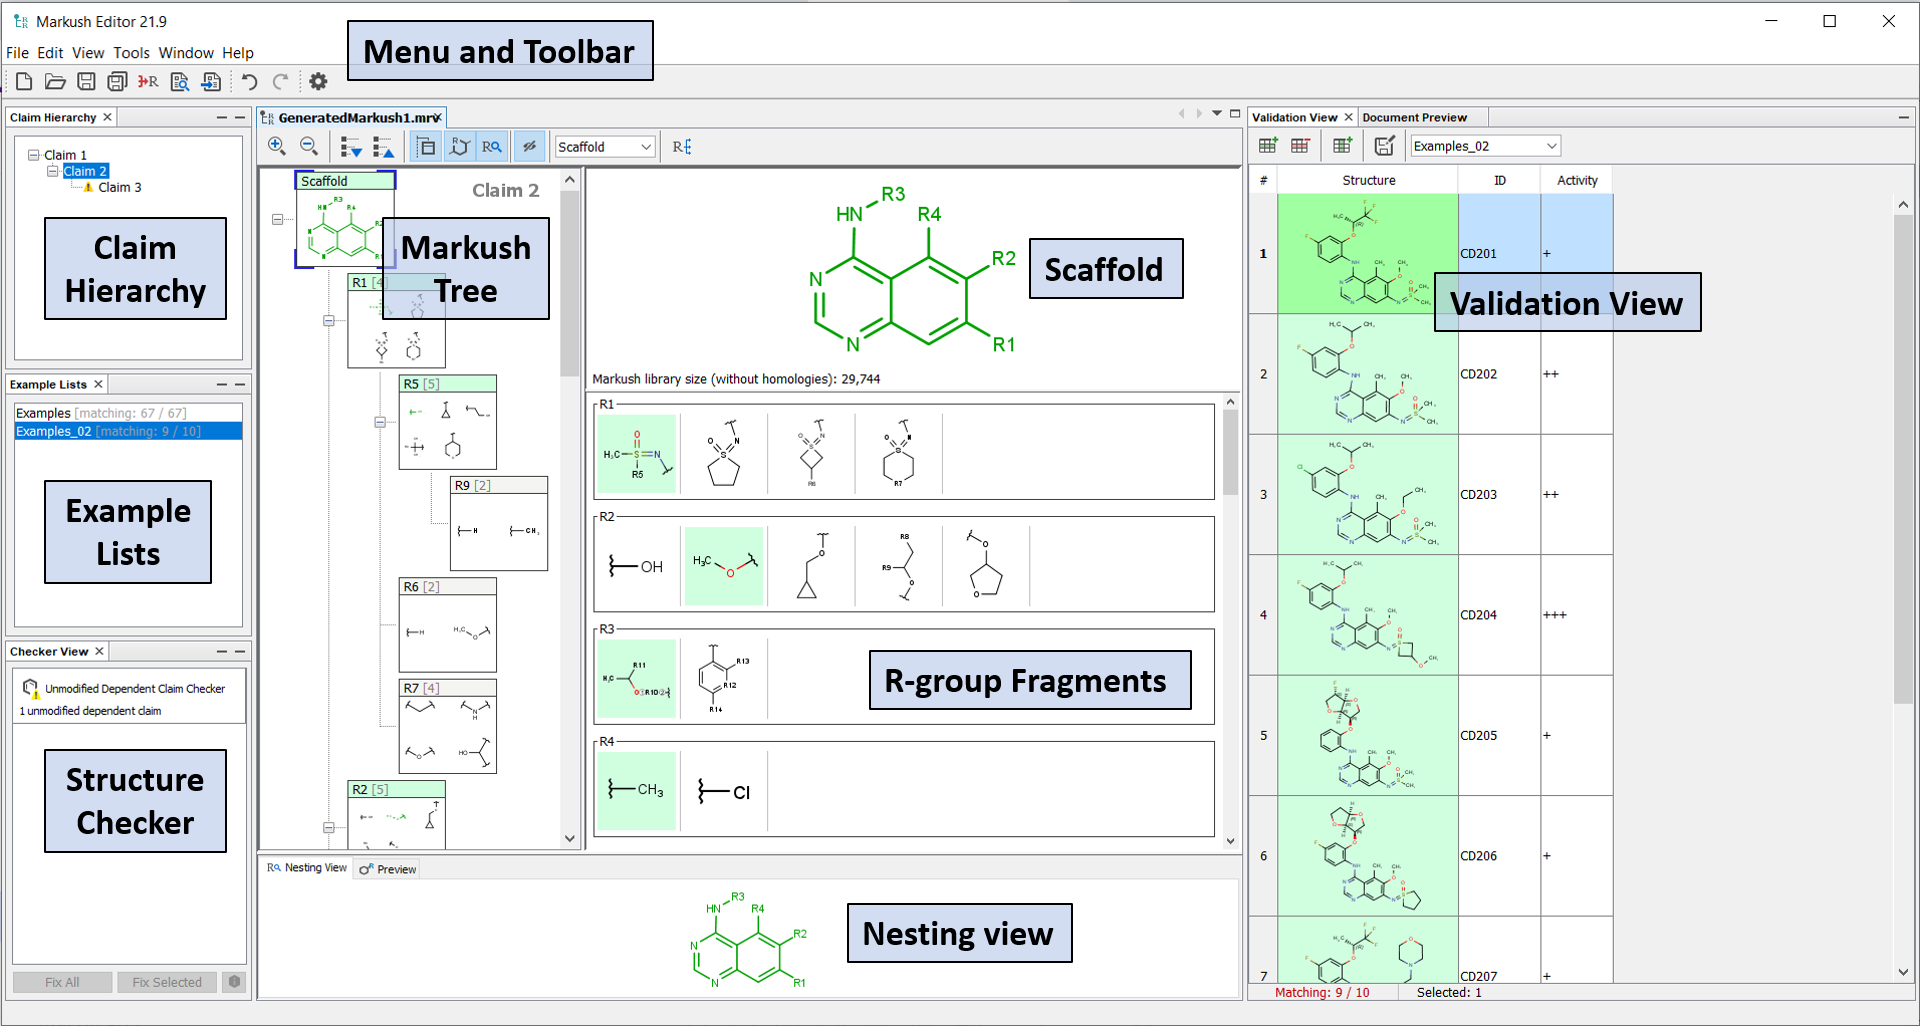
Main menu and toolbar
The main menu contains File , View , Tools , Window and Help elements.
-
File
- New,

- Open (Ctrl+O),

- Compose Markush Structure...,

- Save,

- Save As...,

- Save All,

- Export to document

- Exit.
- New,
-
View
- Show Only Editor (Ctrl+Shift+Enter)
- Full Screen (Alt+Shift+Enter)
-
Tools
- Plugins
- Options...

-
Windows
- Document preview

- Checker View
- Claim hierarchy
- Reset Windows
- Close Window
- Close All Documents
- Close Other Documents
- Documents...
- Document preview
-
Help
- Help (F1)

- Licenses...

- Check for Updates...
- About Markush Editor...
- Help (F1)

-
"Collapse molecule tree"
 Closes all nodes of the R-group tree. The default setting is off .
 -
"Expand molecule tree"
 Expands all nodes of the R-group tree. The default setting is off .
 -
"Toggle molecule display in tree"
 Expands the boxes of the tree to show the structure of the molecule. The default setting is on .
-
"Always display scaffold in Fragments"
 Displays the relevant scaffold of the selected R-group. The default setting is on .
 -
“Toggle displaying Markush inspection views”
 Shows Nesting view and Preview. The default setting is off.
 -
“Show/hide excluded Markush fragments”
 Displays excluded Markush fragments. Hide Excluded More Specific is set by default.
-
-
R-group search box: allows quick navigation the desired R-group of the Markush structure.
-
"Enumerate Markush structure"
 Open the Markush enumeration panel.
Panels and views
Markush Editor contains six main components by default. The windows for each component can be simply dragged and dropped around the screen and all of the components can be reorganized and resized. The default layout can always be reset from the Window dropdown in the main menu bar and selecting Reset Windows. Markush Editor also supports using multiple monitors.
-
Editor panel contains Markush tree, Scaffold and R-group fragments view;
-
Claim hierarchy contains your independent and dependent claims;
-
Example lists contains separate exemplified structure lists;
-
Structure checker displays the error and warnings related to your Markush structure or Claim hierarchy;
-
Validation view can display the validation status (matching or non-matching) of individual compounds against your Markush structure;
-
Markush inspection views (hidden by default);
Editor panel
The Markush structures of the opened file are organized and arranged in the Editor panel. In the tree view, the scaffold is presented on the first (parent) level of the tree, and the associated R-groups are classified as its children. The scaffold(s) and attached groups are denoted by named boxes. The parent level boxe is named as "Scaffold". Nested nodes are labeled according to the represented R-group definitions (e.g.: R1, R2,...Rn or the alias of the R-group if it has one), followed by the number of members. To view any scaffold or R-group definition, select the relevant node. The structure(s) of the chosen element will be presented in the fragment view. The selected items are highlighted in the tree view.
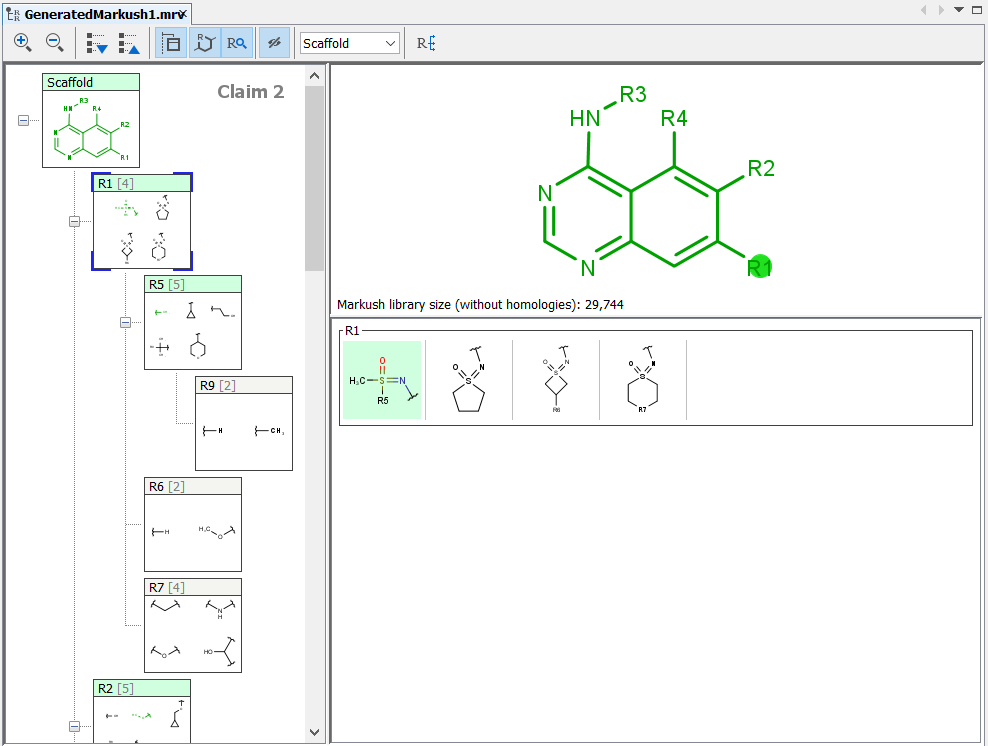
You can select more than one structure from the tree using Shift+Left-Click or Ctrl+Left-Click to display them in the View panel at the same time.
Note: Shift/Ctrl+Arrow keys work for selection as well.
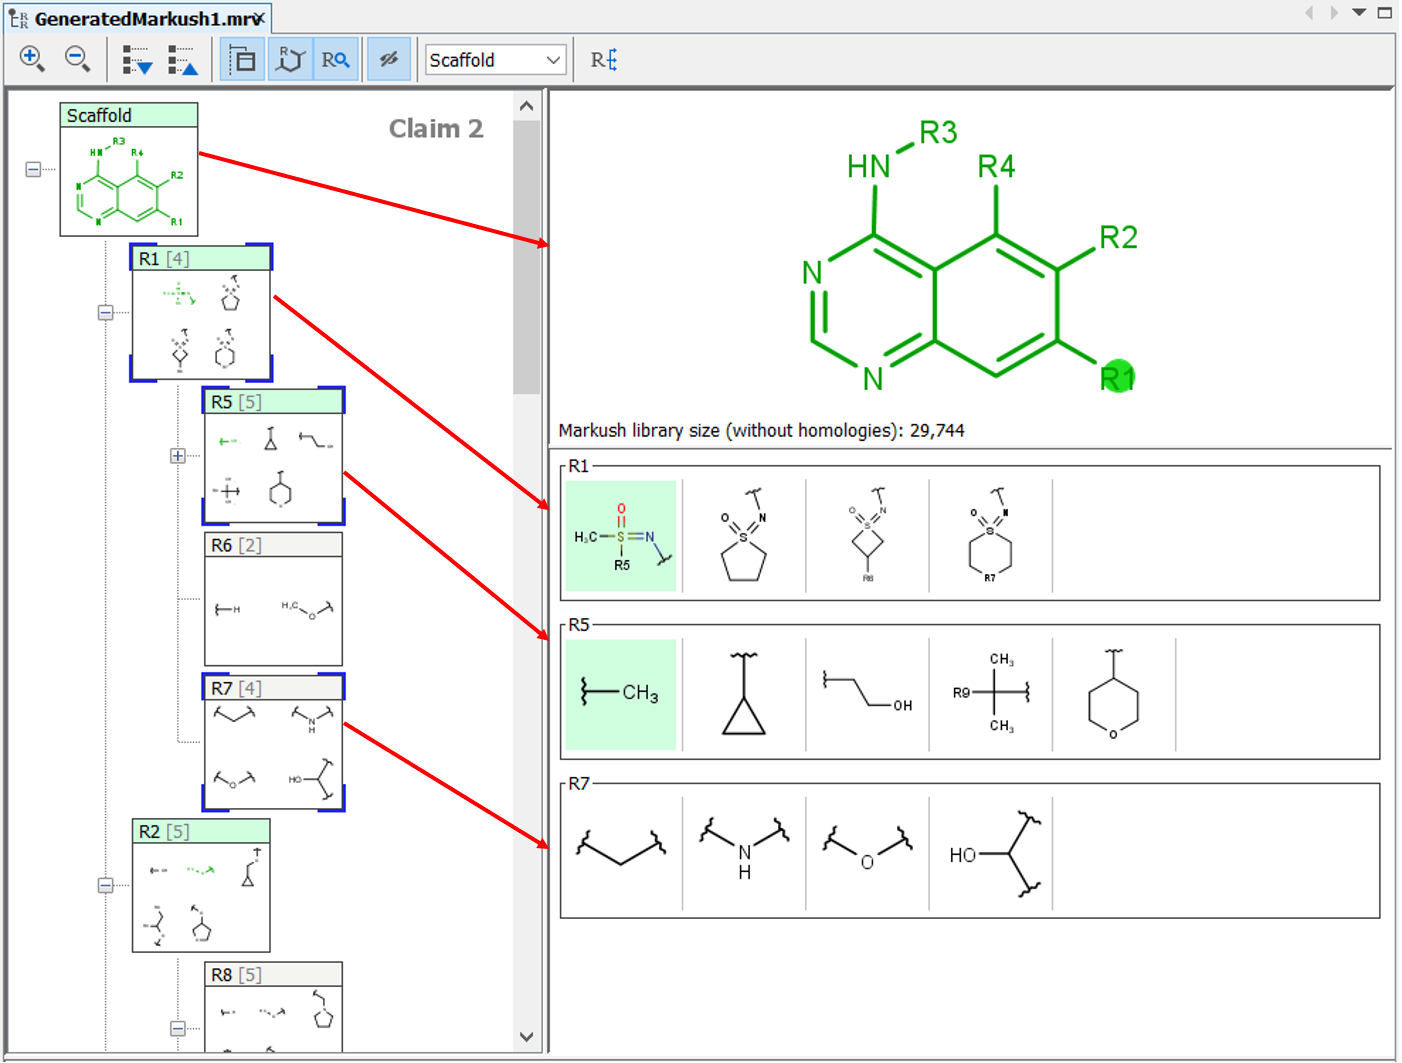
Expand the nodes of the Tree panel to show the fragments of each node.
Claim hierarchy panel
The Claim hierarchy panel allows to display and edit the Claim Tree, highlighting the currently edited claim. The claim hierarchy can be edited through the context menu by right clicking on an existing claim in the panel.
Example lists panel
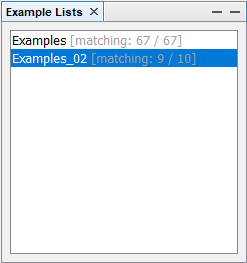
The Example lists panel shows the loaded exemplified structure sets, highlighting the currently displayed set. Example lists can be added, imported, renamed or removed through the context menu by right clicking in the panel.
The loaded example lists are saved together with the Markush.
Structure checker panel
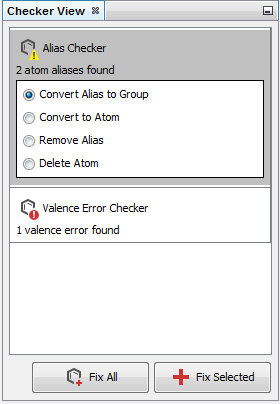
Structure checker panel displays the structure drawing errors and warnings related to the active editor component. In the case of an error, an exclamation mark appears in a red circle. In the case of a warning, a yellow triangle appears. By clicking on the checker items, you can choose between the available automatic fixer options. You can fix the issues one-by-one with the Fix Selected button or all together with the Fix All button.
Validation view panel
The Validation view panel can be used to check whether individual compounds match your Markush structure or not. Matching structures are highlighted by a green background, while non-matching structures are highlighted in red background. The number of matching structures is indicated on the bottom of the screen.
If any of the structures in the validation view are selected, the matching (green) and non-matching (red) R-groups and fragments are also highlighted in the Markush structure (in the scaffold view, the tree view, and the fragment view). In case of the Markush tree view, yellow color indicates that the scaffold or R-group is itself matching, but it uses non-matching (red) R-groups.
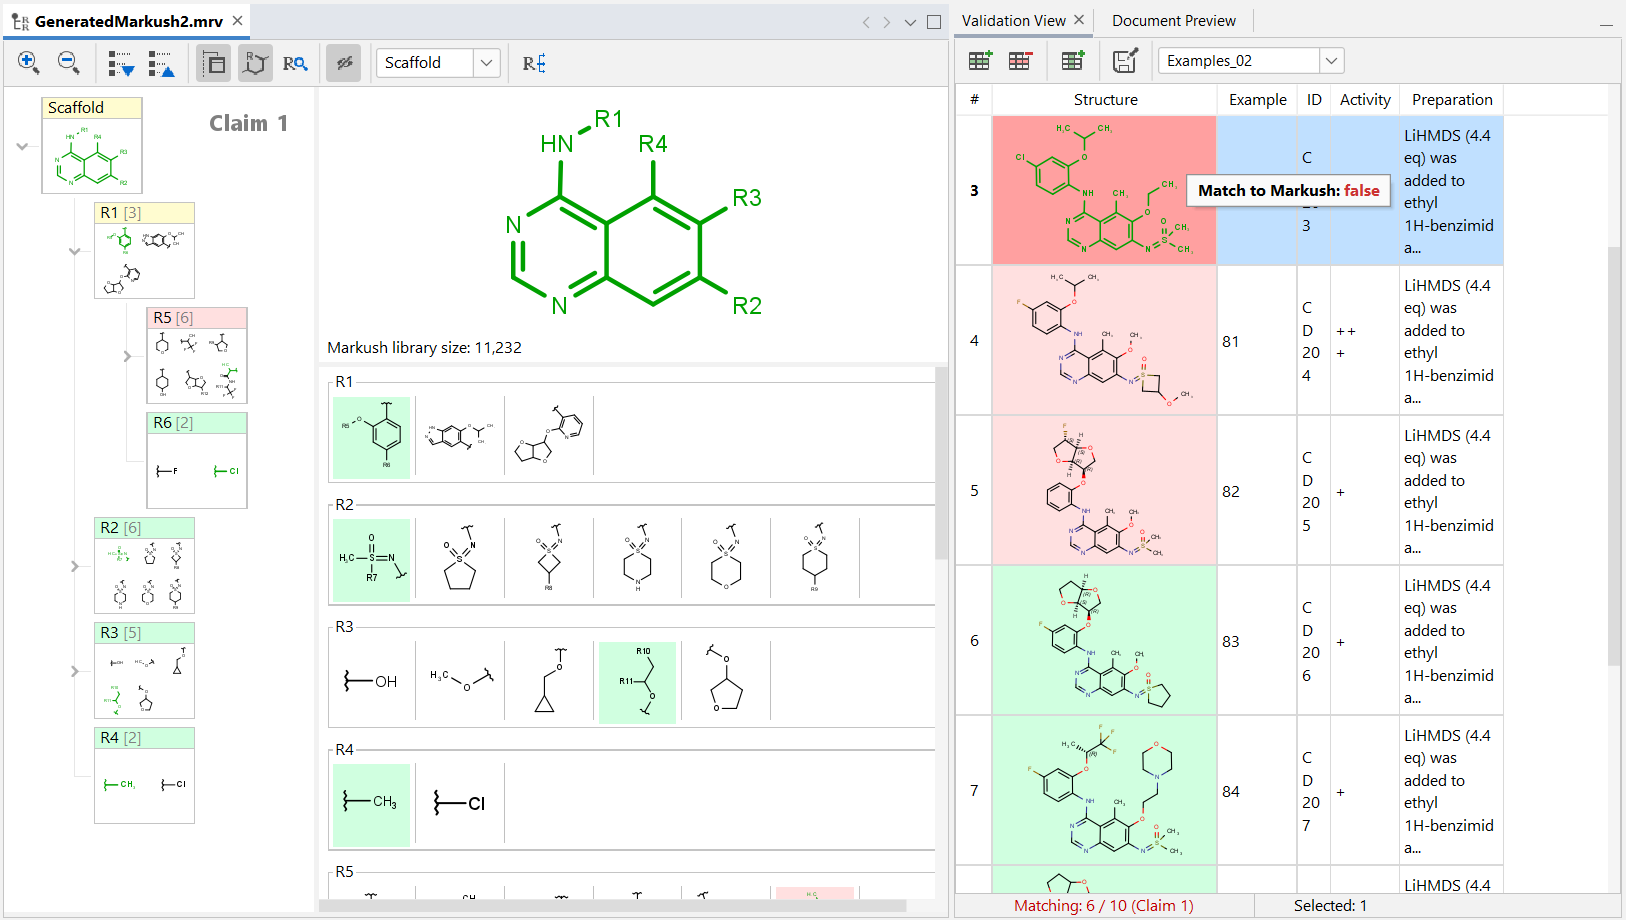
Validation view also shows any additional information contained in the input example file list (e.g: structure ID, activity…). The rows and columns of the Validation panel can be freely reorganized or resized. It is also possible to add or delete additional rows or columns. Sorting of the data is possible through clicking on the column names. In case of the structure column the examples will be sorted based on their matching status.
The orientation of the example structures can be aligned to the scaffold by selecting Align to Markush Scaffold... from the context menu after right clicking. From the popup window it can be chosen whether only the selected or all the structures will be rotated to match the scaffold orientation.
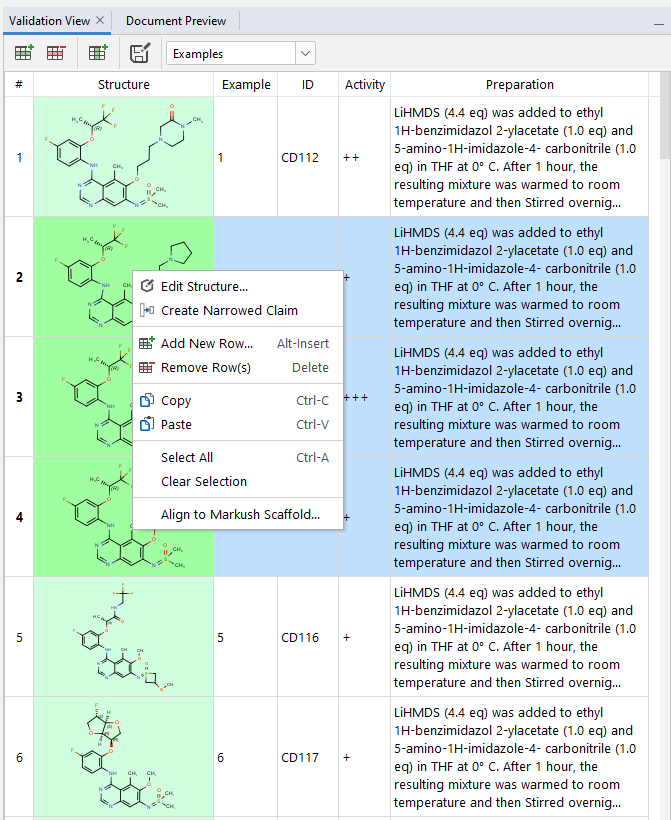
It is also possible to directly create a dependent claim covering only a selected number of compounds (they do not need to be consecutive) by using the Create Narrowed Claim option in the right-click context menu in Validation View.
Markush inspection views
Contains the Nesting view displaying the embedding of the selected R-group(s) and Preview displaying enumerated examples. This view is hidden by default and can be reached by pushing the ![]() button.
button.
The nesting view tab displays the step-by-step route of embedding of the selected R-group starting from the scaffold.

The preview tab displays enumerated examples (max. 4) of the selected R-group(s).
Edit Markush structures
This section contains a description of features specific to creating Markush structures and organizing them into claims. To learn more about editing Markush features visit Marvin Sketch (the built-in chemical editor of Markush Editor) documentation.
Create Markush structure
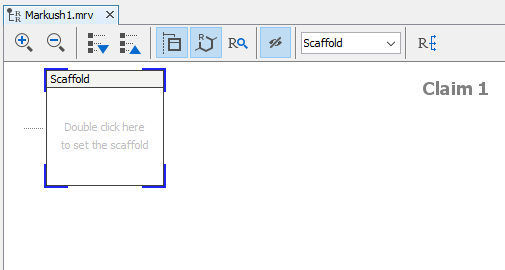
If you would like to create a Markush structure based on existing compounds, check the Markush Composer section. If you want to create a new Markush structure from scratch, click on the New icon,  in the toolbar or select New from the file menu. A new empty scaffold definition appears, and you can draw your scaffold in the previously described way.
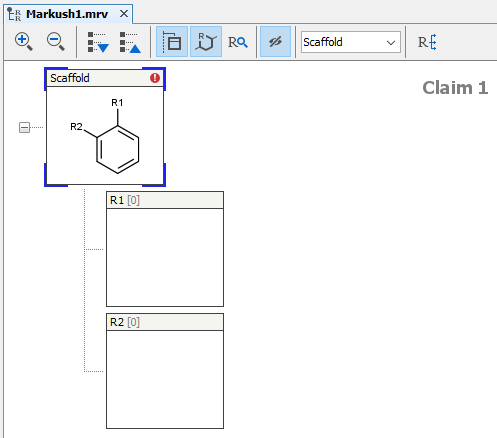
The scaffold can be edited like any R-group definition (see next section). To expand your structure, add R-groups to your scaffold and after saving it, new empty R-group definitions appear and you can continue editing.
Edit R-groups and fragments
You can edit R-group definitions or individual fragment definitions by right-clicking or double-clicking on the tree node or the selected fragment. From the context menu, you can select the Edit function or you can add new fragments or remove existing ones.
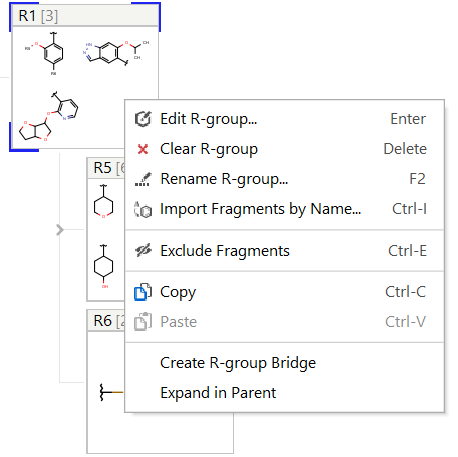
Edit R-group definitions from the context menu
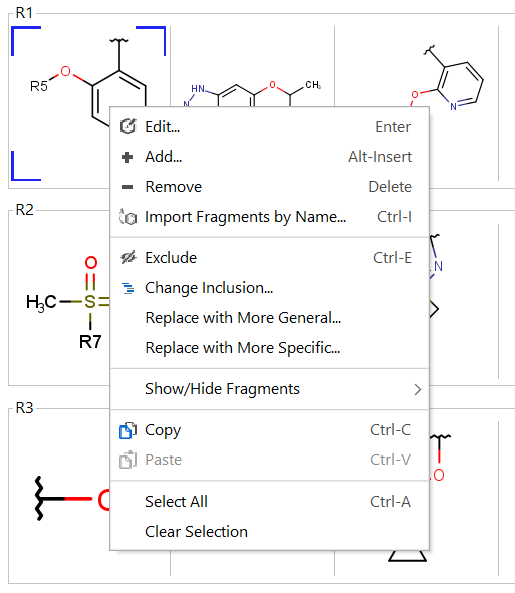
Edit fragment definitions from the context menu
Fragment definitions can also be entered based on their name. In the right-click context menu the Import Fragments by Name... function allows to enter a chemical name, a homology name, SMILES or SMARTS (e.g. benzene or CC). The function can be reached with the Ctrl + I shortcut. Properties of homology groups are also recognized. It is also possible to consecutively add several different fragment definitions from one window as shown on the screenshot.

By double clicking on an existing fragment or an empty space in the Markush Tree a Sketch window opens with the selected definitions. After editing existing ones or adding a new definition selecting the "OK" buton will update R-group definitions in the bottom right corner of the sketch window, or dropped by pressing the "Cancel" button.
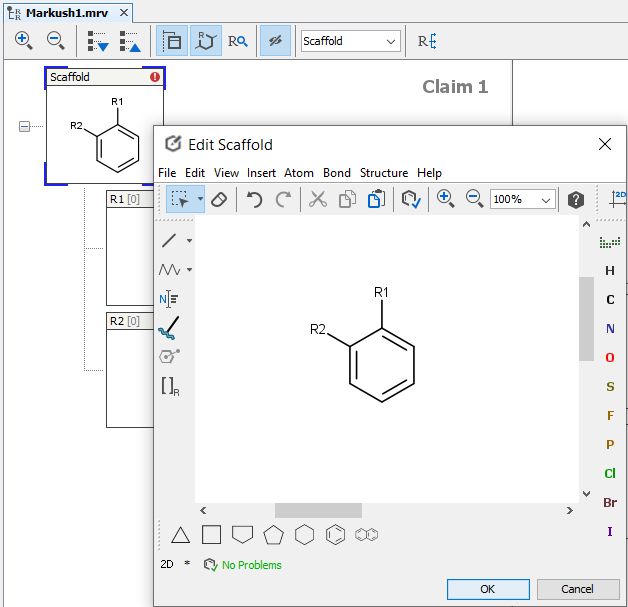
R-group bridging
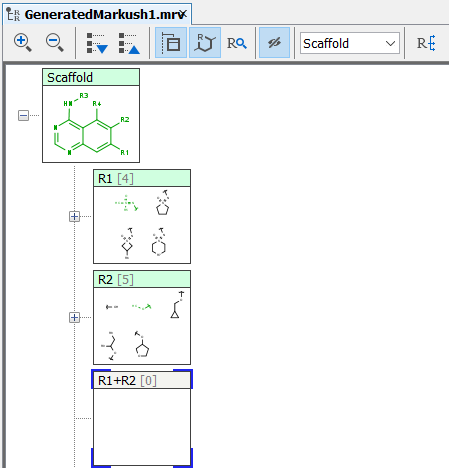
With R-group bridging, you can create connected R-group definitions. First, you need to select two R-groups (on the same level, with one attachment point, and only one occurrence in the parent structure) and after right-clicking on it, you can select the "Create Bridge" function. Currently, we do not support spiro rings with R-group bridging, that is, the two selected R-groups cannot be attached to the same atom.
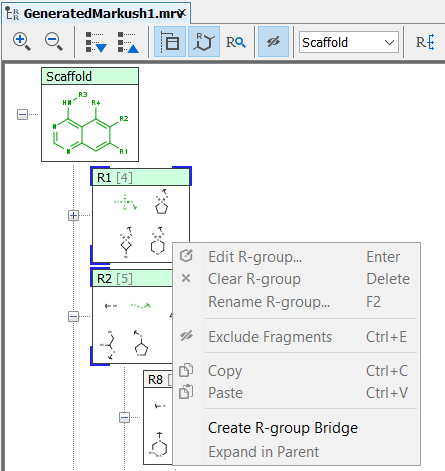
A new empty R-group definition appears with R(x) + R(y) label where x and y denote the number of the originally selected R-groups. You can add fragment definitions with two attachment points to this R-group.
Expand in parent
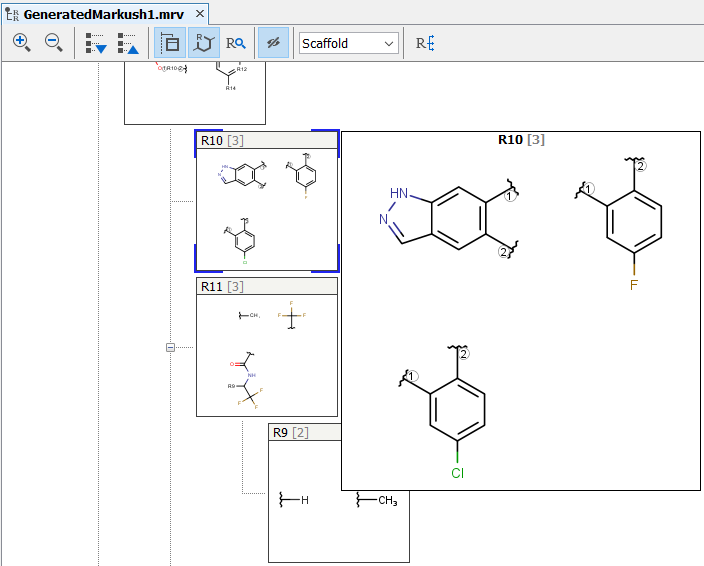
It is possible to expand a fragment definition by including all lower level definitions in fragments. In the example below fragment definition R10 (the parent) also contains a nested R11 group. By selecting Expand in parent from the context menu by right clicking on R11 in the claim tree all definitions of R11 will be enumerated in R10 thus expanding its definition.
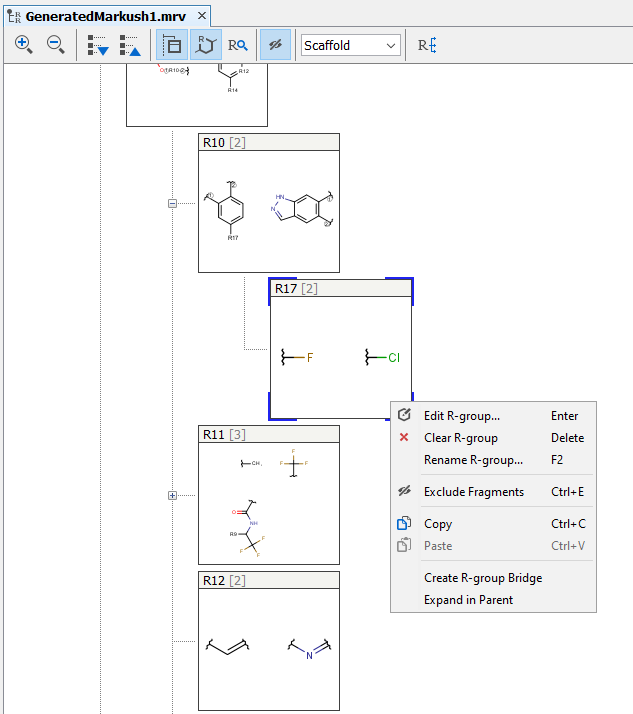
The new R10 group now contains all possible definitions that were previously available as R11
Claim hierarchy
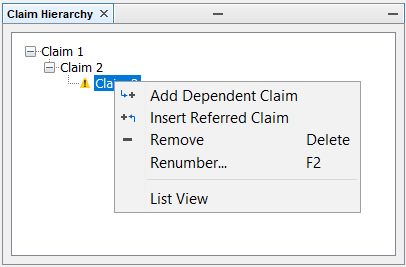
With the Claim Hierarchy feature, you can define dependent claims for your main claim. The claim hierarchy can be edited in the Claim Hierarchy panel. You can expand the initially generated Claim 1 covering the exemplified structures by right clicking on it and selecting Add Dependent Claim or Insert Referred Claim. At first the new claim will appear with a yellow question mark warning that it is identical to the parent claim. Claims can be edited if you select them in the claim tree.
Create narrowed claim
Dependent claims can be created by directly selecting a set of compounds as well. From Validation view after selecting several struture (they do not need to be consecutive) in the right-click context menu there is an option to Create Narrowed Claim. Choosing this function will automatically generate a dependent claim covering only the selected compounds.
Include/exclude fragments
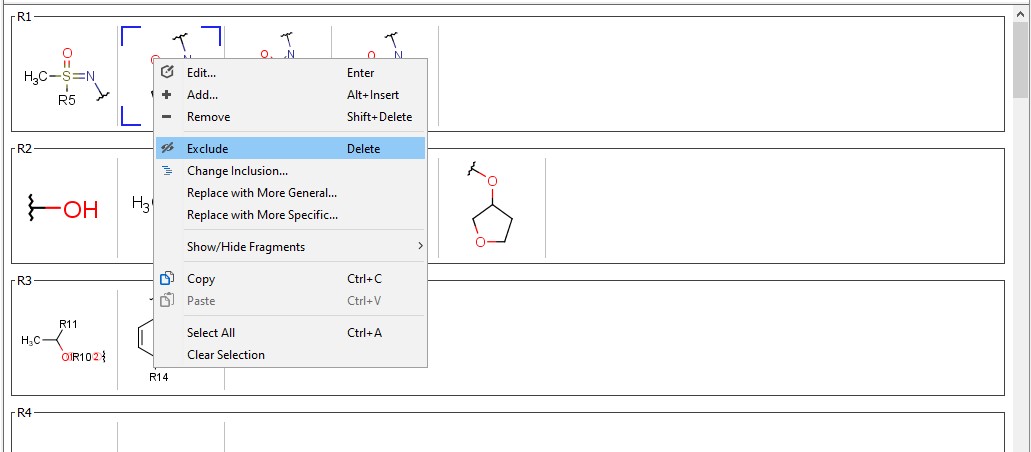
In the dependent claims, you can exclude any selected fragments, to narrow the scope of the claim. Any fragment excluded from a claim is automatically excluded from all of the referring claims. To exclude a fragment select a dependent claim, select any fragment(s) and right-click on it.
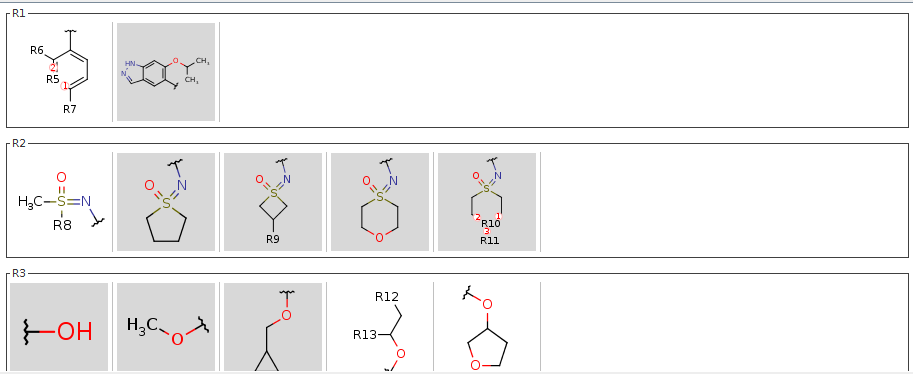
Excluded fragments are displayed with a gray background. Exemplified structures validation follows the claim selection. Excluded fragments can be included again with a right-click.
Replace fragments with more specific/general
In the dependent claims, you can replace selected fragments with a more specific or more general definition to change the scope of the claim. Select a fragment of a claim which has a dependent claim right-click on it, push Replace with more General.... Then define the group or accept one of the suggested generalized fragments. For a dependent claim a fragment definition can be narrowed by right-clicking on it and selecting Replace with more Specific...
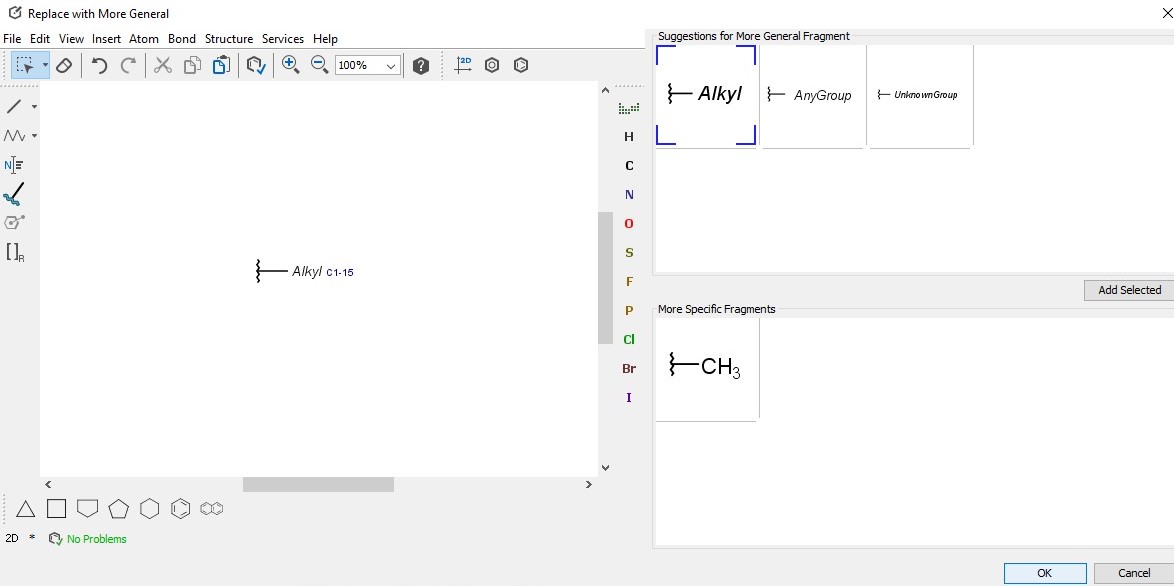
Generic homology groups suggested by Replace with more General... can be further specified by selecting it in the editor right clicking on it and chosing Edit Properties... Further details about homology groups can be found under: Homology Groups in Markush Structures
Markush Composer
With the so-called "Markush Composer" wizard, you can automatically generate Markush structures from a set of compounds. The compound set has to be in a single file (SDF, SMILES, etc). The composer wizard can be opened from the File->Compose Markush Structure... file menu or from the toolbar directly.
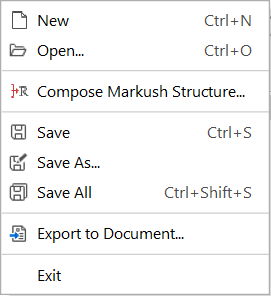
After selecting this action, the Composer wizard opens.
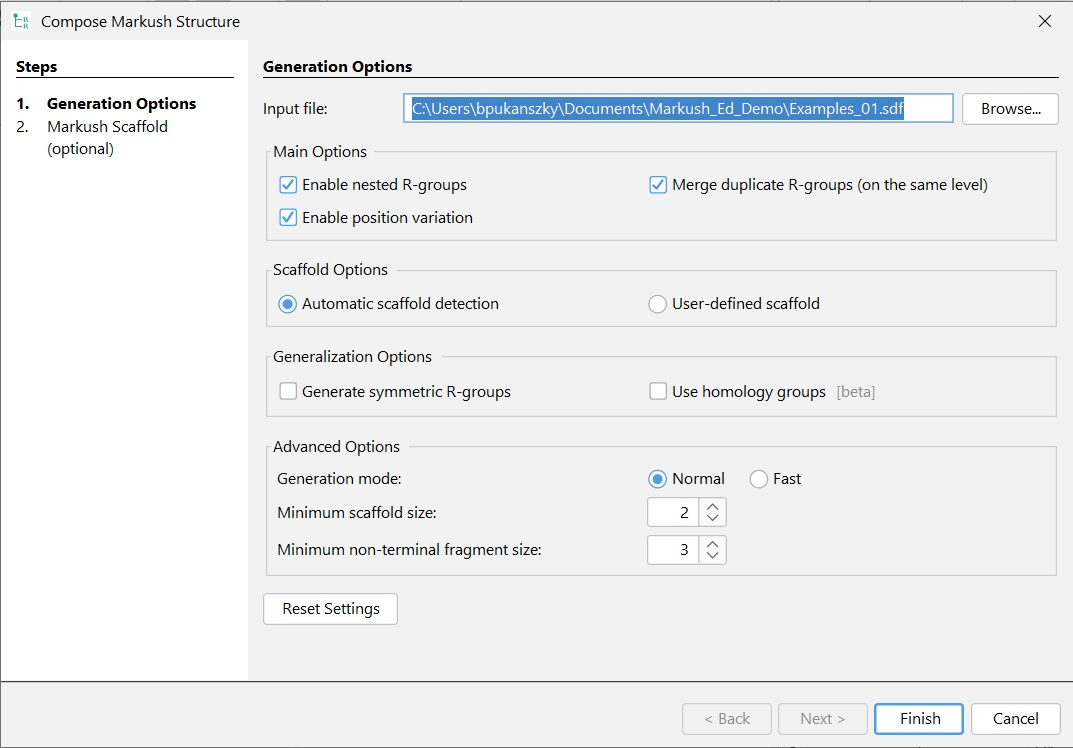
After selecting the Input file, the generation process can be parametrized.
Main options
If you want to generate single-level Markush structures, uncheck the Enable nested R-groups checkbox.
If you don't want to reuse R-group definitions, uncheck the Merge duplicated R-groups checkbox. This option will change how the R-groups are numbered if you have more than one R-group containing the same definitions.
If you don't want to generate atom lists, uncheck the Enable atom lists checkbox.
Scaffold options
You can choose between Automatic detection of the scaffold or using a User-defined scaffold.
Generalization options
Generate symmetric R-groups
This option will change how substituents are handled around a symmetry center. If default options are used, then substituents attached to symmetric positions (e.g. around a ring) are taken into account as many times as they are present in any input structure at the same time. When this option is turned on, however, such substituents are allowed at other symmteric positions at the same time. Thus it yields more general Markush structures covering a larger chemical space.
Use homology groups
By default, homology groups are not generated (like using an alkyl group instead of a methyl group), but by turning this option on, the composer wizard will attempt to generate a Markush structure that also contains some more generic functional groups and thereby covers a larger chemical space. (This feature is still under development)
Advanced options
For processing a very large set of compounds, you can choose a fast search mode instead of normal in Search mode. With fast search mode, the precision of the internal similarity calculations is reduced, which can cause suboptimal results in some cases.
If the largest common part of the set of compounds is smaller than the Minimum scaffold size, the composer generates multiple Markush structures with larger scaffolds.
If some of the R-group fragments in an R-group definition have larger common substructures than the Minimum non-terminal fragment size (in terms of heavy atom count), then the algorithm extracts that common part and generates new nested R-groups. Additionally, nested R-groups are also frequently introduced to handle trivial differences between R-group fragments, the most frequent case being the C/N difference in rings, but this size limit is not applied to such single-atom R-groups.
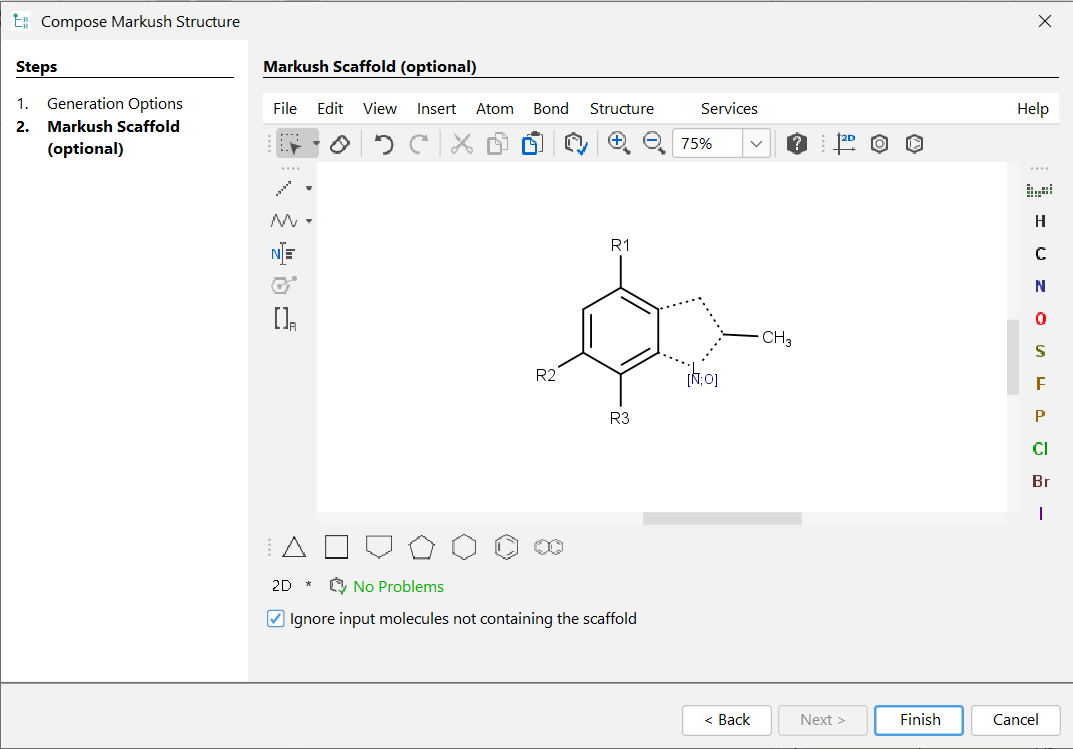
If the User-defined scaffold option is selected, you can navigate to the second page of the wizard dialog with the Next button. On the second page, a preferred scaffold can be set. As a present limitation R-groups cannot be used inside ring systems for the User-defined scaffold. Input structures not containing the preferred scaffold can be ignored with the Ignore input molecules not containing the scaffold option. In the other case composer generates one or more additional Markush structures with different scaffolds for the non-matching input structures. If you do not set any scaffold, Composer tries to find the optimal scaffold automatically. You can use atom lists, bond lists, and R-groups on your predefined scaffold. If you don't define any R-group on this manually specified scaffold, Composer automatically adds R-groups to it. If you define at least one R-group, Composer uses R-groups exactly how you set them. That is, input molecules with substituents in different positions will be ignored.
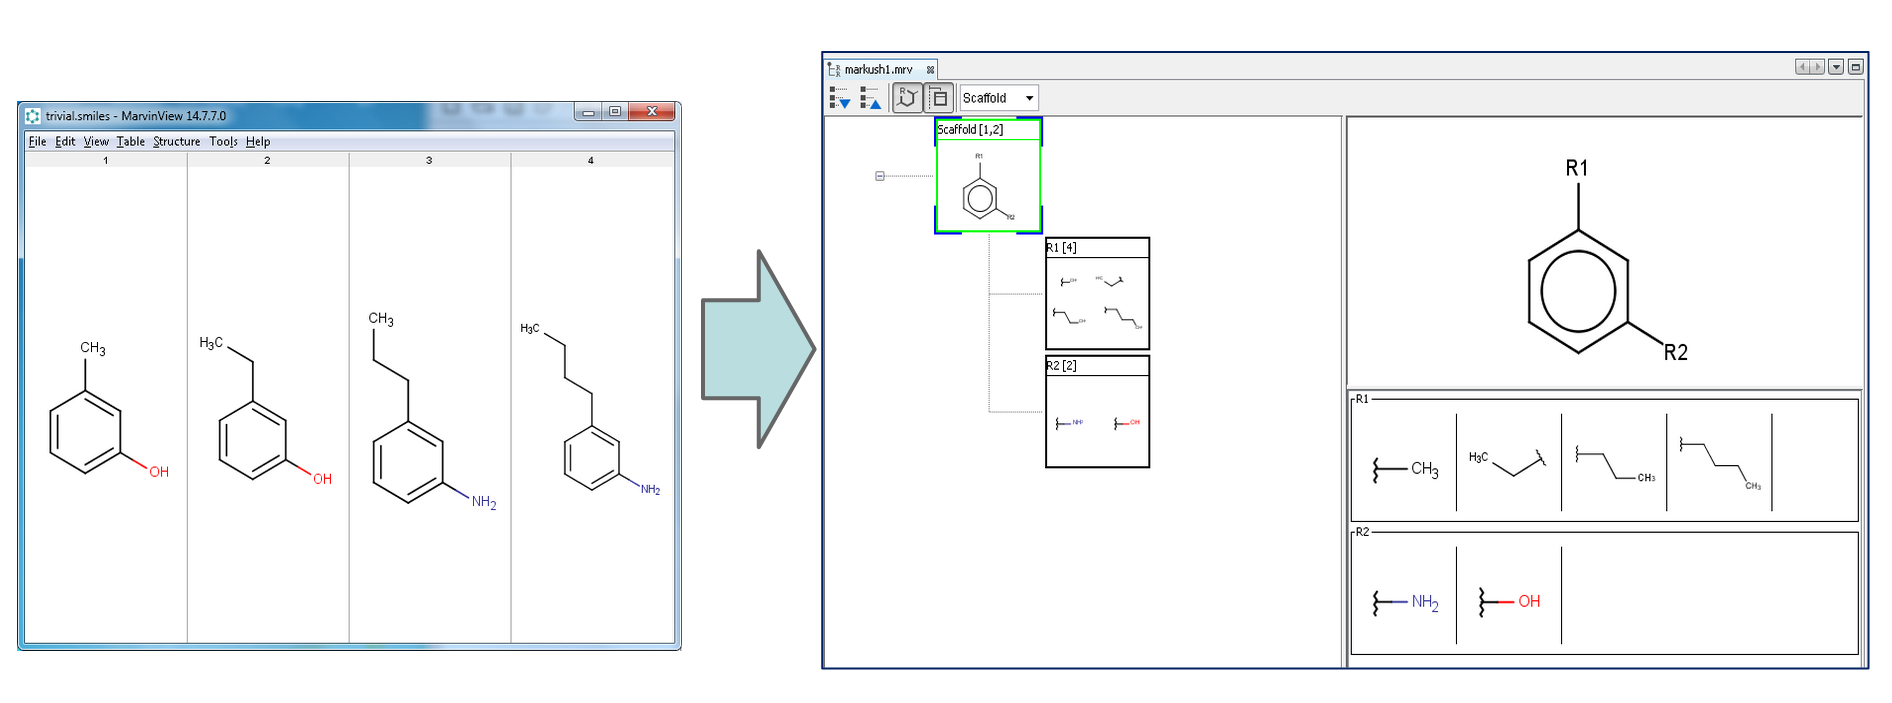
After you click on the Finish button, the wizard automatically generates a Markush structure based on the input set.
Export to document
The claim draft can be automatically generated and exported to docx and html format from the File > Export to Document... menu item or with the ![]() icon from the toolbar.
icon from the toolbar.
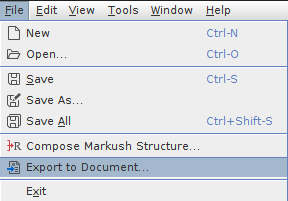
After selecting this action, the document export wizard opens.
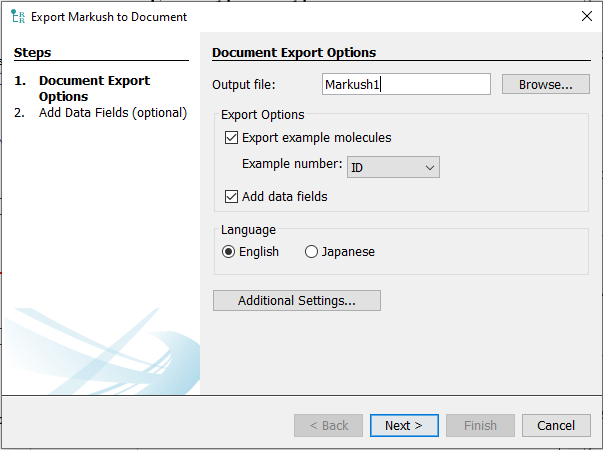
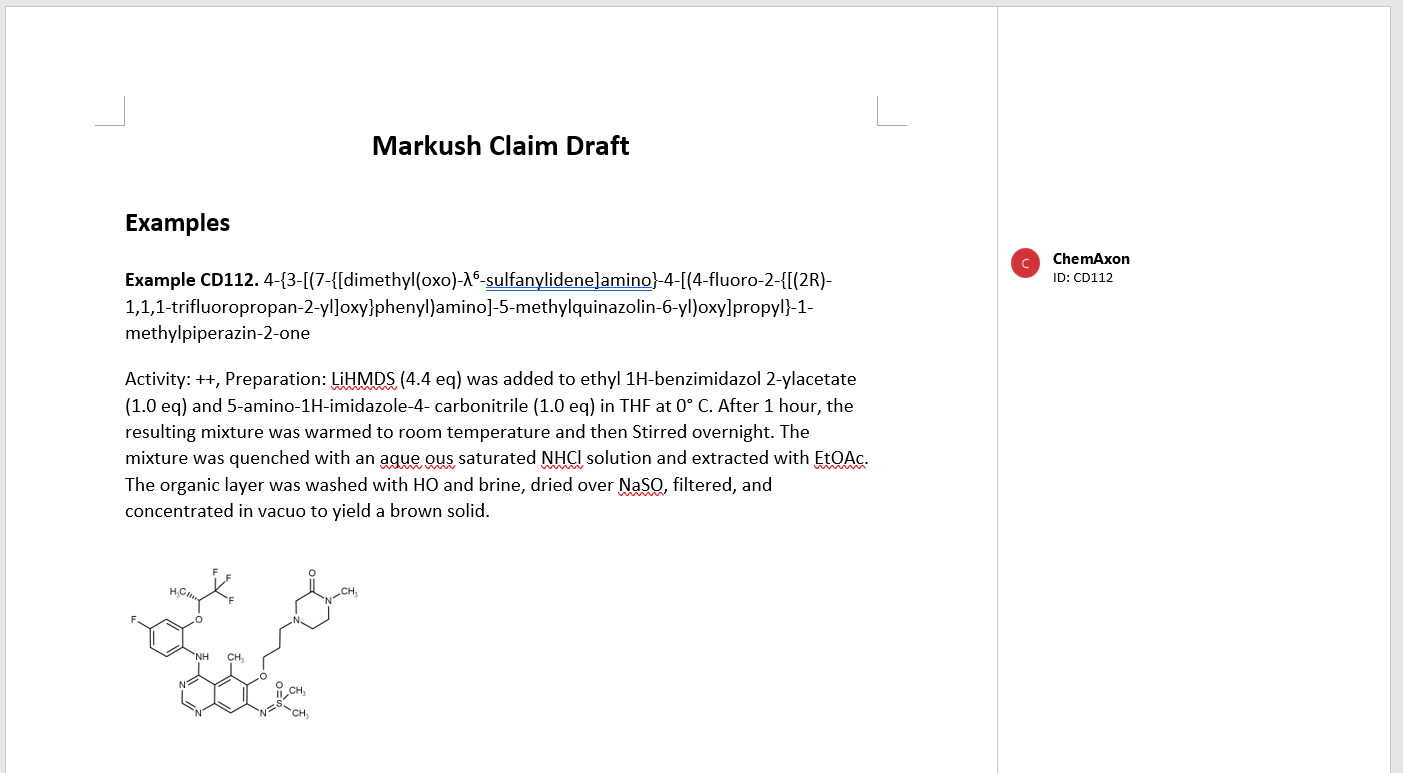
Completing this wizard will automatically open the generated claim draft.
If the "Export example molecules" option is selected, the list of exemplified structures with IUPAC names are also automatically added to the new document before the claims. When the Auto option is selected in the Example number field the examples will be sequentially numbered as they appear in the Validation view. In case the Example list used as an input file to generate the Markush structure originally contained additional fields, or these are later added in the Validation view it is possible to select these from the dropdown menu as custom example numbers. Should a line of the data field chosen to be used as example numbers be empty, that sample will be omitted in the final exported draft.
If the "Add data fields" option is selected it is possible to add additional custom information, like activity or assay data, to the exported document. When the option is selected clicking next will open the "Add Data Fields (optional)" wizard. The wizard will automatically contain fields recognized from the input file as seen in the Validation view.
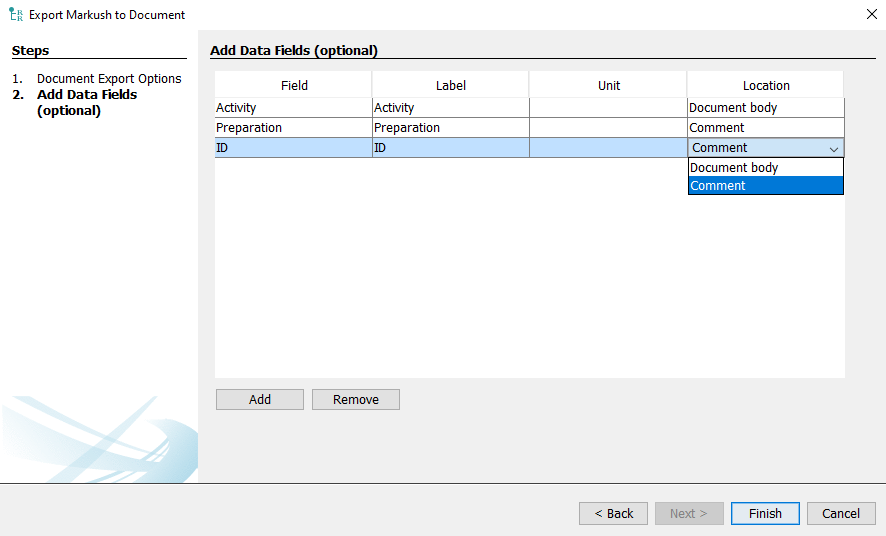
The data will appear in the same order on the exported document as they are seen on to the list in the wizard. It is possible to reorder by simply selecting a line in the Field column of the table and assigning a new value to it. The values in the Label and Unit column of the table can be freely edited. The Location column allows to specify using the drop-down menu whether the data should appear in the document body together with the example name, IUPAC name and chemical structure or appear as a comment in the document.
Empty lines in the input data, as seen in Validation view as well, will return an Unknown value in the example list of the exported claim draft.
It is possible to generate a Japanese language example list and claim draft by selecting the Japanese button. Japanese chemical name and structure conversion license is required to export to a Japanese language document.
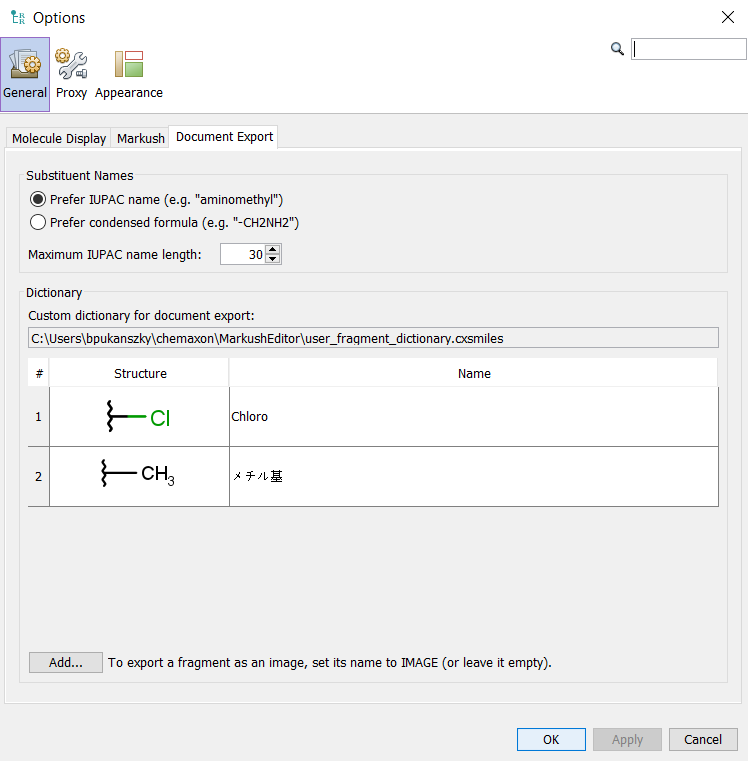
The “Additional Settings…” button allows you to configure several Markush Editor related features like using customized fragment names.
Under the settings you have several tabs. The Document Export tab allows you to further customize the generated Word draft. There are options to see either preferred IUPAC names (e.g. “aminomethyl”) or see condensed formula (e.g. “-CH2NH2”).
With Markush Editor it possible to choose a Journal style for exported structures to appear in from a list. The list includes several widely used Journal styles like ACS or Elsevier. A custom style can also be created by opening an editor window in Markush Editor and selecting File > Document Style > Settings... menu and saving the custom style. There is also an option to chose the image resolution and size of individual exported structure elements (Markush Scaffold, Markush Fragments and Examples). The setting allows to define the structure element size relative to each other - e.g. setting all three values to 100%, rings appearing as part of the scaffold, as part of an R-group or as part of an example will have the same size - or add the structure size in absolute pt values.
Customize fragment names
For generating the draft documents there are options to change the preferred fragment names. This can be found under Tools > Options > Fragment Dictionary (tab). It is also possible to overwrite the default names with a custom fragment dictionary. The dictionary editor allows to freely add or edit custom names for each defined fragment and it is also possible to share the custom dictionary file between different users.
Document preview
Document preview can be opened from Windows > Document Preview menu item or with the ![]() icon from the toolbar. By default, it is opened in the same window as Validation view as an extra tab. Document Preview interactively follows all modifications in the Markush structure or in the claim hierarchy and is updated in real time.
icon from the toolbar. By default, it is opened in the same window as Validation view as an extra tab. Document Preview interactively follows all modifications in the Markush structure or in the claim hierarchy and is updated in real time.
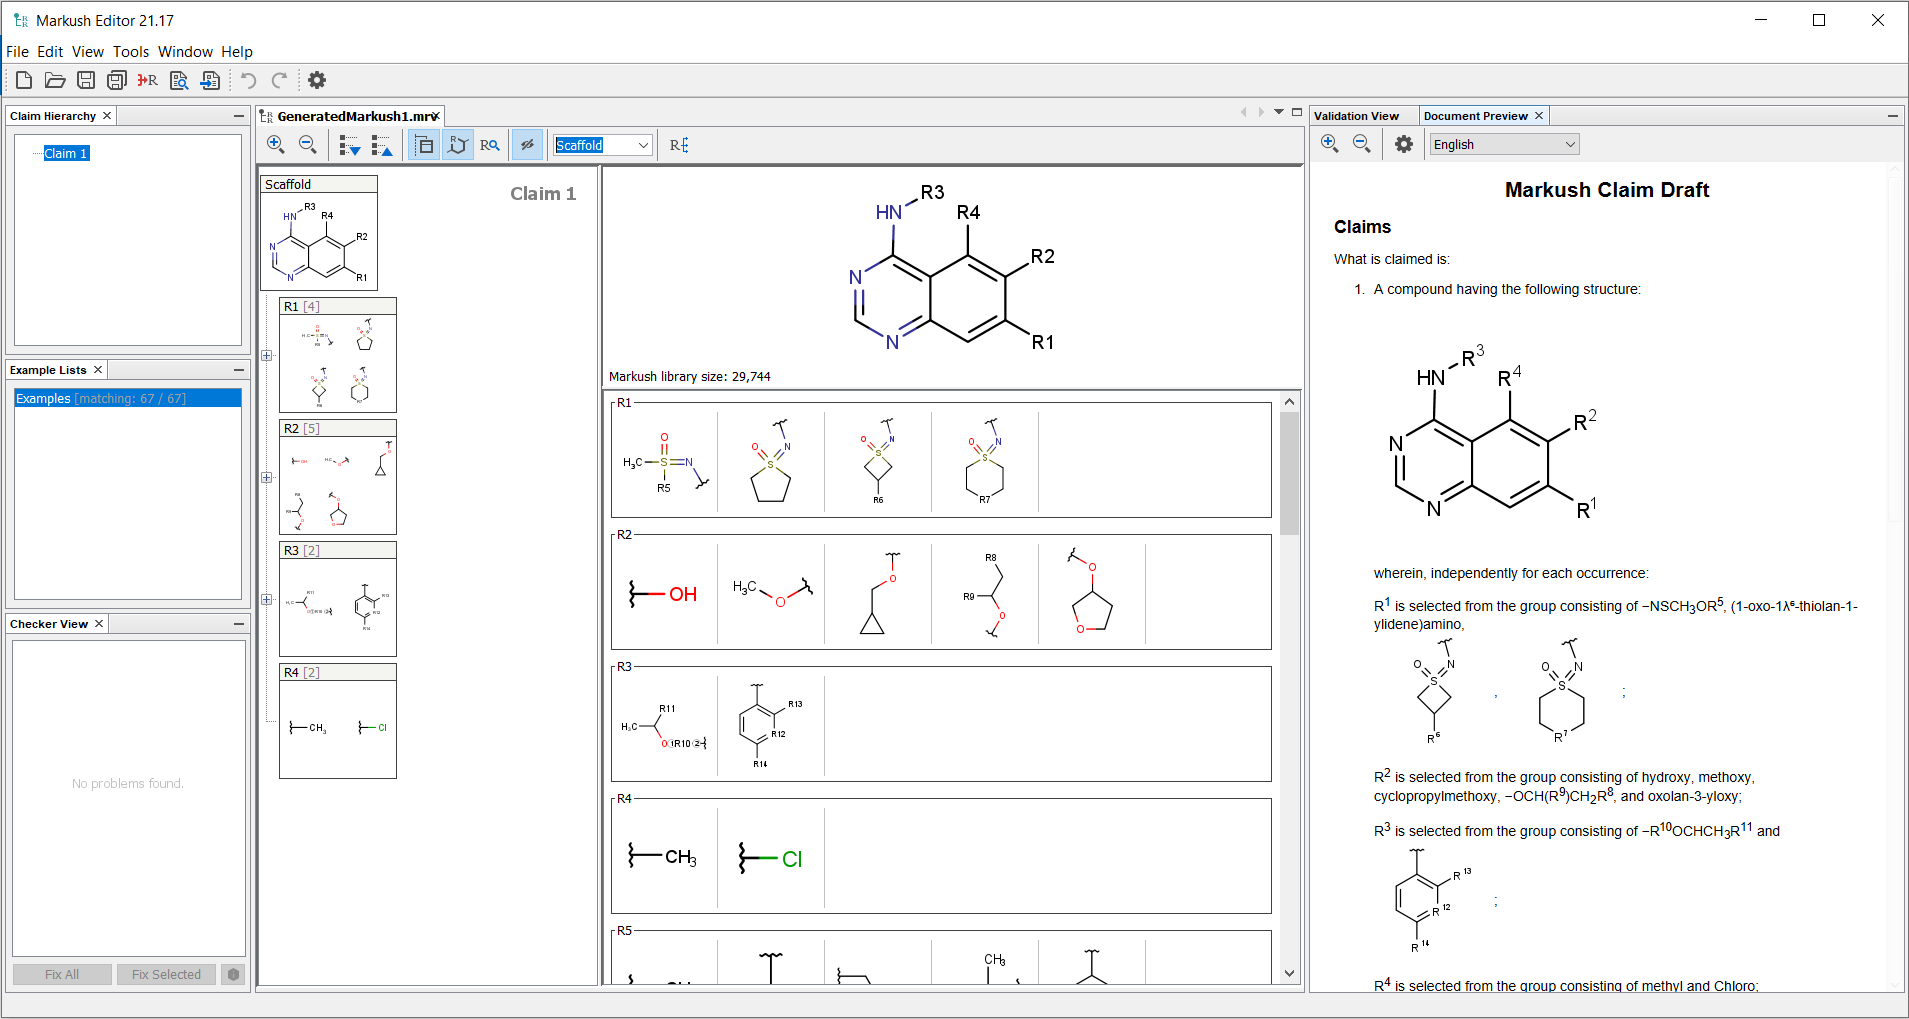
A Japanese version of the claim draft can also be previewed by selecting Japanese in the Document preview language drop-down menu.
Enumerate Markush structures
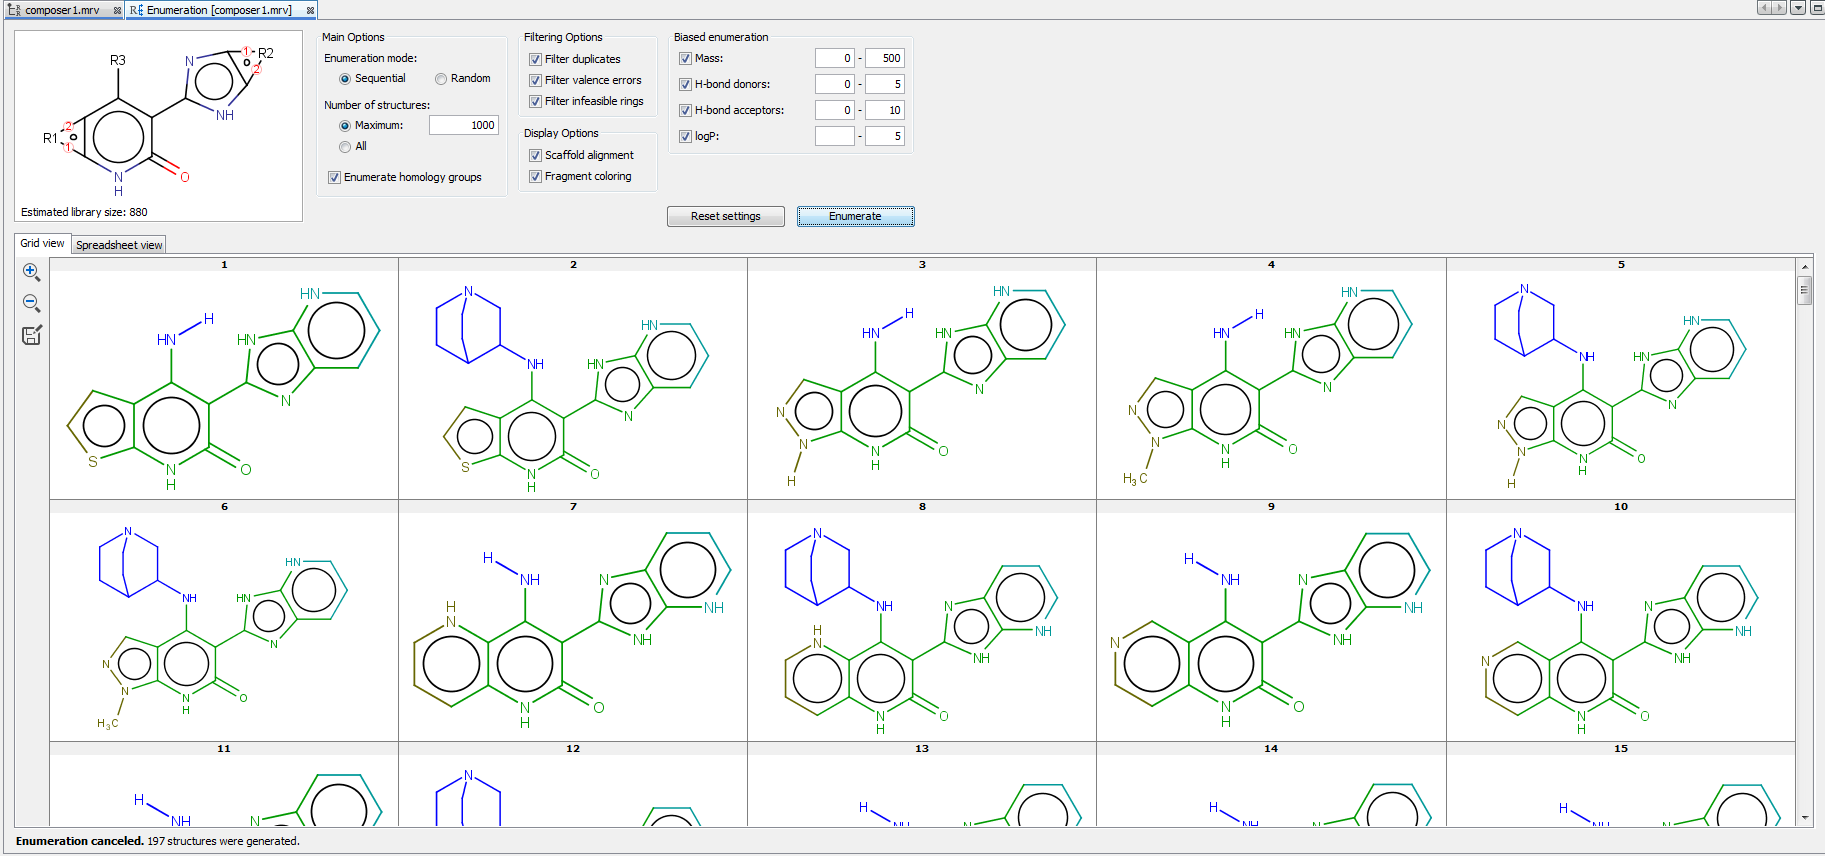
The Markush enumeration panel can be opened by clicking on the button ![]() of the toolbar. Enumeration can generate the specific compounds represented by the Markush structure. The following configuration options are available:
of the toolbar. Enumeration can generate the specific compounds represented by the Markush structure. The following configuration options are available:
Main options that specify some essential enumeration settings:
-
Full enumeration: performs exhaustive enumeration of the Markush structure. Markush libraries can potentially be vast in size, so the enumeration is limited to a maximum number of structures that you can specify.
-
Random enumeration: performs random enumeration (sampling) of the Markush structure. This is mostly useful for large Markush libraries where it is not practical to fully enumerate the library. Random enumeration allows you to sample the library in a random fashion so that you obtain a good representation of the various structures in the library. The same warning about the library size that is described for full enumeration also applies to random enumeration.
-
Enumerate homology groups: specifies whether homology groups (Alkyl, Aryl, etc.) in the Markush structure should be enumerated with examples of the group. Note that this option gives a representative sample of structures for the homology group, but it is definitely a non-exhaustive enumeration. (Note that homology groups may represent a huge or even infinite number of specific groups.)
-
Number of structures: limits the number of enumerated structures to be generated.
Basic filter options help to eliminate the chemically incorrect enumerated structures:
-
Filter duplicates: eliminate duplicated structures.
-
Filter valance errors: eliminate enumeration of structures with valance errors.
-
Filter infeasible rings: eliminate enumeration of structures with chemically infeasible ring systems.
Display options help to understand the correlation between the enumerated structure and the Markush structure, but they have some performance overhead:
-
Scaffold alignment: preserve the original scaffold orientation in the enumerated structures.
-
Fragment coloring: use different colors to highlight the parts that are derived from different R-groups.
Biased enumeration can only be used with sequential enumeration (currently). Enumerated structures can be filtered according to the predefined property ranges. Biased filters guide the full enumeration process to the desired direction internally, thereby biased enumeration has significant performance benefits compared to post-filtering, but the enumeration process itself can be slower with such biased filers.

Enumerated structures can be displayed in the Grid view and Spreadsheet view. The Spreadsheet view contains not only the enumerated structures but the used R-group fragments and some calculated fields as well, including Formula, Name, and Mass. Enumeration results can be saved in various formats by clicking on the icon  in the left sidebar of the enumeration panel.
{primary} Warning: When interpreting the range of repeating units (cases: enumerating a Markush structure, counting the number of enumerated structures, search, etc.), it is possible that not the whole range is used, only a limited set of repetition counts. From versions 25.3.0 and Radium.2 (LTS), these limitations have been changed. For details, see repeating unit limitations. These limitations do not apply to Link Nodes.
Homology group enumeration is sample based. While searching homology groups like Alkyl or Carbocyclyl will match to structures without limitations, it is impossible to enumerate all structures covered by a homology. Thus for enumerating homology groups a limited sample set is used to return valid functional examples.