Design Hub developer guide - real time plugins
- Design checklist
- Life-cycle
- Technical checklist
- NodeJS module API
- REST API
- Templates
- Tutorial
- Next steps
- Examples
Design Hub's real time plugins display information about a chemical structure, such as predicted properties, compound availability or patentability information, by connecting to databases or calling RESTful JSON web services. There are 2 technical approaches to defining and loading plugins:
- NodeJS modules, stored in a folder set by Design Hub's configuration file (
servicesDirectory) - REST API implementing microservices, loaded through URLs defined in Design Hub's configuration file (
remoteServices)
As described below in the specification, the 2 approaches follow the same concepts, and internally are managed by the same service, so outgoing call arguments are the same regardless of the technical choice, and your plugin's configuration will have identical behaviour in the application regardless of the API.
Design checklist
These real time plugins are meant to quickly display relevant, summary information about a chemical structure in a given topic. A chemical structure is typically optimized taking a dozen different attributes into account, which doesn’t allow a lot of details into any single one, but a summary level of detail is useful to prevent mistakes and provide options for further insight on demand. A summary of a topic should consist of a few key numbers, a few important category names, a single structure image, identifiers or hit counts. Further information can be provided as a link, which the users could follow and review later.
Plugins provide good default configurations to the users, but optionally can be reconfigured using checkboxes, dropdowns or text field inputs.
Life-cycle
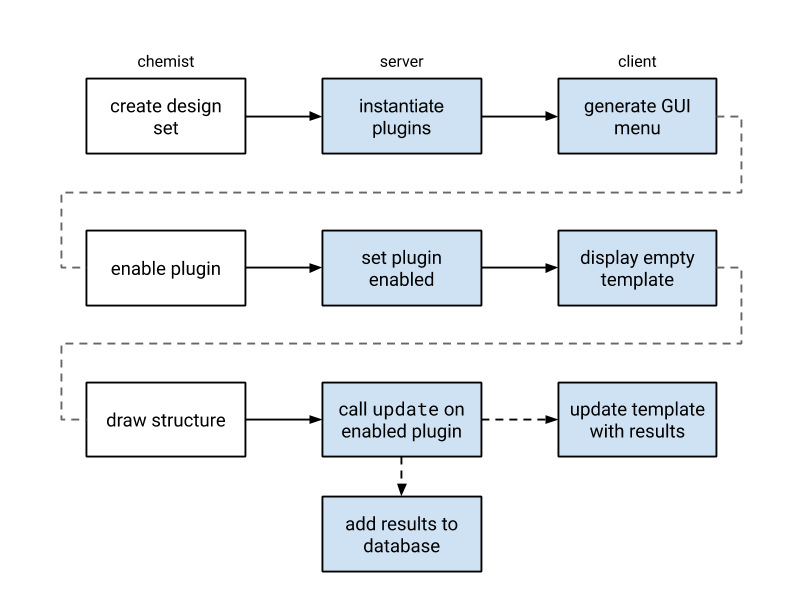
Design Hub scans the service definitions find all real time plugins and generates a GUI element to enable or disable them. When a plugin is enabled, its window is displayed, and that subsequent structure editing can refresh the calculation results. This is done by calling the update() function or /update endpoint of all enabled plugins with the MRV formatted source of that structure. When the promise of this update is resolved or rejected, the results or error message appears for the users.
Technical check-list
- an instance of Design Hub available for development purposes, i.e.: the ability to stop and start it, to try different configuration options
- for the NodeJS module API: familiarity with JavaScript, NodeJS and its module system and good understanding of Promises / async await operations
- for the REST API: familiarity with REST API implementing frameworks in your toolkit's programming language (such as Spring Boot for Java, or fastAPI for Python)
- basic understanding of Angular JS templating syntax
NodeJS module API
{info} NodeJS introduction material: https://www.youtube.com/watch?v=_l96hPlqzcI (78m), https://www.youtube.com/watch?v=hKQr2DGJjUQ (19m), https://www.youtube.com/watch?v=cJVXP1bU68Y (48m) NodeJS module description: https://nodejs.org/api/modules.html Promise introduction: https://www.html5rocks.com/en/tutorials/es6/promises/#toc-async, https://developer.mozilla.org/en-US/docs/Web/JavaScript/Reference/Statements/async_function Templating basics in Angular JS: https://docs.angularjs.org/tutorial/step_02
Specification
Real time plugins are NodeJS modules, denoted by their filename: *.realtime.js and location in the services directory as configured during installation.
A real time plugin exports the following properties:
| Name | Type | Required | Description |
|---|---|---|---|
update |
async function | yes | The main function of the plugin, called when the sketcher is used, once for each change. The function must return a Promise of the results / be declared as an async function. The results are broadcasted by the application. Arguments: mrvSource (string) MRV formatted chemical structure of the editorpinnedStructure (string) MRV formatted chemical structure of the (optionally) pinned structure used for comparisonsthis includes domain, settings and user for the current callReturn value: Promise The return value can take 2 forms. Either it must be a JS Object with a client property containing the data to be linked to the template and a report property with the data needed for the report respectively, or it's a simple JS Object containing the data to be linked to the template, in which case, client and report are reserved keywords. Please see the tutorial below. |
batchUpdate |
async function | no | Batch variant of the plugin, called in a spreadsheet mode. The function must return a Promise of the results. Arguments: structures (string[]) list of MRV formatted chemical structures. The list's size is clamped between 1 and 50, and further maximized by the setting of batchUpdateSize.Return value: Promise of list of result objects, identical the return value of update. |
name |
string | yes | Unique identifier of the plugin, used by Design Hub for identification and internal communication. If multiple plugins use the same identifier, the last one to be loaded overrides the others. |
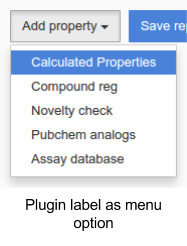
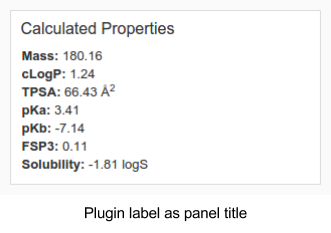
label |
string | yes | Human readable name of the plugin, used by Design Hub to display GUI elements related to this plugin: as menu entry in the menu to enable the plugin, as title of the panel displaying the results. |
hasReport |
boolean | no | Information whether this plugin provides report data. Based on value visibility of this plugin in design set is set up (true == visible). If not provided value falls back to "true" (visible). |
template |
string | one of template or templateFile |
The plugin template is an HTML fragment that’s injected into the room’s interface as a panel. The templating language is Angular JS, which should allow interpolating formatted numbers or easily enumerating a list. The result of the update call is made available as the client variable inside the template fragment. |
templateFile |
string | one of template or templateFile |
Relative path to an HTML file that contains the template. |
domains |
array of strings | yes | List of domains where this plugin may be used, when authentication is enabled in Design Hub. Use * to allow any domain. |
sortOrder |
number | no | Sorting order of the plugin as it appears on the GUI. Sorting is ascending. If no number is specified, plugins are sorted by name. Default: 9999 |
getSettings |
async function | no | Configuration options exposed to a chemist in a generated UI component of the plugin. Values selected are passed in this to subsequent update() calls.Return value: Promise of array of objects. See settings.Has higher precendence than settings. Default: none |
settings |
array of objects | no | Configuration options exposed to a chemist in a generated UI component of the plugin. Values selected are passed in this to subsequent update() calls. A valid setting object has the following properties - see below.Default: [] |
settings[*].label |
string | yes | Human friendly name of the setting. |
settings[*].type |
string | yes | One of: boolean, string, number, enum, multienum, project, project-object, objectenum, objectmultienum . |
settings[*].default |
any | no | Default value of the setting. |
settings[*].values |
array of strings or array of objects | no / yes for enum type |
Picklist contents for enum type setting. enum, multienum accept an array of strings, while objectenum and objectmultienum accept an array of objects as possible values. |
settings[*].values[*].id |
string | yes | Saved value of the settings, must be unique among values of this settings |
settings[*].values[*].label |
string | yes | Human friendly label of the setting |
settings[*].values[*].category |
string | no | grouping key of settings |
docs |
string | no | HTML describing technical details of this plugin. When specified, an icon will be rendered on the plugin's GUI panel. |
contact |
string | no | Text describing ways to contact to owner of this plugin. URLs and email addresses will be automatically made clickable. When specified, an icon will be rendered on the plugin's GUI panel. |
reportConfig |
object | no | Object containing configuration for reports. For more details see Report Config |
batchUpdateSize |
number | no | Maximum size of structure list to pass to batchUpdate. Must be set to a value larger than 1 for batchUpdate to be used |
Note: you may use _development authentication type to test aspects of your plugin specific to a domain. This authentication type accepts any username, password combination, where the 2 field string match.
REST API
Available from v20.3.1, Design Hub plugins are single-purpose microservice endpoints that describe the plugin and provide a calculation endpoint to be called as user activity demands. These are implemented by 2 JSON endpoints specified below.
Specification
Method: GET
Path: baseURL (the specified remote service URL without any changes)
Purpose: Provides metadata about the plugin.
Required: yes
Request parameters: None
Response content-type: application/json
Response body: JSON object with the following properties:
| Name | Type | Required | Description |
|---|---|---|---|
type |
string | yes | The type property should be realtime for realtime plugins. |
name |
string | yes | Unique identifier of the plugin, used by Design Hub for identification and internal communication. If multiple plugins use the same identifier, the last one to be loaded overrides the others. |
label |
string | yes | Human readable name of the plugin, used by Design Hub to display GUI elements related to this plugin: as menu entry in the menu to enable the plugin, as title of the panel displaying the results. |
hasReport |
boolean | no | Information whether this plugin provides report data. Based on value visibility of this plugin in design set is set up (true == visible). If not provided value falls back to "true" (visible). |
template |
string | yes | The plugin template is an HTML fragment that’s injected into the Compound creation interface as a panel. The templating language is Angular JS, which should allow interpolating formatted numbers or easily enumerating a list. The result of the update call is made available as the client variable inside the template fragment. |
domains |
array of strings | yes | List of domains where this plugin may be used, when authentication is enabled in Design Hub. Use * to allow any domain. |
sortOrder |
number | no | Sorting order of the plugin as it appears on the GUI. Sorting is ascending. If no number is specified, plugins are sorted by name.Default: 9999 |
settings |
array of objects | no | Configuration options exposed to a chemist in a generated UI component of the plugin. Values selected are passed in the settings object to subsequent POST /update calls. A valid setting object has the following properties - see below.Default: [] |
settings[*].label |
string | yes | Human friendly name of the setting. |
settings[*].type |
string | yes | One of: boolean, string, number, enum, multienum, project, project-object, objectenum, objectmultienum . |
settings[*].default |
any | no | Default value of the setting. |
settings[*].values |
array of strings or array of objects | no / yes for enum type |
Picklist contents for enum type setting. enum, multienum accept an array of strings, while objectenum and objectmultienum accept an array of objects as possible values. |
settings[*].values[*].id |
string | yes | Saved value of the settings, must be unique among values of this settings |
settings[*].values[*].label |
string | yes | Human friendly label of the setting |
settings[*].values[*].category |
string | no | grouping key of settings |
docs |
string | no | Text describing important usage details of this plugin. URLs will be automatically made clickable. When specified, an icon will be rendered on the plugin's GUI panel. |
contact |
string | no | Text describing ways to contact to owner of this plugin. URLs and email addresses will be automatically made clickable. When specified, an icon will be rendered on the plugin's GUI panel. |
reportConfig |
object | no | Object containing configuration for reports. For more details see Report Config |
Method: POST
Path: <baseURL>/update
Purpose: Called once for each compound change to obtain calculation results.
Required: yes
Request content-type: application/json
Request body:
| Name | Type | Description |
|---|---|---|
structure |
string | MRV formatted chemical structure of the editor |
pinnedStructure |
string | MRV formatted chemical structure of the (optionally) pinned structure used for comparisons |
context |
JSON object | Other information like user information about the caller if available, domain information, etc. |
settings |
JSON object | JSON object containing key-value pairs as JSON strings for each setting entry where key matches selected setting label and values will match selected setting values |
Response content-type: application/json
Response body: a JSON object including the following properties:
| Name | Type | Required | Description |
|---|---|---|---|
client |
JSON object | yes | any data structure to be linked to the plugin template. Please see the tutorial below. |
report |
JSON object | yes (can be null) | A list of key-value pairs denoting the results in an easily filterable / sortable fashion. |
If your plugin doesn't provide reportable key-value pairs of results, you may use a simplified response body where the entire response data structure is linked to the plugin template. In this format, client and report variables are reserved keywords.
Templates
Templates provide a rich option set for realtime plugins so there's a dedicated page describing the available options and components made available through the application. Be sure to check out the examples below as well!
- variable interpolation
- iteration and conditional blocks
- styling
<diff><larger><smaller><pager>[structure]<threedee><protein><ligand>
For details and examples - read more in the template guide.
Tutorial
Setup
First, create a services directory to store all your plugins and add it to docker-compose.yml as the /services mount
version: '2'
services:
    design-hub:
        image: hub.chemaxon.com/cxn-docker-release/chemaxon/dh:latest
        restart: always
        ports:
            - "8888:8888"
        volumes:
            - "/data/config.json:/config/config.json:ro"
            - "/data/services/:/services"
            - "/data/license/:/license:ro"
Next, in this directory, create a new npm module to keep track of your plugins and their dependencies and to ensure others using this code have an easy time with it.
user:/data/services$ npm initIf you follow the prompts, you’ll get a new package.json file, which describes the plugins. Later, this file can be used to upgrade dependencies - npm outdated and npm update .
More importantly, when you migrate plugins from this development environment to your production server, you can easily install all dependencies - some of which may be OS dependent - with npm install, just by copying your plugin file and package.json.
Creating your module
In your services directory, create a new JavaScript file named my-plugin.realtime.js. It’s important to end the filename with .realtime.js, this differentiates the file from other supported plugin types and unrelated files.
user:/data/services$ touch my-plugin.realtime.jsOpen the file in your favorite editor, and let’s define the interface by adding the necessary exports:
module.exports = {
 name: "myPlugin",
 label: "My Plugin",
 domains: ["*"],
 update: async function() {},
 template: ""
};
Template usage
The title of the plugin panel is automatically added, along with a close button and a progress bar visible during updates, so you all you need to take care of is a display for your results.
Displaying a number
First, let’s display a simple number, myNumber with a value of 2, to see the templating syntax.
Change the update function’s body to the following. We resolve the Promise with an Object, which has a simple myNumber key and its value is 2.
update: async function(mrvSource) {
  return {
    myNumber: 2
  };
},
As noted above, in the browser the results are made available to the template in the client object, so a template matching this data structure would be:
template: "<div>My number is: {{client.myNumber}}</div>",{info} Note: Angular JS’s interpolation syntax is to surround the scope variable - our client object’s property name - with double curly braces.
Iterating over a list
Now you need to restart the application, and wait for the refresh to see the plugin with number 2 in the results!
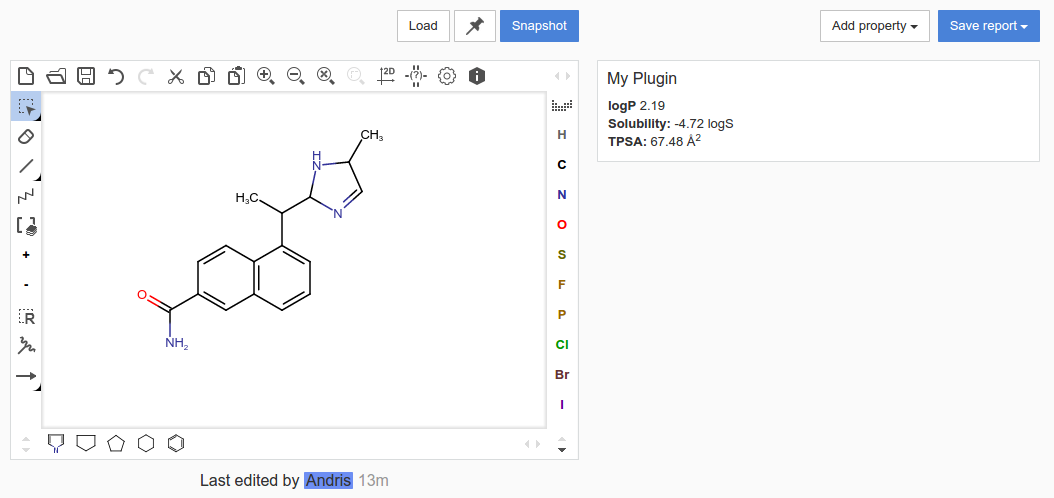
In a slightly more complicated example we’ll iterate over a few properties. Let’s resolve the Promise with an object where each property is also an object. These have a label and value defined, corresponding to frequently used phys-chem properties.
{
 logP: {
  label: "cLogP",
  value: 2.1898169993333334
 },
 solubility: {
  label: "Solubility",
  value: -4.7225842048721605
 },
 polarSurfaceArea: {
  label: "TPSA",
  value: 67.47999999999999
 }
}
The template to display all values would use ng-repeat, AngularJS’s construct for iterating over lists and maps.
<div>
  <p ng-repeat="property in client">
    {{property.label}}: {{property.value}}
  </p>
</div>
To round numbers, we may use of a built-in filter of AngularJS, number, and change {{property.value}} to {{property.value | number: 2}}. We can also display units of measurements by loading extra definitions in the Promise and interpolating them as well.
Report Config
reportConfig is an object containing columns property. columns is a list of column objects. Column object contains name and colorRules. colorRules is a list with rules for conditional coloring of columns. colorRule contains zero or more conditions and a color. The rules are evaluated sequentially. If all conditions are true for the given rule the color is applied, if any condition is false, next colorRule is evaluated. The color must be in a valid css format. Supported rules are equals, greaterThan, greaterThanOrEquals, lessThan, lessThanOrEquals. All rules support numeric values, equals supports also text values.
Example reportConfig:
reportConfig = {
    columns: [
        {
            name: "Example column",
            colorRules: [
                {
                    greaterThanOrEquals: 0
                    lessThan: 4.5,
                    color: "rgb(242, 116, 110)"
                },
                {
                    greaterThanOrEquals: 4.5,
                    color: "hsl(120, 100%, 75%)"
                },
                {
                    color: "blue"
                }
            ]
        }
    ]
 }
Calling a web service
Let’s calculate the solubility forecast index of this structure. This descriptor is easily calculable from logD and the number of aromatic rings. Chemaxon has a REST web services product that can calculated these descriptors. Once that's installed we can use its service "View Properties Without Storing" (documentation). We need a POST request with the following JSON structure:
POST /webservices/rest-v0/util/detail
{
  "structures": [
     "structure": <structure to use>
  ],
  "display":  {
    "include": ["logD", "topologyAnalysis"]
  }
}
Installing dependencies
Before we make the connection to JChem Web Services though, we need a little bit of help.
NodeJS has a built in library handling all tasks related to networking, called http, but we’re going to use a higher level API that’s more convenient and requires less boilerplate code: request-promise.
user:/data/services$ npm install request-promise request --saveThis will fetch and install the library from npmjs.org - this is the default registry - and save its details to the package.json manifest. In the future, we can use the manifest to reinstall dependencies e.g. a migration.
After this we can import the module, and construct the request. Please make sure the URL to the /rest-v0/util/detail service in the properties variable matches your setup:
const request = require("request-promise");
...
const propertiesEndpoint = "http://localhost:8080/rest-v0/util/detail";
...
update: async function(mrvSource) {
    const results = await request.post({
        url: propertiesEndpoint,
        body: {
            structures: [{
                structure: mrvSource
            }],
            "display":  {
                "include": ["logD", "topologyAnalysis"]
            }
        },
        json: true
    });
    return results;
},
The results are in a large data structure, so the template will be used to simplify it for the chemists. In Angular JS templates, we may perform simple arithmetic expressions too, such as adding two numbers to calculate SFI:
<div>
  <p>logD: {{client.data[0].logD.logD}}</p>
  <p># of Ar: {{client.data[0].topologyAnalysis.ring.aromaticRingCount}}</p>
  <p>SFI: {{client.data[0].logD.logD + client.data[0].topologyAnalysis.ring.aromaticRingCount | number:2 }}</p>
</div>
Adding data to the report
The most common formats for reports (SDF, PPTX) have no capabilities to display or interpret HTML code or complex data structures, so there’s a separate and optional way to specify what information to add to reports.
To add key numbers or identifiers to the report, you need to extend the fulfillment value of the promise. In the previous steps, it specified data only for the client, this should change to an object containing both a client and a report property. The client property should contain the data required by the template as earlier - this is the reason we name the root variable client in the template.
The report property should contain a map, simple key - value pairs, where each pair becomes a data field or column in the report. This is the common data structure that fits all report types, Design Hub can easily print the values provided here to PowerPoint or SD files.
To add the SFI value to the report, let’s change the resolve part of the code:
const clientData = results;
const reportData = {
 "SFI": results.data[0].logD.logD +
    results.data[0].topologyAnalysis.ring.aromaticRingCount
};
return {
  client: clientData,
  report: reportData
};
Converting to other chemical file formats
In many cases you need to convert the structure from Chemaxon's native MRV format to some other chemical file format before starting calculations or a search. In this example we’ll convert the structure to SMILES. JChem Web Services provides a converter service, its documentation shows the request needed:
POST /rest-v0/util/calculate/stringMolExport
{
   "structure": <structure to convert>,
   "parameters": <format to convert to>
}
With the request module installed earlier, we can easily send this request:
const converterEndpoint = "http://localhost:8080/rest-v0/util/calculate/stringMolExport";
...
update: async function(mrvSource) {
    const results = await request.post({
        url: converterEndpoint,
        body: {
            structure: mrvSource,
            parameters: "smiles"
        },
        json: true
    });
    const clientData = {
        "smiles": results
    };
    const reportData = {
        "SMILES": results
    };
    return {
        client: clientData,
        report: reportData
    };
},
template: "<div>{{client.smiles}}</div>"
Next steps
Now you can add you own functionality to the plugin by extending the update function. Check the examples to save even more time with your first plugin. A few reminders though:
- Design Hub provides only the
MRVsource of the sketcher to plugins. Make sure you convert it with a converter service before sending requests to services that don’t understandMRV. - Your module is a loaded only once, make sure the
update()function doesn’t modify the plugin’s global state, otherwise you may run into problems when different users call update at the same time. You can use the singleton nature to your advantage, for instance by authenticating with backend services only once. - It’s essential to return information as fast as possible. A good target is 2 seconds, as it’s often faster than chemical drawing increments. If however you’re dealing with a slower system, Design Hub displays a progress bar at the top of the panel.
- All resources, including URLs and static file paths will be resolved relative to the NodeJS process within the docker container, so special attention should be taken to addresses. For instance loading a file should use paths that are available as Docker volumes, and URLs should reference IP addresses or DNS aliases that the process within the docker container can resolve
Examples
Existing plugin implementations, utilities and examples can be found here.
Pull requests welcome!