Marvin Live developer guide - real time plugins
Marvin Live real time plugins display information about a chemical structure by connecting to databases or calling web services. These plugins are NodeJS modules, stored in a folder set by Marvin Live's configuration file.
Prerequisites
-
an instance of Marvin Live available for development purposes, i.e.: the ability to stop and start it, to try different configuration options
-
familiarity with JavaScript, NodeJS and its module system
-
good understanding of Promises / async await operations
-
for real time plugins, basic understanding of Angular JS templating syntax
{info} NodeJS introduction material: https://www.youtube.com/watch?v=_l96hPlqzcI (78m), https://www.youtube.com/watch?v=hKQr2DGJjUQ (19m), https://www.youtube.com/watch?v=cJVXP1bU68Y (48m)
NodeJS module description: https://nodejs.org/api/modules.htmlPromise introduction: https://www.html5rocks.com/en/tutorials/es6/promises/#toc-async, https://developer.mozilla.org/en-US/docs/Web/JavaScript/Reference/Statements/async_function
Templating basics in Angular JS: https://docs.angularjs.org/tutorial/step_02
Real time plugins
This plugin type is intended to fetch relevant information about a chemical structure, such as predicted properties, search results or literature information, by making asynchronous network requests to RESTful JSON services.
Design checklist
These real time plugins are meant to quickly display relevant, summary information about a chemical structure in a given topic. A meeting environment doesn’t allow a lot without distracting participants, but a summary level of detail is useful to prevent mistakes and avoid having to use heavyweight workstation tools. A summary of a topic should consist of a few key numbers, a few important category names, a single structure image, identifiers or hit counts. Further information can be provided as a link, which the room participants could follow and review later.
Plugins provide limited configuration options to the users, behaviour should intelligently decide what are the best settings for the given structure.

Life-cycle
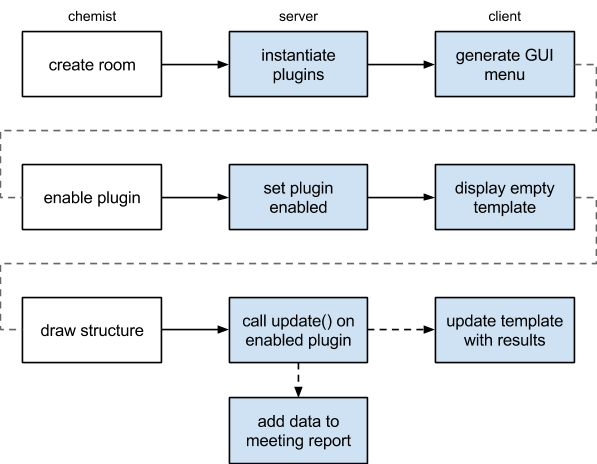
Marvin Live scans the services directory to find all real time plugins and generates a GUI element to enable or disable them. When a plugin is enabled, it’s displayed to all users in the given room. This state is independent for each room. When a structure is edited in the sketcher, the application calls the update() function of all enabled plugins of the room with the MRV formatted source of that structure. When the promise of this update is resolved or rejected, all users in the room see the results.
Specification
Real time plugins are NodeJS modules , denoted by their filename: *.realtime.js and location in the services directory as configured during installation.
A real time plugin exports the following properties:
| Name | Type | Description |
|---|---|---|
update |
async function | The main function of the plugin, called when the sketcher is used, once for each change. The function must return a Promise of the results / be declared as an async function with NodeJS v8. The results are broadcasted by the application.Arguments: mrvSource (string) MRV formatted chemical structure of the editor pinnedStructure (string) MRV formatted chemical structure of the (optionally) pinned structure used for comparisons * thisincludes domain, roomName and settings for the current callReturn value: PromiseRequired: yesThe return value must be a JS Object containing the data to be linked to the template, or a JS Object with a client and report property with the data needed for the client template and the data needed for the report respectively. Please see the tutorial below. |
template |
string | The plugin template is an HTML fragment that’s injected into the room’s interface as a panel. The templating language is Angular JS, which should allow interpolating formatted numbers or easily enumerating a list. The result of the update call is made available as the client variable inside the template fragment.Required: template or templateFile |
templateFile |
string | Relative path to an HTML file that contains the template.Required: template or templateFile |
name |
string | Unique identifier of the plugin, used by Marvin Live for identification and internal communication. If multiple plugins use the same identifier, the last one to be loaded overrides the others.Required: yes |
label |
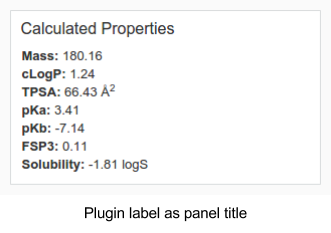
string | Human readable name of the plugin, used by Marvin Live to display GUI elements related to this plugin: as menu entry in the menu to enable the plugin, as title of the panel displaying the results.Required: yes |
domains |
array of strings | List of domains where this plugin may be used, when authentication is enabled in Marvin Live. Use * to allow any domain. If no authentication is setup, this option has no effect. To query the configured domains, send a GET request to /domains or open /domains in your browser.Required: if authentication is configured |
sortOrder |
number | Sorting order of the plugin as it appears on the GUI. Sorting is ascending. If no number is specified, plugins are sorted by name .Required: noDefault: 9999 |
settings |
array of objects | Configuration options exposed to a chemist in a generated UI component of the plugin. Values selected are passed in this to subsequent update() calls. A valid setting object has the following properties: label, type, default, and values.Required: noDefault: none |
settings[*].label |
string | Human friendly name of the setting. Required: yes |
settings[*].type |
string | One of: boolean, string, number, enum. Required: yes |
settings[*].default |
any | Default value of the setting. Required: no |
settings[*].values |
array of strings | Picklist contents for enum type setting. Required: no / yes for enum type. |
docs |
string | Text describing technical details of this plugin. URLs will be automatically made clickable. When specified, an icon will be rendered on the plugin's GUI panel.Available from v17.17.0.Required: no |
contact |
string | Text describing ways to contact to owner of this plugin. URLs and email addresses will be automatically made clickable. When specified, an icon will be rendered on the plugin's GUI panel.Available from v17.17.0.Required: no |
Note: you may use _developmentauthentication type to test aspects of your plugin specific to a domain. This authentication type accepts any username, password combination, where the 2 field string match.
Templates
Templates provide a rich option set for realtime plugins so there's a dedicated page describing the available options and components made available through the application. Be sure to check out the examples below as well!
-
variable interpolation
-
iteration and conditional blocks
-
styling
-
<diff> -
<larger> -
<smaller> -
<pager> -
[structure] -
<threedee> -
<protein> -
<ligand>
For details and examples - read more in the template guide.
Tutorial
Setup
First, create a services directory to store all your plugins and add it to config.json as servicesDirectory .
{
  "port": 80,
  "servicesDirectory": "../services"
}
user:~/app$ mkdir ../services
user:~/app$ cd ../services/Next, in this directory, create a new npm module to keep track of your plugins and their dependencies and to ensure others using this code have an easy time with it.
user:~/services$ npm initIf you follow the prompts, you’ll get a new package.json file, which describes the plugins. Later, this file can be used to upgrade dependencies - npm outdated and npm update .
More importantly, when you migrate plugins from this development environment to your production server, you can easily install all dependencies - some of which may be OS dependent - with npm install, just by copying your plugin file and package.json.
Creating your module
In your services directory, create a new JavaScript file named my-plugin.realtime.js. It’s important to end the filename with .realtime.js, this differentiates the file from other supported plugin types and unrelated files.
user:~/services$ touch my-plugin.realtime.jsOpen the file in your favorite editor, and let’s define the interface by adding the necessary exports:
module.exports = {
  name: "myPlugin",
  label: "My Plugin",
  domains: ["*"],
  update: async function() {},
  template: ""
};
Template usage
The title of the plugin panel is automatically added, along with a close button and a progress bar visible during updates, so you all you need to take care of is a display for your results.
Displaying a number
First, let’s display a simple number, myNumber with a value of 2, to see the templating syntax.
Change the update function’s body to the following. We resolve the Promise with an Object, which has a simple myNumber key and its value is 2.
update: async function(mrvSource) {
  return {
    myNumber: 2
  };
},
As noted above, in the browser the results are made available to the template in the client object, so a template matching this data structure would be:
template: "<div>My number is: {{client.myNumber}}</div>",{info} Note: Angular JS’s interpolation syntax is to surround the scope variable - our client object’s property name - with double curly braces.
Iterating over a list
Now you need to restart the application, rejoin a room to see the plugin with number 2 in the results!
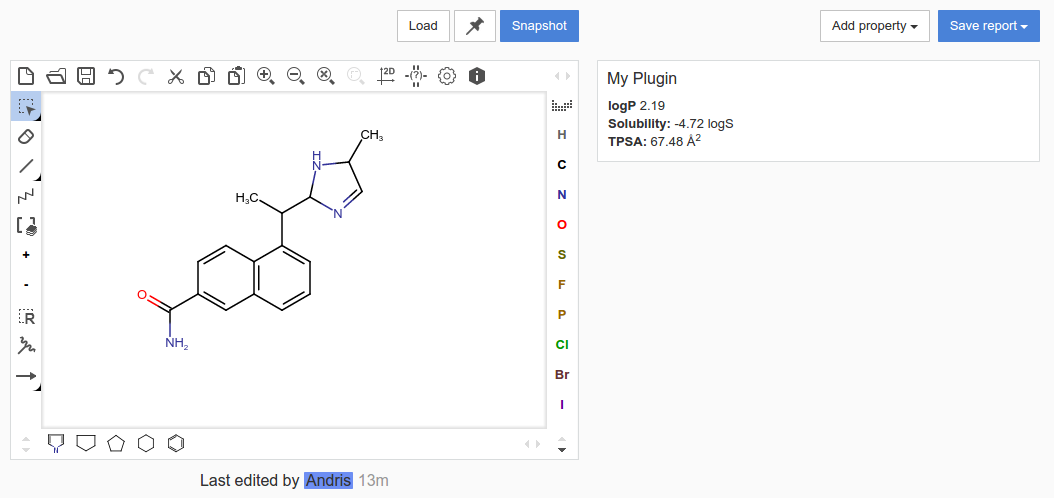
In a slightly more complicated example we’ll iterate over a few properties. Let’s resolve the Promise with an object where each property is also an object. These have a label and value defined, corresponding to frequently used phys-chem properties.
{
  logP: {
    label: "cLogP",
    value: 2.1898169993333334
  },
  solubility: {
    label: "Solubility",
    value: -4.7225842048721605
  },
  polarSurfaceArea: {
    label: "TPSA",
    value: 67.47999999999999
  }
}
The template to display all values would use ng-repeat , AngularJS’s construct for iterating over lists and maps.
<div>
  <p ng-repeat="property in client">
    {{property.label}}: {{property.value}}
  </p>
</div>
To round numbers, we may use of a built-in filter of AngularJS , number , and change {{property.value}} to {{property.value | number: 2}}. We can also display units of measurements by loading extra definitions in the Promise and interpolating them as well.
Calling a web service
Let’s calculate the solubility forecast index of this structure. This descriptor is easily calculable from logD and the number of aromatic rings. ChemAxon has a REST web services product that can calculated these descriptors. Once that's installed we can use its service "View Properties Without Storing" (documentation). We need a POST request with the following JSON structure:
POST /webservices/rest-v0/util/detail
{
  "structures": [
     "structure": <structure to use>
  ],
  "display": {
    "include": ["logD", "topologyAnalysis"]
  }
}
Installing dependencies
Before we make the connection to JChem Web Services though, we need a little bit of help.
NodeJS has a built in library handling all tasks related to networking, called http, but we’re going to use a higher level API that’s more convenient and requires less boilerplate code: request-promise.
user:~/services$ npm install request-promise request --saveThis will fetch and install the library from npmjs.org - this is the default registry - and save its details to the package.json manifest. In the future, we can use the manifest to reinstall dependencies e.g. a migration.
After this we can import the module, and construct the request. Please make sure the URL to the /rest-v0/util/detail service in the properties variable matches your setup:
const request = require("request-promise");
...
const propertiesEndpoint = "http://localhost:8080/rest-v0/util/detail";
...
update: async function(mrvSource) {
    const results = await request.post({
        url: propertiesEndpoint,
        body: {
            structures: [{
                structure: mrvSource
            }],
            "display":  {
                "include": ["logD", "topologyAnalysis"]
            }
        },
        json: true
    });
    return results;
},
The results are in a large data structure, so the template will be used to simplify it for the chemists. In Angular JS templates, we may perform simple arithmetic expressions too, such as adding two numbers to calculate SFI:
<div>
  <p>logD: {{client.data[0].logD.logD}}</p>
  <p># of Ar: {{client.data[0].topologyAnalysis.ring.aromaticRingCount}}</p>
  <p>SFI: {{client.data[0].logD.logD + client.data[0].topologyAnalysis.ring.aromaticRingCount | number:2 }}</p>
</div>
Adding data to the report
The most common formats for reports (SDF, PPTX) have no capabilities to display or interpret HTML code or complex data structures, so there’s a separate and optional way to specify what information to add to reports.
To add key numbers or identifiers to the report, you need to extend the fulfillment value of the promise. In the previous steps, it specified data only for the client, this should change to an object containing both a client and a report property. The client property should contain the data required by the template as earlier - this is the reason we name the root variable client in the template.
The report property should contain a map, simple key - value pairs, where each pair becomes a data field or column in the report. This is the common data structure that fits all report types, Marvin Live can easily print the values provided here to PowerPoint or SD files.
To add the SFI value to the report, let’s change the resolve part of the code:
const clientData = results;
const reportData = {
  "SFI": results.data[0].logD.logD +
    results.data[0].topologyAnalysis.ring.aromaticRingCount
};
return {
  client: clientData,
  report: reportData
};
Converting to other chemical file formats
In many cases you need to convert the structure from ChemAxon’s native MRV format to some other chemical file format before starting calculations or a search. In this example we’ll convert the structure to SMILES. JChem Web Services provides a converter service , its documentation shows the request needed:
POST /rest-v0/util/calculate/stringMolExport
{
    "structure": <structure to convert>,
    "parameters": <format to convert to>
}
With the request module installed earlier, we can easily send this request:
const converterEndpoint = "http://localhost:8080/rest-v0/util/calculate/stringMolExport";
...
update: async function(mrvSource) {
    const results = await request.post({
        url: converterEndpoint,
        body: {
            structure: mrvSource,
            parameters: "smiles"
        },
        json: true
    });
    const clientData = {
        "smiles": results
    };
    const reportData = {
        "SMILES": results
    };
    return {
        client: clientData,
        report: reportData
    };
},
template: "<div>{{client.smiles}}</div>"
Checklist
Now you can add you own functionality to the plugin by extending the update function. Check the examples to save even more time with your first plugin. A few reminders though:
-
Marvin Live provides only the
MRVsource of the sketcher to plugins. Make sure you convert it with a converter service before sending requests to services that don’t understandMRV. -
Your module is a loaded only once, make sure the
update()function doesn’t modify the plugin’s global state, otherwise you may run into problems when different rooms call update at the same time. You can use the singleton nature to your advantage, for instance by authenticating only for the first time. -
It’s essential to return information as fast as possible. A good target is 200ms, as it’s often indistinguishable from instantaneous. If however you’re dealing with a slower system, Marvin Live displays a progress bar at the top of the panel.
Examples
You can find a brief selection of plugins in on our Github repository for: ChemAxon calculator plugins, ChemAxon 3D Alignment and Conformations, eMolecules, Reaxys, KNIME Server, Pipeline Pilot, ChemAxon Madfast Similarity search, PubChem or UniChem. These mix SOAP, REST APIs and direct database connections, such as to a JChem Postgres Cartridge.
Pull requests welcome!